A.R.I. D-070 EN User Manual
Page 2
PERIODIC MAINTENANCE
The purpose of periodic maintenance: check integrity of the seals and clean
the sealing areas.
The frequency of maintenance will be determined by the condition of
the water system – weekly, monthly quarterly etc.
The maintenance of the Dynamic Air Valve is performed for 2 separate parts:
Shut the isolating valve on the riser below the air valve.
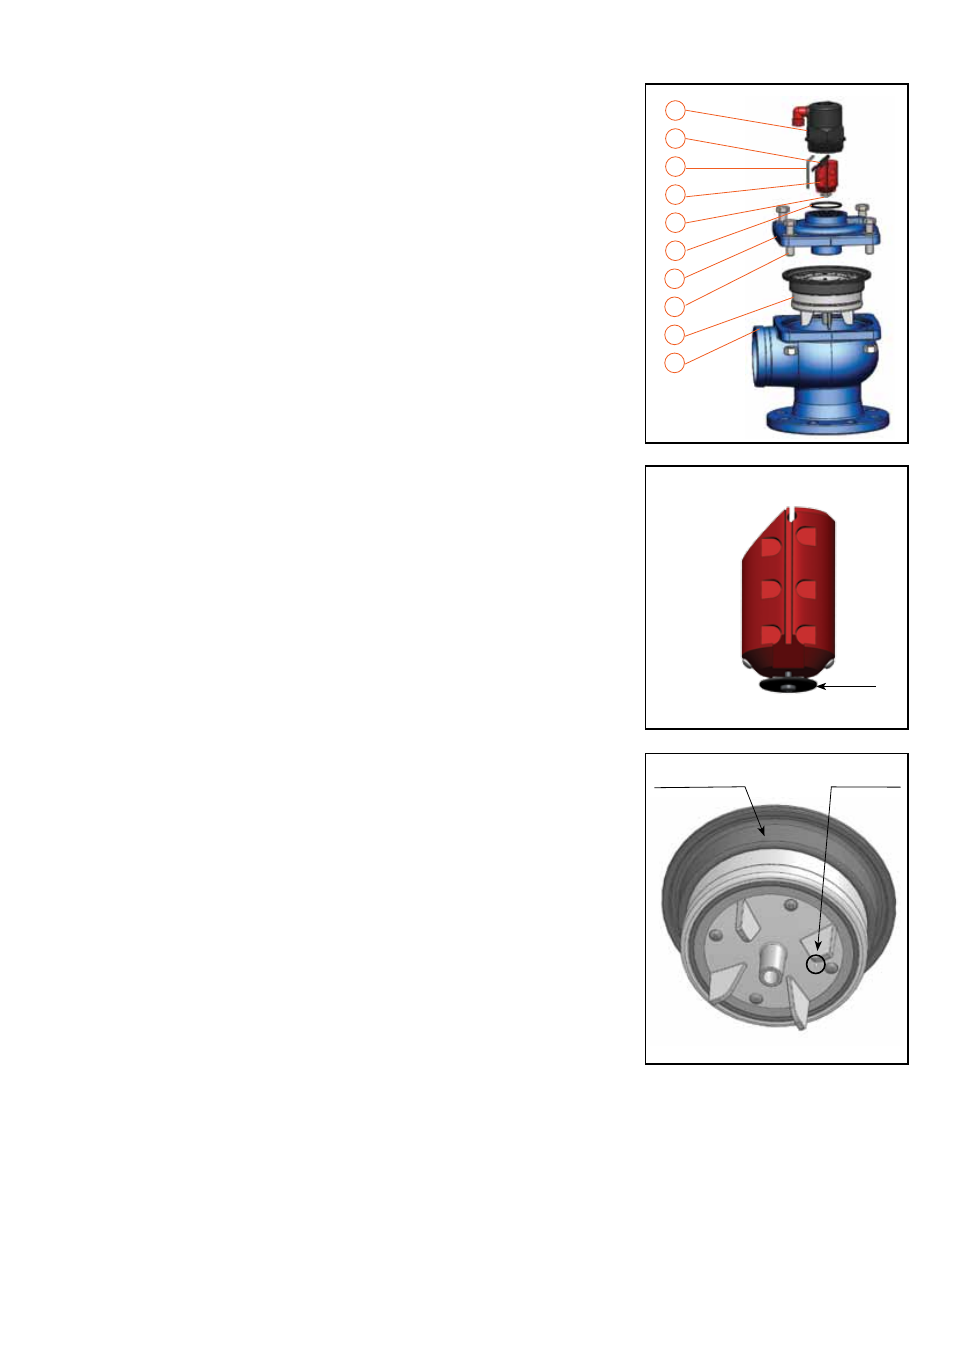
Maintenance of the Operating Valve
1. Shut the isolating valve on the riser below the air valve.
2. Unscrew the body of the
Operating Valve Body (1).
3. Remove the Clamping Stem (2) and the
Operating Assembly (4).
4. Wash the inside of the Body, the Clamping Stem, the
Operating Assembly,
the Rolling Seal (3), and the O-ring (6) with clean water.
5. Gently wash and clean the sealing area inside the valve Body.
6. Check the O-rings visually for any defects. Replace if needed.
7. Check and make sure that the Rolling Seal (3) is intact (not torn or cracked)
and is positioned precisely in the middle of its groove in the
Operating
Assembly. Replace if needed.
8. The disc at the bottom of the Operating Assembly (4) should be loose and
move freely. Do not tighten the holding screw.
MAINTENANCE OF THE DYNAMIC VALVE BODY
9. Unscrew the bolts (8) (with the aid of 2 hex keys, size 19 mm) that connect
the main valve cover (7) to its body (10).
10. Remove the Air & Vacuum Sealing Assembly (9) from the body.
11. Wash the body and the cover in clean water in order to remove coarse
grime or accumulated scale.
12. Wash the Air & Vacuum Sealing Assembly (9) and check the rubber parts
for any tears.
13. Make sure that the drill hole (D-070 sizes 3", 4") is clean and the passage
(D-070 all sizes) is open. Make sure the lower assembly seal is intact and
not torn.
14. Replace the whole Air & Vacuum Sealing Assembly (9) if any of the above
parts are torn or damaged.
Do not open screws of the assembly under any circumstances.
15. Make sure that there is no dirt or debris around the sealing area of the
dynamic valve body.
16. Replace the assembly in the body, reassemble in reverse order, then fasten
and tighten all bolts.
17. Open the isolating valve beneath the air valve, making sure that there are
no leaks.
18. Paint the outer body of the dynamic air valve according to need.
Fig. 5
Air & Vacuum Sealing Assembly
Fig. 3
Fig. 4 Operating Assembly
Disc
Sealing Assembly
Drill Hole
5
4
3
2
1
6
7
8
9
10