Safety guidelines for working on vehicles, Digital battery tester, Vehicle preparation – Actron KAL8100 User Manual
Page 2: Hookup, Battery test
2
Safety Guidelines For Working on Vehicles
• Always wear approved eye protection.
• Always operate the vehicle in a well-ventilated area. Do not inhale exhaust gases—they
are very poisonous!
• Always keep yourself, tools, and test equipment away from all moving or hot engine parts.
• Always make sure the vehicle is in Park (automatic transmission) or Neutral (manual
transmission) and that the parking brake is firmly set. Block the drive wheels.
• Never lay tools on vehicle battery. You may short the terminals together, causing harm to
yourself, the tools, or the battery.
• Never smoke or have open flames near vehicle. Vapors from gasoline and charging
batteries are highly flammable and explosive.
• Never leave vehicle unattended while running tests.
• Always keep a fire extinguisher suitable for gasoline/electrical/chemical fires handy.
• Always turn ignition key OFF when connecting or disconnecting electrical components,
unless otherwise instructed.
• Keep away from engine cooling fan. On some vehicles, the fan may start up unexpectedly.
• Always follow vehicle manufacturer’s warnings, cautions, and service procedures.
DIGITAL BATTERY TESTER
The Digital Battery Tester is a hand held, diagnostic tool used to test 12-volt lead-acid
type batteries rated from 375 to 950 CCAs (Cold Cranking Amps). The tester will test
partially charged batteries as long as enough battery charge is exists to power the tester.
Test results are displayed by discrete LED indicators (ORANGE - Ready, GREEN - Good
(Check mark symbol) , RED - Replace (X symbol)). The battery may remain connected to
the vehicle, as long as the vehicle’s electrical system does not interfere with testing.
Maximum input voltage to the tester is 32 volts. The tester is protected from accidental
reverse connection to the battery.
VEHICLE PREPARATION
BEFORE TESTING, READ ALL SAFETY GUIDELINES.
• Key OFF, Engine OFF.
• Disconnect all battery chargers! Battery cannot be tested while being charged.
• In all multiple battery systems, all batteries must be tested separately.
Only
batteries
connected in series may remain connected during test. See diagram below:
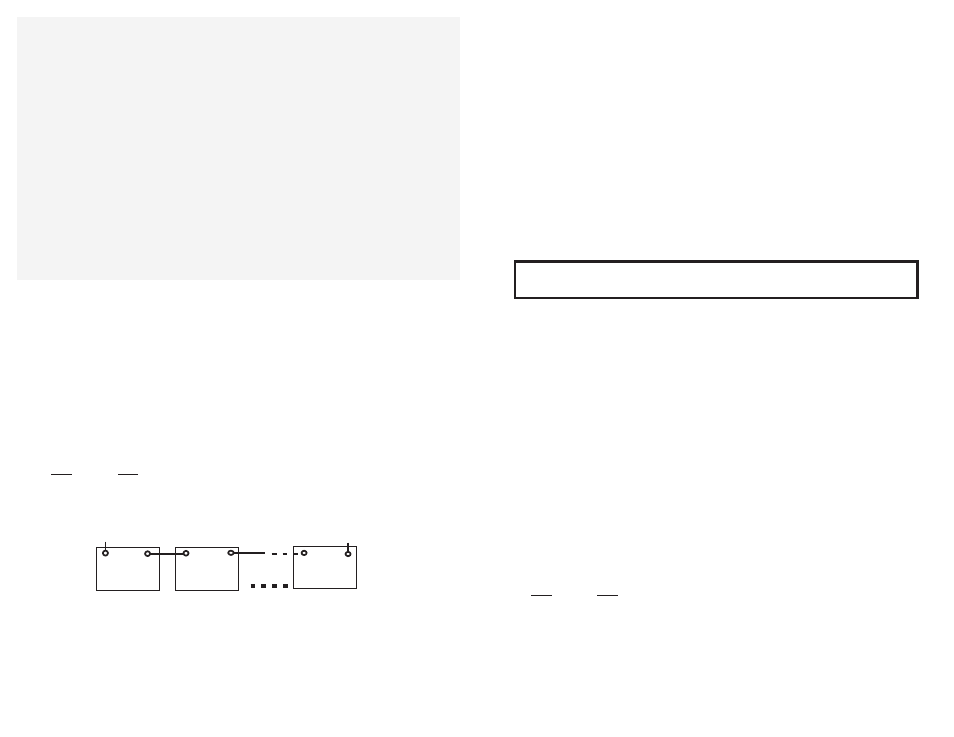
Batteries in Series: All batteries are connected from negative (-) terminal of one to
positive (+) terminal of the other, with only one battery’s positive (+) and one other’s
negative (-) connected to the vehicle. Any number of batteries can be connected in series,
but.each battery
must
be tested separately.
All other types of multiple connections
must be disconnected.and isolated from the other.
• Remove
All
electrical loads if the battery is connected to the vehicle.
• Battery connections must be clean and must make good contact to give correct test
results.
+ -
TO VEHICLE
TO VEHICLE
+ -
POS NEG
POS NEG
+ -
POS NEG
3
• Install terminal stud adapters (not included) on side post batteries. Terminal stud
adapters are available at most automotive parts stores.
HOOKUP
Connect Tester to Battery.
• Connect the black clamp to the battery’s negative (-) terminal.
• Connect the red clamp to the battery’s positive (+) terminal.
• Make sure both sides of each clamp make good contact with the battery terminals. If
needed, rock the clamps back and forth to improve the connection.
Make Sure Ready LED Comes ON.
• If the Ready LED is ON, then the battery is sufficiently charged to test.
• If ALL the LEDs are FLASHING, then either the battery needs to be charged or the
battery connections are loose. If the connections are good, then the battery is dis-
charged too low to test and must be charged.
- Disconnect the tester, connect charger and charge battery. Follow battery
charger manufacturer’s instructions and safety precautions.
- Reconnect the tester. If the Ready LED is still not ON or ALL the LEDs are
FLASHING, then the battery is not accepting a charge and should be replaced.
• If ALL the LEDs are OFF, then either the clamps are reversed, the clamps are not
making good continuity, or the battery is discharged too low to power the battery tester.
If the clamps are correct and the connections are good, then the battery must be
charged.
- Disconnect the tester, connect charger and charge battery. Follow battery
charger manufacturer’s instructions and safety precautions.
- Reconnect the tester. If the LEDs do not turn ON or FLASH, then the battery is
not accepting a charge and should be replaced.
Ready LED Should Remain ON.
The Ready LED should remain ON during test. If ALL the LEDs begin FLASHING or turn
OFF, then the battery needs to be charged.
- Disconnect the tester, connect charger and charge battery. Follow battery
charger manufacturer’s instructions and safety precautions.
- Reconnect the tester. If ALL the LEDs begin FLASHING or turn OFF during test,
then the battery is not accepting a charge and should be replaced.
BATTERY TEST
1. Key OFF, Engine OFF.
2. If Ready LED is ON, the battery is charged enough to be tested.
3. Set CCA rotary switch to battery CCA rating.If battery CCA rating is between switch
positions, use the higher position. For example, if battery is rated 540 CCA, set switch
to 550.
NOTE: Do not be confused by CA rating. Use the CCA rating.
4. Press and hold TEST button, for testing above 32°F (0°C), or COLD TEST button for
testing at 32°F (0°C) or lower (actual battery temperature).
WARNING:
It is dangerous to attempt to charge a battery with a bad cell.