Installation testing with the fuel system test kit, Disconnecting fuel pressure gauge, General fuel pressure diagnostics – Actron KM2529 User Manual
Page 2: Caution, Figure 2, Customer service
100
200
300
400
10
psi
40
60
kPa
50
30
20
INSTALLATION
TESTING WITH THE FUEL SYSTEM TEST KIT
NOTE: Before beginning any test-
ing, perform diagnostic procedures
described in vehicle service
manual to eliminate other possible
causes of driveability problem.
Compression and ignition prob-
lems may imitate fuel injection sys-
tem problems.
Before proceeding with fuel pres-
sure testing, read and understand
all safety guidelines and perform all
pre-testing checks.
1. Place end of 6-ft. bleed-off hose in
an approved fuel container. Bleed-
off hose must remain in container
until testing is complete.
2. Turn all accessories OFF (i.e. ra-
dio, A/C, blower fan, headlights,
windshield wipers, etc.)
3. Turn ignition key ON.
Perform the following checks:
Pressurize fuel system by cycling
ignition ON and OFF every ten
seconds until fuel pressure is at
manufacturers specifications
(check vehicle service manual for
your particular application).
Check fuel system for leaks. If
leaks are found, turn ignition key
OFF and clean up fuel immedi-
ately!
If fuel pressure is not within
manufacturers specifications,
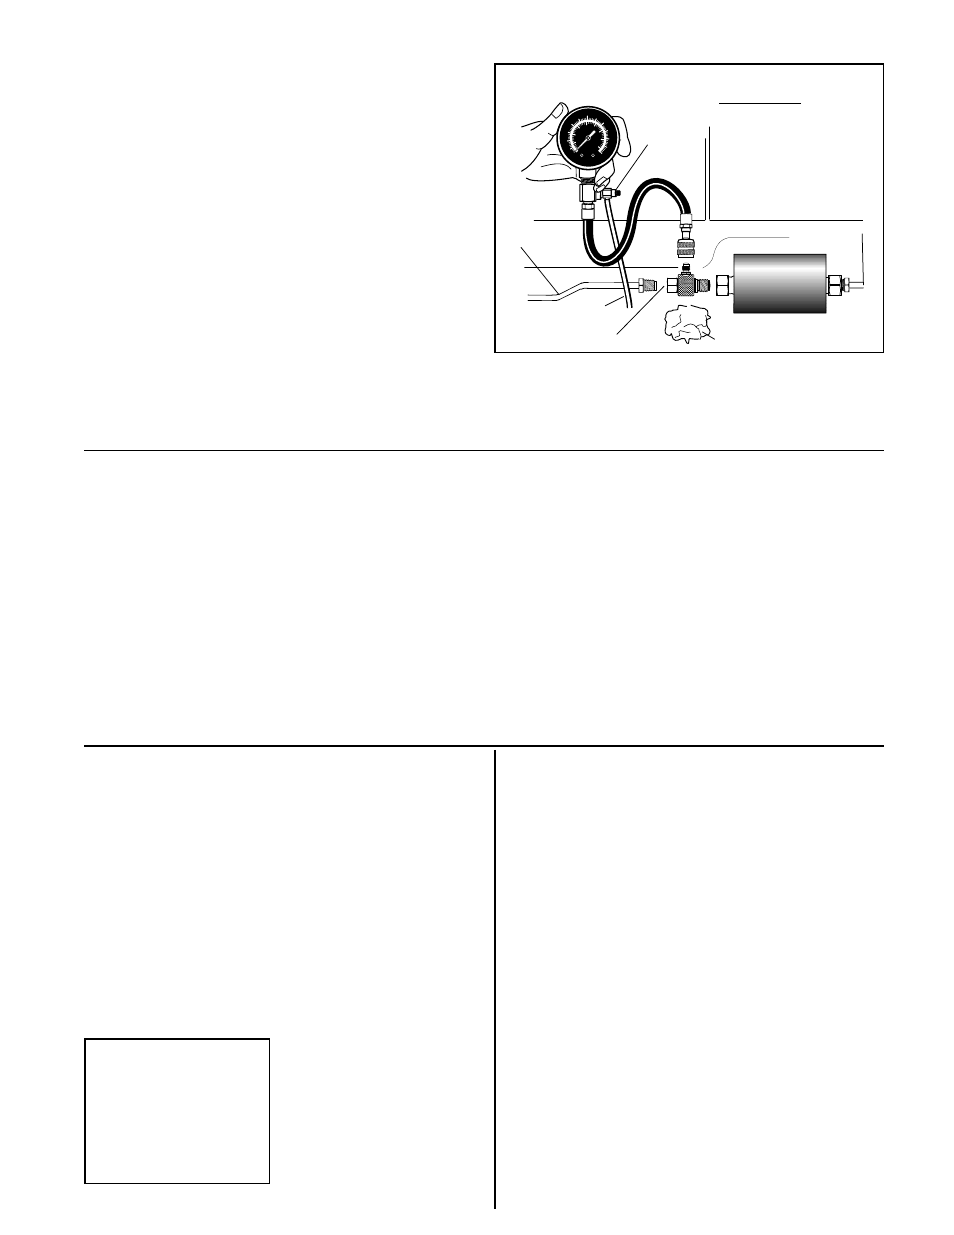
PRESSURE
RELIEF
BUTTON
BLEED-OFF
HOSE
FUEL LINE
from TANK
GM TBI ADAPTER
SHOP TOWEL
FUEL FILTER
CAUTION:
ALWAYS MAKE SURE
THAT BLEED-OFF HOSE
DRAINS INTO A
2-GALLON OR LARGER
APPROVED
CONTAINER!
Figure 2
WARNING: Some vehicles may
have more than one fuel pump.
Failure to deactivate all fuel
pumps can result in spilled fuel,
fire, or other hazardous condi-
tions that could cause vehicle
damage, personal injury, or
death.
CAUTION: The information pro-
vided here is not intended as a
substitute to the procedures
given in the vehicle service
manual. Always follow the
manufacturers instructions
when working on fuel systems.
2. At the location specified in vehicle
service manual, disconnect the fuel
line. Use a shop towel to catch any
released fuel. Figure 2 shows the
typical location at a fuel filter. If filter
is attached with a clamp, remove
the clamp and then remove the filter
if necessary. If the filter is dirty or is
suspect in any way, replace it.
3. Attach the special fuel tester
adapter to the fuel filter, and then
attach the fuel line to the adapter
as shown in Figure 2. Tighten all
fittings finger tight and then tighten
gently 1/2 turn with wrenches.
For GM vehicles without a
fuel access valve test port
on the fuel rail:
When working on fuel system lines
and components, always make sure
to keep a dry chemical fire extin-
guisher ready. Never put water on a
fuel or electrical fire. Keep a supply of
clean dry shop towels handy to absorb
leaks and spills when disconnecting
fittings, lines, and hoses. Also have a
2-gallon or larger approved fuel con-
tainer ready to collect fuel when test-
ing or bleeding the fuel lines.
Install the fuel pressure tester as fol-
lows:
1. Relieve fuel system pressure by
following the instructions given in
the vehicle service manual. On
most vehicles this is done by
removing
the
fuel
cap,
disconnecting or deactivating the
electric fuel pump(s), and running
the engine for about 30 seconds
until it stalls.
FUEL LINE to
ENGINE
cycle ignition key 2 or 3 more
times. If fuel pressure is still not
within specification, service ve-
hicle according to vehicle service
manual.
4. Start engine and let idle.
If test vehicles fuel system uses
a
vacuum
actuated
(compensated) fuel pressure
regulator, then fuel pressure
should drop 3-10 psi, depending
on manifold vacuum.
If test vehicles fuel system uses
a fuel pressure regulator without
a vacuum port, then fuel pressure
should remain constant during
both key-on-engine-off
and idle.
• Read fuel pressure from dial
face.
• If fuel pressure is not within
manufacturer ’s specification,
then service vehicle according to
vehicle service manual.
• When repair is complete and idle
fuel pressure is within
manufacturer ’s specification,
then proceed to Step 5.
5. Turn ignition key OFF.
6. Disconnect fuel pressure gauge as
described in the following section.
DISCONNECTING FUEL
PRESSURE GAUGE
1. Verify that 6-ft. bleed-off hose is still
in an approved container for fuel.
2. Fully DEPRESS and HOLD the
pressure relief button until dial face
pointer is resting on stop pin.
CAUTION: Pressurized fuel will
spray out of bleed-off hose and into
approved container.
3. Shake bleed-off hose to make sure
that all fuel has gone into approved
container.
4. Remove gauge hose from fuel line
adapter fitting:
Wrap a shop rag around fuel line
adapter fitting in case a small
amount of fuel drips out while
unscrewing test adapter.
Unscrew fuel pressure gauge
from fuel line adapter fitting.
Wrap a shop rag around end of
fuel pressure gauge hose to catch
any fuel dripping from hose.
Remove bleed-off hose from
approved fuel container and hold
gauge hose over container so any
remaining fuel will drip into
container.
5. After relieving fuel system pressure,
disconnect fuel line adapter and
reconnect fuel lines as described
in vehicle service manual. Use
correct fuel line fitting tools. Clean
up any spilled fuel immediately!
6. Store shop rags in an approved
container so they cannot cause
personal injury or a hazardous
situation.
7. Store fuel pressure gauge in a well-
ventilated area where it cannot
cause personal injury or a
hazardous situation.
GENERAL FUEL PRESSURE
DIAGNOSTICS
4. Attach the 42-inch hose and pres-
sure gauge assembly to adapter
top fitting and tighten fitting until fin-
ger tight.
Checking fuel pressure is an essen-
tial part of fuel injection system
troubleshooting. High fuel pressure
will make an engine run rich, while
low fuel pressure will make an en-
gine run lean or not at all. In some
cases, low fuel pressure can cause
additional damage such as burned
pistons, valves, spark plugs, or
blown head gaskets.
Fuel pressure readings which are
higher than manufacturers speci-
fications are generally caused by a
problem in the fuel return line com-
ponents. Conversely, fuel pressure
readings which are lower than
manufacturers specifications are
generally caused by a problem in
the fuel pressure line components.
If fuel pressure readings are not
within manufacturers specifications,
refer to a vehicle service manual for
step-by-step diagnostic procedures
which will pinpoint the faulty compo-
nent for each specific vehicle.
Customer Service
For product information or customer
service please call 1-800-ACTRON-7
(1-800-228-7667) or fax anytime at
(216) 651-2388.
For technical support call:
1-800-253-9880
Internet home page:
http://www.actron.com
Possible causes of high fuel
pressure readings may include:
Faulty fuel pressure regulator.
Restriction in fuel return line.
Faulty fuel line couplings at fuel
tank or fuel pickup.
Sticking or sluggish fuel
injectors.
Possible causes of low fuel pres-
sure readings may include:
Clogged or restricted fuel filter.
Restriction in pressure line.
Faulty fuel pump(s).
Faulty fuel pump relay.
Blown fuel pump fuse.
Faulty fuel pump wiring.
Clogged or restricted fuel pump
filter.
Faulty fuel pressure regulator.
Leaking fuel injectors.
Faulty fuel line couplings at fuel
tank or fuel pickup.
0002-002-2350