Remote control operation – Anthem AVM 20 v2 User Manual
Page 42
35
6. REMOTE CONTROL OPERATION
Dr. Jekyll and Mr. Hyde, as you may know, were two
very different personalities, even though they were
the same person. Well, the AVM 20 Remote Control
is the host to NINE different personalities! (All of
them ‘good’, of course.)
The AVM 20 Universal Learning Remote Control has
all of the same functions as the front panel buttons
and is operated in a similar way, but there are some
differences. Please take the time to read this
section to fully understand all the functions of the
AVM 20 remote Control.
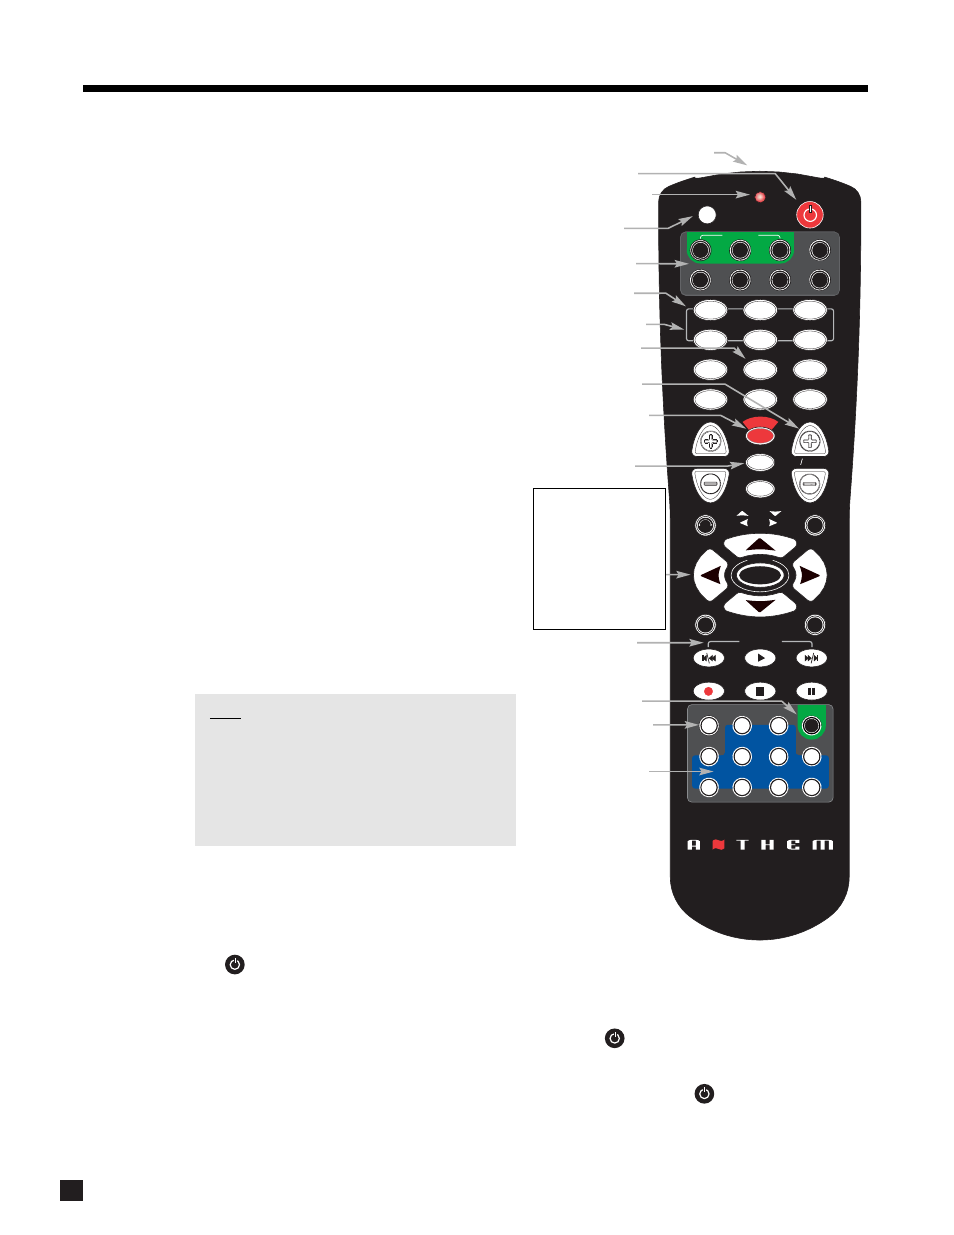
The keys labeled in this illustration show those that
have a different method of operation from their
front panel counterparts. Those shown in bold
italics indicate keys that are unique to the Remote
Control and not found on the Front Panel. For a
detailed layout diagram see section 3.3.
To install the batteries, remove the cover that is on
the bottom of the remote, and be sure that they’re
installed with the correct polarity. Down the road, if
the keys don’t light up when they’re pressed, and
the red LED blinks twice, it’s an indication that the
batteries need replacement – use only ‘AA’ alkaline.
Before we get started, we have to give the remote
a little attitude adjustment – set the ‘personality’ to
MAIN by pressing MAIN near the top of the remote.
Note: The Path / Component keys do not
transmit any commands to the AVM 20, or
anywhere else. They only determine where
subsequent commands are sent. For example,
if ZONE2 is selected followed by VOL+, then
the volume changes in ZONE2 while MAIN and
all other components remain unaffected.
6.1
POWERING THE AVM 20 ON AND OFF
Two separate keys are used to turn the AVM 20 On/Off, because discrete
power commands are required in most custom installations.
The power key in the top right corner turns the AVM 20 Power ON. The red SSP OFF key near the middle
turns the AVM 20 Power OFF.
The AVM 20 can be turned ON and OFF as follows:
• MAIN ON: Press MAIN in Path/Component, then press .
• MAIN OFF: Press MAIN in Path/Component, then press SSP OFF.
• ZONE2 or ZONE3 ON: Press Z2 (or Z3) in Path/Component, then press .
• ZONE2 or ZONE3 OFF: Press Z2 (or Z3) in Path/Component, then press SSP OFF.
SLEEP
INPUT
FRT
CTR
THX
TIMERS
STATUS
PIP
SWAP
MOVE
SSP SOURCE
COPY
AUX
TAPE
DVD
TV
SAT
VCR
CD
DVD
TV
SAT
VCR
BASS
TREBLE
BALANCE
2-Ch
CD
REC
MAIN
Z2
Z3
SSP PATH
DYN
AMICS
VOLUME
CH PRE-SET
FM/AM PRE-SETS
TUNE
SEEK
SOURCE SEEK
LEARN
ENTER
MUTE
7
8
0
9
SELECT
SUB
LFE
FM
AM
SUR
RR
SSP OFF
DISPLAY
TO
NE BYPASS
MODE
ON
SCREEN
INFO
GUIDE
BACK
SETUP
1
2
3
4
5
6
POWER
6-Ch
SSP
PATH
SSP OFF
LAST
Path/Component
(‘Personality’)
Sleep and Timers
Enable/Disable
Audio Group Delay
Source Seek
FM • AM Presets
RECORD Path
IR Transmitter
Power ON
Transmission Indication
Learning Mode
AVM 20 Power OFF
MAIN Source Copy
Source Selection
• FM • AM Seek / Tune
• Level / Bass / Treble /
Balance / Display /
Timers Adjustments
• Mode / DD Dynamics /
THX Options selection
• Navigation (North /
South / East / West)
FM•AM Presets
UP / DOWN
FM•AM Direct Entry