Nitrous Express MainLine Nitrous Systems User Manual
Page 2
engine.
4. Using the horsepower jetting chart select the
desired jets. Insert the jets into the nozzle fittings
being sure to insert the correct nitrous and fuel jets
into the correct fittings.
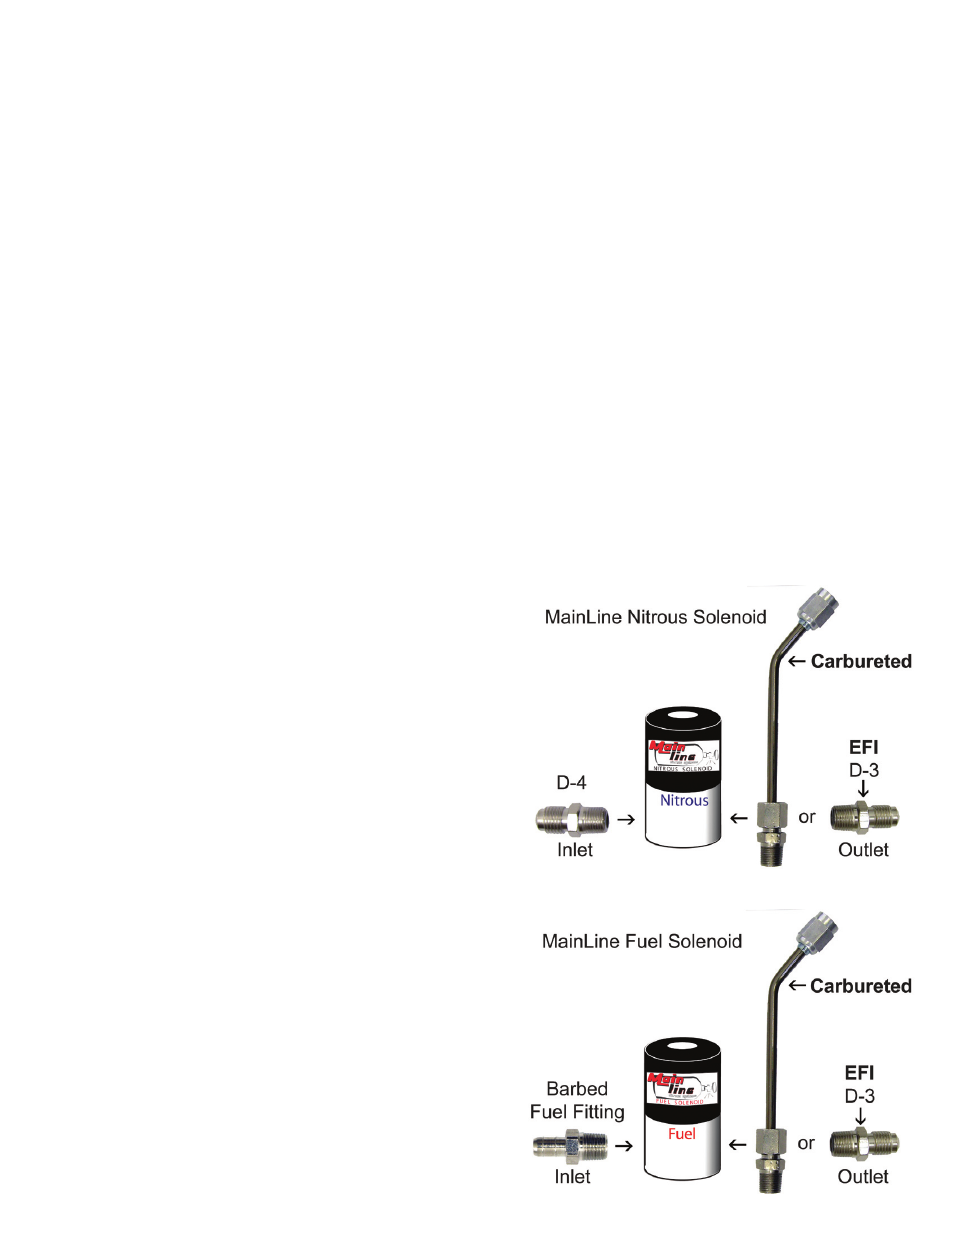
5. After installing the fittings into the solenoids (see
Figure “B”) connect the Fuel and Nitrous solenoids
to the nozzle with the D-3 braided lines, paying
attention to connect the nitrous solenoid to the
fitting labeled Nitrous on the nozzle and the fuel
solenoid to the fitting labeled Fuel
Connect the previously cleaned supply line to the Nitrous
Solenoid and tighten securely
Section “B” Carbureted:
1. Using the horsepower jetting chart select the
desired jets. Insert the jets into the nitrous plate
fittings being sure to insert the correct nitrous and
fuel jets into the correct fittings
2. After installing the solenoid fittings (see Figure
“B”) Pre-assemble the nitrous plate, attaching the
fuel solenoid to the fuel fitting on the plate using
the 3/16 stainless jumper line. Repeat this step on
the nitrous solenoid side. Do not over-tighten these
fittings
3. Referring to a shop manual for your vehicle, follow
the instructions for removing the carburetor.
4. Referring to the shop manual remove the original
carb studs and install the extra long studs furnished
with the system.
5. Install the pre-assembled nitrous plate using the
new gasket between the intake and the plate and
existing gasket between the plate and the carb.
(Note: Always install the plate with the fuel
solenoid facing forward and the text on top of the
plate up.)
6. Referring to the shop manual reinstall the
carburetor.
Plumbing the Fuel
If your car has a carburetor skip to section “B”, if your car is EFI
use section “A”:
Section “A”
1. Locate the supply line connecting the fuel filter to
the EFI fuel rail. This line must be cut and a Tee
inserted to supply fuel to the nitrous system. Use
extreme caution; this line contains flammable fuel
under high pressure. Carefully cut this line and
insert the Tee fitting. Use the supplied clamps
to secure a leak free installation. Note: If your
vehicle has a rigid plastic fuel line, an alternate
method to tap this line must be used. Do not
attempt to cut this type of line.
2. Route the supplied rubber fuel hose from the Tee
fitting to the fuel solenoid. Secure this line with
the supplied clamps. Caution: When cutting any
fuel lines be sure to prevent any debris from
entering the fuel system. Debris can cause a
catastrophic engine failure due to clogged fuel
jets or injectors.
Section “B”
Note: The MainLine carbureted nitrous system
requires up to 10 PSI on the fuel enrichment
circuit and must be fed by a high volume
fuel pump. A minimum 110-gallon per hour
pump is recommended to feed the engine and
nitrous system. A dedicated fuel system for the
nitrous system only is neither necessary nor
recommended.
1. Locate the line connecting the fuel pump to the carburetor.
This line must be cut and a tee installed. Connect this line to
a dedicated fuel pressure regulator feeding the nitrous system
fuel solenoid. This regulator should be set according to the
recommended pressures listed on the card located in the system
jet pack. This pressure may need to be adjusted higher or lower
to tune the nitrous system to it’s highest potential. The tee, hose,
clamps, and regulator must be ordered separately from NX or
sourced from your local parts store. Recommended NX part
numbers are: Regulator PN 15951, 3/8 barbed hose “T” PN
16137. Caution: When cutting any fuel lines be sure to
prevent any debris from entering the fuel system. Debris can
cause a catastrophic engine failure due to clogged fuel jets or
fouled needle and seats.
Figure B
2