JELD-WEN JII026 Wood Patio Doors with Exterior Trim or Nailing Fin User Manual
Page 6
INSTALLATION INSTRUCTIONS
for Wood Patio Doors with Exterior Trim or Nailing Fin (JII026)
6
SECURE PATIO DOOR
Note!
Fastener heads must be flush. Do not dent nailing fin. Always
use pre-punched holes or pre-drill with a 3/16" bit.
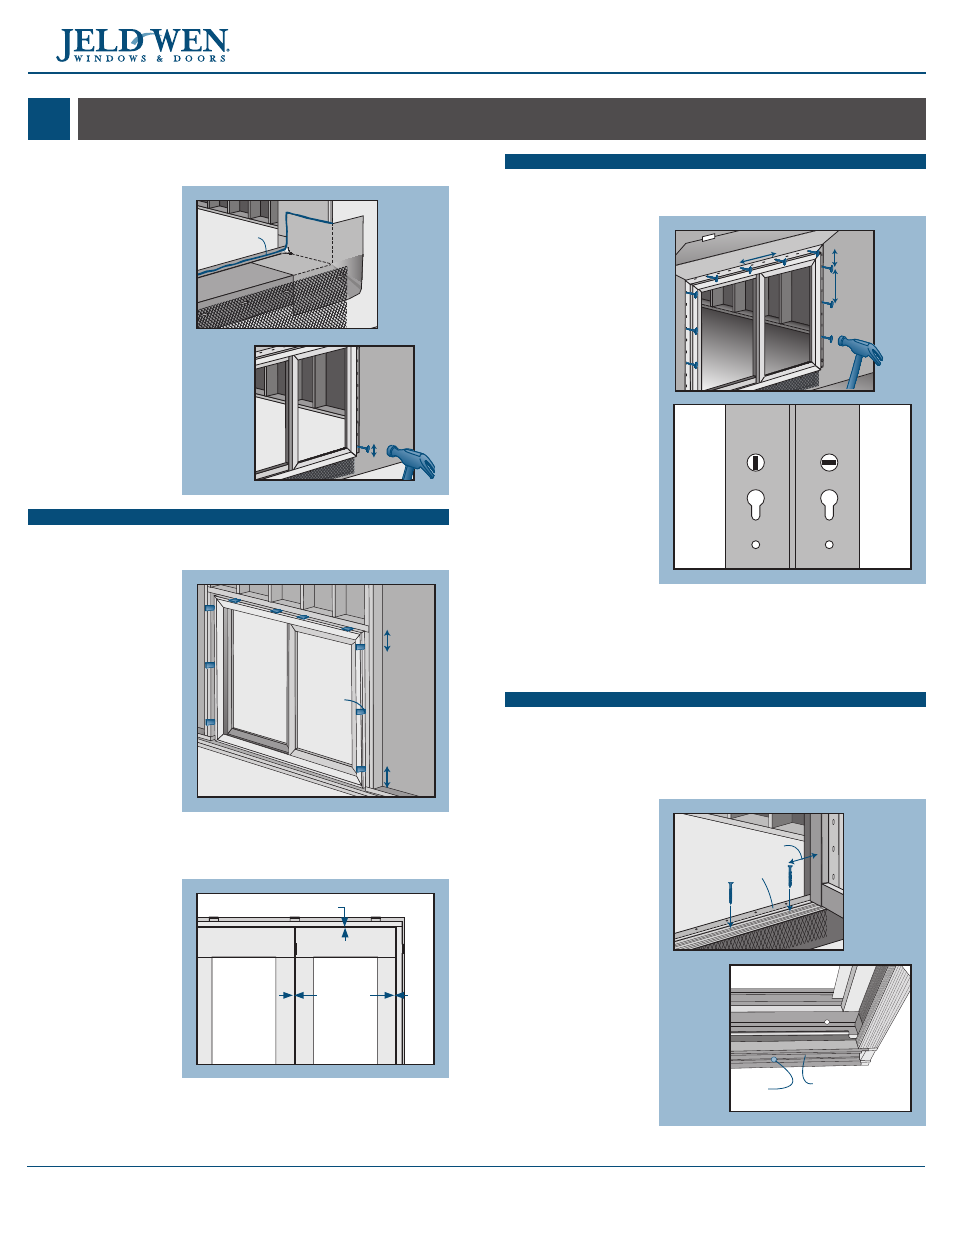
1. Fasten patio door
through nailing fin
holes, or through
exterior trim 3"-7"
from the corners
and 8" apart all the
way around the
patio door.
2. Fasten strike plates
to the structural
rough opening
jamb with 3" screws
through the open
holes in the strike
plate, then replace
the existing strike
plate screws. Does
not apply to post
or astragal latched
doors.
STEPS 3 and 4 are for
swinging doors only
3. Unlock the deadbolt
with a small
flathead screwdriver
and open doors.
4. Remove the spacer button from the bottom of the panels, or pine
blocks from under aluminum sill.
5. On the interior, structurally secure side and head jambs by driving
one screw through each of the remaining shims.
STRUCTURALLY SECURE SILL
Note!
Applies to swinging doors and sliding doors with pre-drilled holes
on the lower interior edge of the fiberglass sill only. Apply sealant to the
threads of all screws, and, after installation, cover the tops of all screws
with sealant. Use previously removed screws (if present) for wood
subfloors or use 3/16" x 2 1/2" self-tapping concrete screws for concrete.
1. For traditional
thresholds, drive
screws through the
threshold 6" from
each end of each
panel. For adjustable
thresholds, drive
screws through the
aluminum sill in front
of every other screw
in the threshold.
2. For outswing patio
doors, replace the
screws on the sill
keeper with the #8
x 2 1/4" pan head
screws provided.
3. For sliding doors
with a pre-drilled
fiberglass sill, start at
the middle and work
outward, driving the
provided #8 x 1.5"
pan head screws at 12" maximum intervals and at both ends.
Warning!
To avoid injury, use at least two people to install. Adequately
support the door until fully installed.
1. Apply a 3/8"
continuous bead
of sealant across
the sill pan back
dam and over the
flashing joints as
shown.
2. Tilt patio door into
the rough opening.
Make sure the back
of the door makes
solid contact with
the sealant.
3. Fasten patio
door with the
appropriate nail for
nail fin or exterior
trim between 3"
and 4" from one
lower corner.
SHIM THE JAMBS
Note!
Each location should be shimmed with two opposing shims.
Secure all shims with sealant.
4. From the interior,
shim the hinged
side jamb at every
hinge (swinging
doors). Shim the
latch jamb 6" from
the corners and at
the strike plate.
5. Shim all other jambs
6" from the corners
and at center.
6. Shim the head jamb
6" from the corners
of each panel and
at the strike plate
if present. Position
shims so that strike plate/head bracket screws will penetrate shims.
7. Inspect the patio door for square, level, and plumb. Test for proper
operation (remove and reinstall if necessary).
8. For center hinge
patio doors only,
check for proper
reveal (clearance)
between the frame
and panels at the
side jambs and head
as shown.
8
INSTALL PATIO DOOR
Sealant
3" - 4"
6"
6"
Strike
plate
1/4" 1/8"
3/32"
3-7"
8"
8"
Dead
bolt
unlocked
Dead
bolt
locked
6" from the end of
each panel
Threshold
In front
of every
other
screw
Interior
Exterior
Pre-drilled
hole
Fiberglass
sill