Installation instructions, Prepare stud-framed wall – JELD-WEN JII015 Vinyl Patio Doors without Nailing Fin User Manual
Page 5
INSTALLATION INSTRUCTIONS
for Vinyl Patio Doors without Nailing Fin (JII015)
5
PREPARE STUD-FRAMED WALL
5
Spray Adhesive
6"
6"
4. Cut two pieces of
self-adhesive flashing
9" wide by the sill
pan width + 3" long.
a. For continuous
slab landings
only, cut out the
inside corner.
b. Adhere the pieces
of flashing to the
inside corners.
Stretch flashing
as needed to
cover corners and
lay flat.
5. Smooth gaps or
bubbles beneath
self-adhesive flashing
with a J-roller
(remove and replace
if necessary).
6. Seal back corners of
sill pan with sealant.
7. For step-down
landings only, allow
for the drainage and
drying of incidental
moisture out of the
rough opening. Do
not apply sealant to
the face of the sill
and/or trim pieces so
that they block water drainage.
End of Stud-Framed Wall Instructions, continue with section 6,
“INSTALL DOOR.”
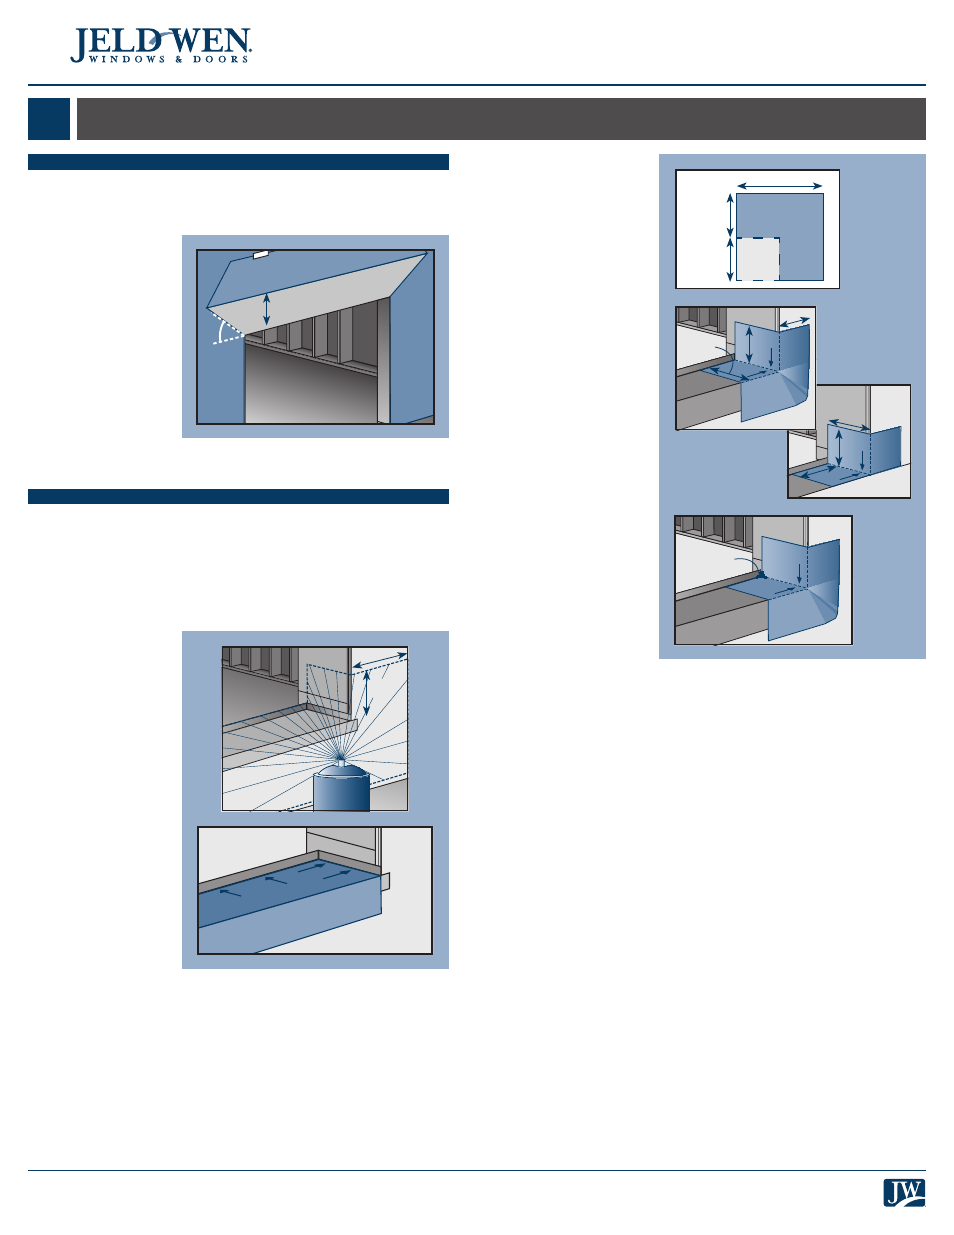
PREPARE BUILDING WRAP
Check with the building wrap manufacturer to verify the following
steps will not void their product warranty.
Note!
Steps 1 and 2 apply only to new construction.
1. Trim building
wrap flush with
the edges of the
rough opening.
2. If the door extends
beyond the exterior
plain of the building
and a drip cap is
desired, at the
head, slit building
wrap 6" at 45°.
Tape up as shown.
We recommend
installing a drip cap
because this integrates the building wrap and drip cap to protect the
structure and the product from incidental water.
INSTALL JOBSITE FABRICATED SILL PAN
Note!
The rest of the steps in this section only apply to a job site
fabricated sill pan. If installing a sill pan that you have purchased,
follow manufacturer's instructions for installation and skip to section 6,
“INSTALL DOOR.”
1. If installing a metal sill pan on concrete, cut a piece of self-adhesive
flashing the length of the sill pan and adhere it to the entire bottom
surface where the pan will sit on the concrete.
2. Apply spray adhesive/
primer to the sill pan
and surrounding
area. Follow
manufacturer’s
instructions for
application methods.
3. If fasteners are
required through
the sill, cut a piece of
self-adhesive flashing
the length of the sill
and apply over the
entire sill pan. For
step down landings,
fold flashing down
as shown. For
continuous slabs,
trim flush with
rough opening.
Sill pan
width
3"
9"
Discard
(for
continuous
slab only)
Continuous Slab
Landing
Sill pan
width
6"
3"
Step-Down
Landing
Sill pan
width
6"
3"
Sealant
45˚
6"