JELD-WEN JII023 Vinyl Projecting Windows with Integral Nailing Fin User Manual
Page 4
INSTALLATION INSTRUCTIONS
for Vinyl Projecting Windows with Integral Nailing Fin (JII023)
4
PREPARE SILL FOR BAY/BOW WINDOW
4
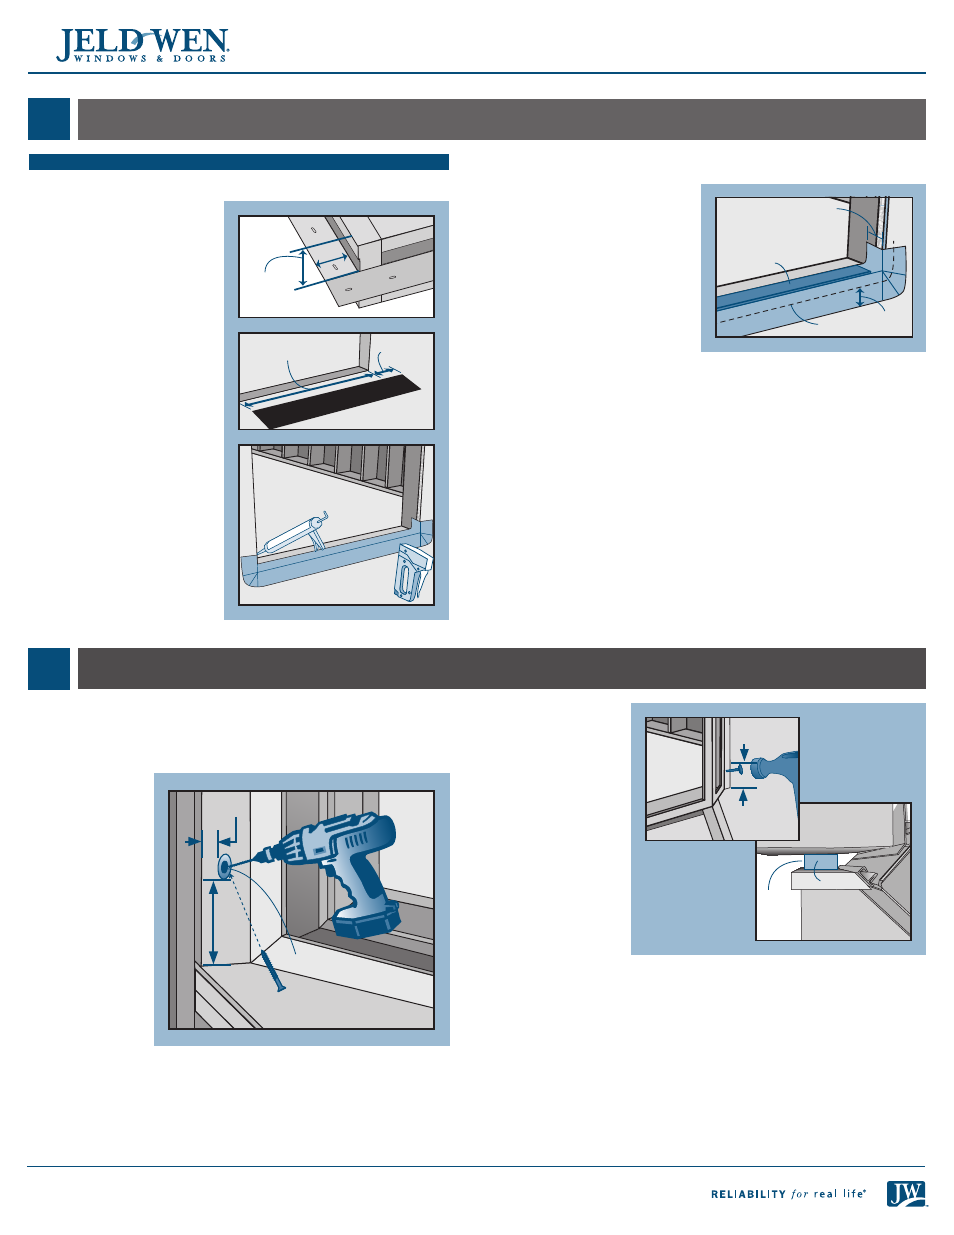
PREPARE/SHIM THE SILL
1. Use self adhesive flashing to waterproof the sill.
2. Flashing must have at least 2"
of visible material below nail
fin. Flashing width must be at
least measurement
1 + 2 + 1 3/4".
3. Measure the width of the
frame from the interior to the
nail fin (measurement 1) and
subtract 1/4". Transfer this
measurement from the outside
edge of the rough opening
sill and draw a line all along
the rough opening sill. This is
where the back of the flashing
will sit.
4. Cut a piece of flashing the
length of the sill plus 12".
5. Place flashing on rough
opening sill, wrapping the
flashing up 6" on each jamb as
shown.
6. Pull release tape and set
flashing into place.
7. Fold the flashing down onto
the sheathing. Staple flashing
to the wall and seal the corner
edges as shown.
3. Fasten window
with a galvanized
roofing nail
through the
nailing fin
between 3" and
7" from one
lower corner.
4. Align side jamb
shims with the
pre-drilled holes
so fasteners will
penetrate shims.
Shims must be set
back at least 1/4"
from the interior
of the jamb.
Secure shims with sealant.
5. Inspect window for square, level, and plumb. Test for proper
operation (remove and reinstall if necessary).
6. Using #10 x 3 1/2" pan head screws, fasten the jambs, head, and seat
board through the pre-drilled and countersunk pilot holes. Screws
should penetrate the previously installed shims.
Warning!
To avoid injury, use at least two people to install. Temporarily
support the window until fully installed.
Note!
Window should be pre-drilled and countersunk before placing
inside the rough opening.
1. Pilot holes should
be spaced 1 1/2"
from interior
edges, 4" from
each corner and
then evenly spaced
no more than 12"
around the inside
perimeter. Drill
1/8" pilot holes
and countersink.
2. Place window
onto the drain
mat in the rough
opening. The
window sill must
rest on and be
fully supported
by the rough
opening framing.
INSTALL BAY/BOW WINDOW
5
Countersink
1 1/2"
4"
3"- 7"
Framing
Shim
Seat board
1/4"
sealant
gap
8. Smooth out any bubbles or creases with a J-roller. Remove and
replace if necessary.
9. Install the continuous shim as
follows:
Note!
The continuous shim must
be 1/2" shorter than the width
of the window frame, be 1/4"
narrower than the depth of the
window frame sill, should level
the rough opening sill and be no
more than 1/4" thick.
Align the shim on the sill flush
with the exterior and centered
between the side jambs. If installing a mulled unit, leave gaps at the
mull joint(s) so they don't sit on the shim and tack into place or secure
with sealant.
Measure
frame
width
1
2
Interior
Width of
rough opening
12"
Continuous
shim
Depth of
window
minus 1/4"
Flashing
Nail fin position
2" min.