ididit Floor Mount: 1962-67 Nova Floor Mount User Manual
ididit For the car
PROPERTY OF
ididi
T, inc
PROPERTY OF
ididi
T, inc
PROPERTY OF
ididi
T, inc
PROPERTY OF
ididi
T, inc
PROPERTY OF
ididi
T, inc
PROPERTY OF
ididi
T, inc
1962-67 Nova Floor Mount Installation Instructions
For Part Number’s 2400020010
ididit inc. 610 S. Maumee St. 49286 Tecumseh, MI • PH: 517-424-0577 • FAX: 517-424-7293 • ididitinc.com
Instruction #: 8000010225
REV 12/12
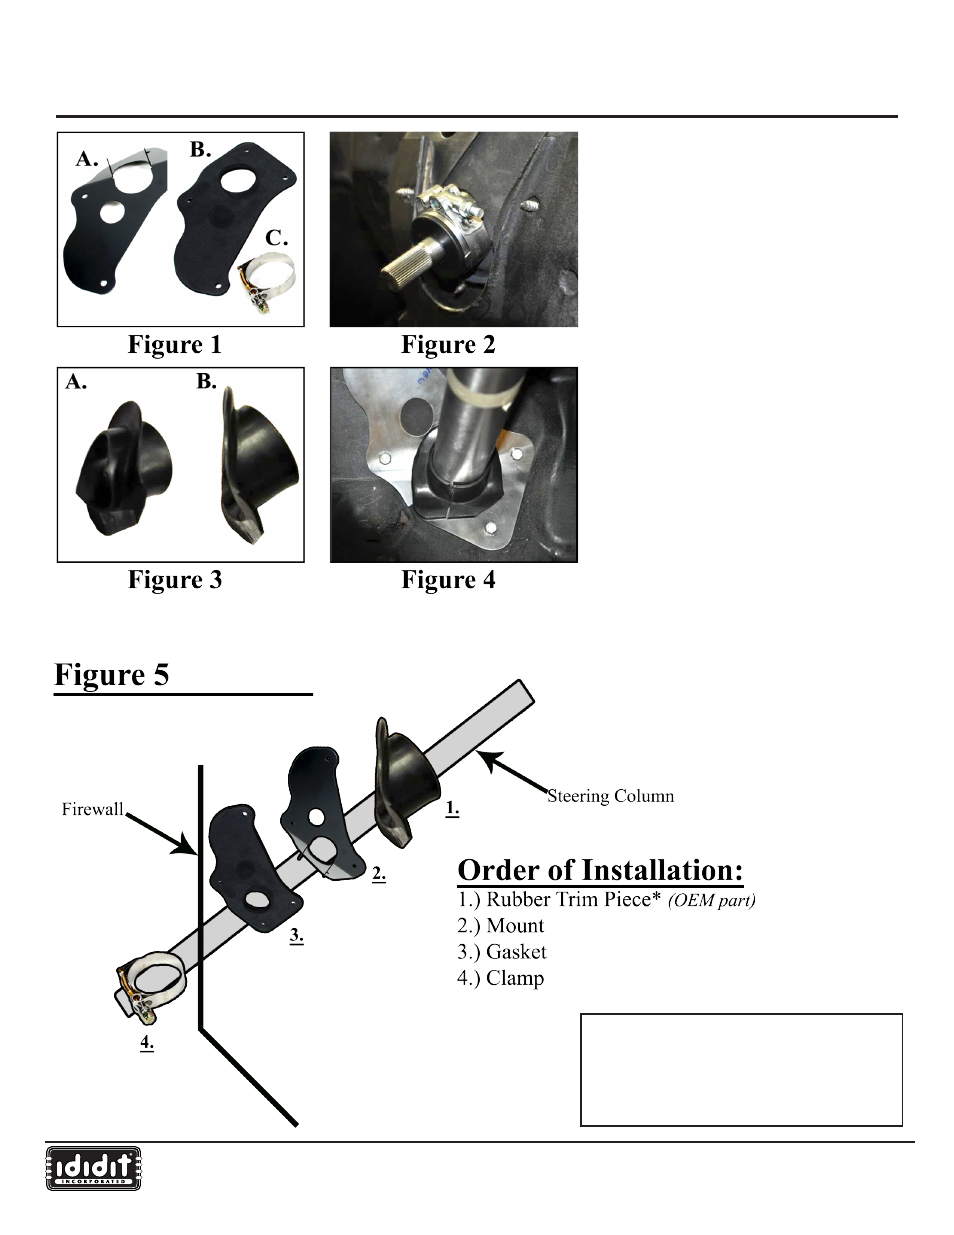
Kit Includes (Figure 1):
(A.) Mount, (B.) Gasket & (C.) Clamp
Slide the gasket down the column tube, then
slide the floor mount down the columns
tube with the prongs facing the engine
compartment. Align the floor mount & gasket
with the original mounting holes in the floor.
Install the 4 bolts with the large washers to
secure the floor mount to the firewall. From
inside the engine compartment, slide the
clamp around the two tabs of the floor mount
& the column. Simply tighten the clamp to
secure the column to the floor mount.
(Figure 2 & Figure 5)
The lower interior rubber trim piece
(Figure
3A) will have to be modified as there is
no way to slide the grommet into the floor
mount.
Interior Rubber Trim Piece: This
piece is an original part of the vehicle. If
one was not provided with your vehicle,
follow our Source Guidance below.
Figure
3B shows the finished part trimmed and
ready for installation. Install the trim piece
loosely. To secure it, put a dab of silicone or
trim adhesive on the inside where it meets
the column. You may want to put a piece
of tape around the grommet for 24 hours or
until it dries.
Figure 4 shows the trimmed
part properly installed.
*PLEASE NOTE: The enclosed floor
mount has a “hot dip” black oxide
finish. It would be important to put a
permanent finish on it before you install.
1962-66 Screw Size: 1/4” screw, 3/4” long,
#10 thread & no washer
1967 Screw Size: 1/4” screw, 7/8” long,
#14 thread & 1” washer
Rubber Trim Piece: Found on nnnova.com
Source Guide: