Working with dvr – Clinton Electronics CE-PTZ-KEY User Manual
Page 13
13
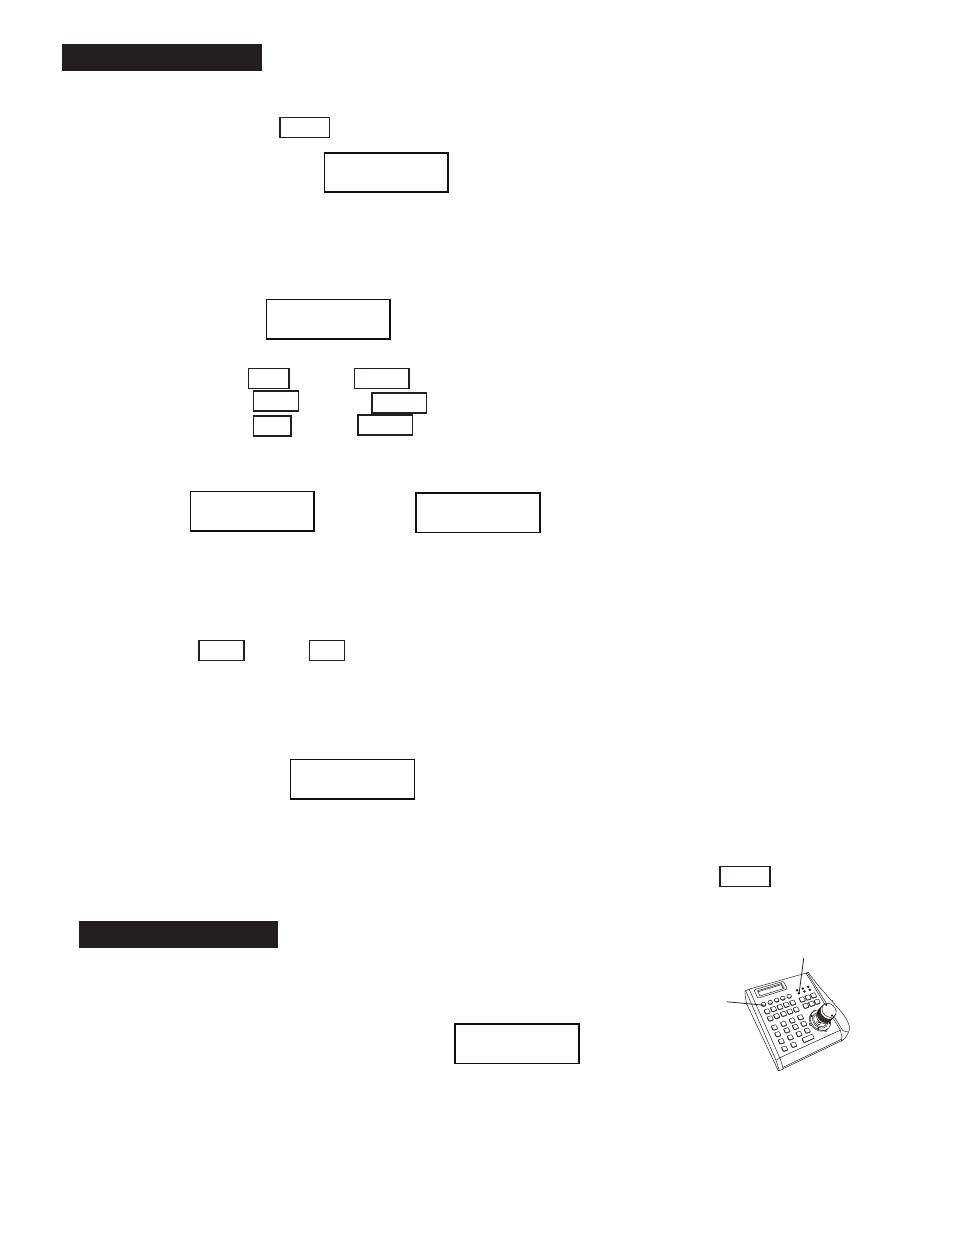
Enter DVR mode
To control DVR, press the DVR-Button and enter the DVR-mode.
The LED with “DVR” tag indicates the current status, and the LCD
shows the current selected DVR ID:
If you have more than one DVR installed and configured, you can switch to other ID by pressing NEXT
+ # + ENTER. For returning to PTZ mode, press MENU.
Depending on the DVR Model, the function keys may be different. Please refer to “Function key for
NVIDO DVR” section for key assignment.
VERxx<01>
System Keyboard
MON--- CAM- ALM-
001 0001 0001
press menu key to exit startup screen
CAM+1
001 0001 0001
Selected
Monitor
Selected
Camera
Selected
Alarm Input
camera info will show up on
screen after its connected
type in the camera number
you wish to control: example:
hit “CAM” button, then “1”,
then “ENTER” to control camera #1.
This may be necessary the first
time you connect your keyboard,
even if it shows “CAM-0001” on
the LCD display.
ADMIN AUTHORITY
001 0001 0001
PASSWORD :
**********
PASSWORD :
9876543210
SET MUX PROTOCOL
>ROBOT
SET MTX BAUD RAT
>9600bps
SET DVR :
>SET_PROTOCOL>
SET DVR :
>SET_BAUDRATE>
ALL : >NVIDO
01 : >NVIDO
ALL : >9600bps
01 : >9600bps
SET DVR :
>SET_CHANNEL>
ID:01 OUT:0001
IN:01 CAM:0001
DVR ID
Camera ID
(mapped to DVR CH ID)
DVR CH ID
Monitor ID for output
SET CAM PROTOCOL
>SET_PROTOCOL>
SET CAM PROTOCOL
>SET_BAUDRATE>
ALL : >9600bps
01 : >9600bps
ALL : >B02
01 : >B02
SET KEY ID
>01<00 -->63>
SET KEY LEVEL
>01<00 -->15>
SET MON RANGE
>0000 -->0239
SET CAM RANGE
>0000 -->9999
SET ALM RANGE
>0000 -->9999
RESET DEFAULT_I?
>
**********
RESET DEFAULT_I?
PLEASE WAIT . . .
MON--- CAM- ALM-
001 0001 0001
CAM+#
001 0001 0001
Seq Pos Spd Ti
001 000 000 000
DVR_ID:01
Set DVR ID:
01< 00 99>
ID:01 OUT:0001
IN:01 CAM:001
DVR_ID:01 IN:01
PTZ
Cam:001
SET+#
001 0001 0001
SHOT+#
001 0001 0001
DVR ID
DVR Input
Channel
Output to Matrix
Assign to
Camera ID
MUX_ID:01
Set MUX ID:
01< 00 66>
ID:01 OUT:0001
IN:01 CAM:001
MUX_ID:01 IN:01
PTZ
Cam:001
MUX ID
MUX Input
Channel
Monitor ID for Output
Camera ID
Working with PTZ
Start PTZ mode
By default, the keyboard usually starts in PTZ mode (display shown below). You can also access the
PTZ menu by pressing the MENU button.
Select / Change current camera-
By default, the keyboard usually starts in PTZ mode (display shown below). You can also access the
PTZ menu by pressing the MENU button.
Change selected camera
Preset Function-
Add Preset:
SET + # + ENTER . #=1 to 255*
Call a Preset:
SHOT + # + ENTER . #=1 to 255*
Delete a Preset:
CLR + # + ENTER . #=1 to 255*
*The maximum preset number depends on the PTZ device. Please refer to the user’s manual for further information.
Tour - Sequence:
A sequence can store up to 24 preset points with individual dwell times and speeds. You can store a
sequence by using this function. (Only available in B01 / B02 Protocol).
Press GRP + # + SET . #=1 to 4
After entering sequence programming mode, the display shows the preset input and settings for
speed and time.
Repeat the preset position input with speed and time settings, and confirm with ENTER. After exiting
the programming mode, the settings will be saved to the dome’s memory.
Seq: Sequence number
Pos: Preset number
Spd: Move speed between 1-8
Ti: Stop time between 0-60 sec.
Press ENTER to confirm and save the setting.
VERxx<01>
System Keyboard
MON--- CAM- ALM-
001 0001 0001
press menu key to exit startup screen
CAM+1
001 0001 0001
Selected
Monitor
Selected
Camera
Selected
Alarm Input
camera info will show up on
screen after its connected
type in the camera number
you wish to control: example:
hit “CAM” button, then “1”,
then “ENTER” to control camera #1.
This may be necessary the first
time you connect your keyboard,
even if it shows “CAM-0001” on
the LCD display.
ADMIN AUTHORITY
001 0001 0001
PASSWORD :
**********
PASSWORD :
9876543210
SET MUX PROTOCOL
>ROBOT
SET MTX BAUD RAT
>9600bps
SET DVR :
>SET_PROTOCOL>
SET DVR :
>SET_BAUDRATE>
ALL : >NVIDO
01 : >NVIDO
ALL : >9600bps
01 : >9600bps
SET DVR :
>SET_CHANNEL>
ID:01 OUT:0001
IN:01 CAM:0001
DVR ID
Camera ID
(mapped to DVR CH ID)
DVR CH ID
Monitor ID for output
SET CAM PROTOCOL
>SET_PROTOCOL>
SET CAM PROTOCOL
>SET_BAUDRATE>
ALL : >9600bps
01 : >9600bps
ALL : >B02
01 : >B02
SET KEY ID
>01<00 -->63>
SET KEY LEVEL
>01<00 -->15>
SET MON RANGE
>0000 -->0239
SET CAM RANGE
>0000 -->9999
SET ALM RANGE
>0000 -->9999
RESET DEFAULT_I?
>
**********
RESET DEFAULT_I?
PLEASE WAIT . . .
MON--- CAM- ALM-
001 0001 0001
CAM+#
001 0001 0001
Seq Pos Spd Ti
001 000 000 000
DVR_ID:01
Set DVR ID:
01< 00 99>
ID:01 OUT:0001
IN:01 CAM:001
DVR_ID:01 IN:01
PTZ
Cam:001
SET+#
001 0001 0001
SHOT+#
001 0001 0001
DVR ID
DVR Input
Channel
Output to Matrix
Assign to
Camera ID
MUX_ID:01
Set MUX ID:
01< 00 66>
ID:01 OUT:0001
IN:01 CAM:001
MUX_ID:01 IN:01
PTZ
Cam:001
MUX ID
MUX Input
Channel
Monitor ID for Output
Camera ID
Working with DVR
VERxx<01>
System Keyboard
MON--- CAM- ALM-
001 0001 0001
press menu key to exit startup screen
CAM+1
001 0001 0001
Selected
Monitor
Selected
Camera
Selected
Alarm Input
camera info will show up on
screen after its connected
type in the camera number
you wish to control: example:
hit “CAM” button, then “1”,
then “ENTER” to control camera #1.
This may be necessary the first
time you connect your keyboard,
even if it shows “CAM-0001” on
the LCD display.
ADMIN AUTHORITY
001 0001 0001
PASSWORD :
**********
PASSWORD :
9876543210
SET MUX PROTOCOL
>ROBOT
SET MTX BAUD RAT
>9600bps
SET DVR :
>SET_PROTOCOL>
SET DVR :
>SET_BAUDRATE>
ALL : >NVIDO
01 : >NVIDO
ALL : >9600bps
01 : >9600bps
SET DVR :
>SET_CHANNEL>
ID:01 OUT:0001
IN:01 CAM:0001
DVR ID
Camera ID
(mapped to DVR CH ID)
DVR CH ID
Monitor ID for output
SET CAM PROTOCOL
>SET_PROTOCOL>
SET CAM PROTOCOL
>SET_BAUDRATE>
ALL : >9600bps
01 : >9600bps
ALL : >B02
01 : >B02
SET KEY ID
>01<00 -->63>
SET KEY LEVEL
>01<00 -->15>
SET MON RANGE
>0000 -->0239
SET CAM RANGE
>0000 -->9999
SET ALM RANGE
>0000 -->9999
RESET DEFAULT_I?
>
**********
RESET DEFAULT_I?
PLEASE WAIT . . .
MON--- CAM- ALM-
001 0001 0001
CAM+#
001 0001 0001
Seq Pos Spd Ti
001 000 000 000
DVR_ID:01
Set DVR ID:
01< 00 99>
ID:01 OUT:0001
IN:01 CAM:001
DVR_ID:01 IN:01
PTZ
Cam:001
SET+#
001 0001 0001
SHOT+#
001 0001 0001
DVR ID
DVR Input
Channel
Output to Matrix
Assign to
Camera ID
MUX_ID:01
Set MUX ID:
01< 00 66>
ID:01 OUT:0001
IN:01 CAM:001
MUX_ID:01 IN:01
PTZ
Cam:001
MUX ID
MUX Input
Channel
Monitor ID for Output
Camera ID
RS 485+
RS 485-
120Ω
Resistor
120Ω
Resistor
Device 1
Device 2
Device 3
DVR
MUX
MENU
SET/
SHO
T/
ALM/
GRP/
OFF/
ON/
AUTOP
AN/
System Keybo
ard
VER34<01>
AUX/
RUN/
HOLD/
PREV/
NEXT/
1
2
3
4
5
6
7
8
9
*
0
ENTER
MON
CAM
CLR
OPEN/
BACK
FAR/
PIC.L
NEAR/
PIC.F
CLOSE/
DEL
TELE/
PgDn
WIDE/
PgUp
POWER
DVR
MUX
SYS
Rx
Tx
IRIS
FOCUS
ZOOM
Termination ON
RS 485+
RS 485-
Termination OFF
Termination OFF
Termination ON
DVR
MUX
MENU
SET/
SHO
T/
ALM/
GRP/
OFF/
ON/
AUTOP
AN/
System Keyboard
VER34<01>
AUX/
RUN/
HOLD/
PREV/
NEXT/
1
2
3
4
5
6
7
8
9
*
0
ENTER
MON
CAM
CLR
OPEN/
BACK
FAR/
PIC.L
NEAR/
PIC.F
CLOSE/
DEL
TELE/
PgDn
WIDE/
PgUp
POWER
DVR
MUX
SYS
Rx
Tx
IRIS
FOC
US
ZOOM
RS-485 Distributor
Video Amplifier (optional)
DVR
DIGITAL VIDEO
RECORDER
Monitor
(optional)
DVR
(optional)
Up to 750m, coaxial cable
Balun Transmitter
(optional)
DVR
DIGITAL VIDE
O RECORDER
Monitor
(optional)
DVR
(optional)
Up to 1200m, twisted pair or cat5 cable
Balun Receiver
(optional)
Press DVR button to
enter DVR mode
LED for DVR mode