Dwyer instruments, inc – Dwyer 641 User Manual
Page 4
Span Setting
The Series 641 AVT has been calibrated for standard sea
level conditions. As a mass flow device it will always read
the air velocity for standard conditions. Density changes due
to barometric or absolute pressure are not corrected auto-
matically. The span setting allows correction for altitude or
other static pressure conditions that affect the density of the
process air. This parameter allows for a ±50% adjustment in
the span value.
To make the span adjustment you will need to know either
the absolute static pressure or the corrected velocity of the
process air. Set the air velocity to a known value, ideally
about 3/4 of the full-scale range value. Press SELECT until
the SPAN LED indicator is illuminated then press ENTER.
The SPAN LED will begin to blink. Adjust the control for the
desired velocity then press and hold the ENTER button until
all of the LED’s flash, indicating the new value was saved. If
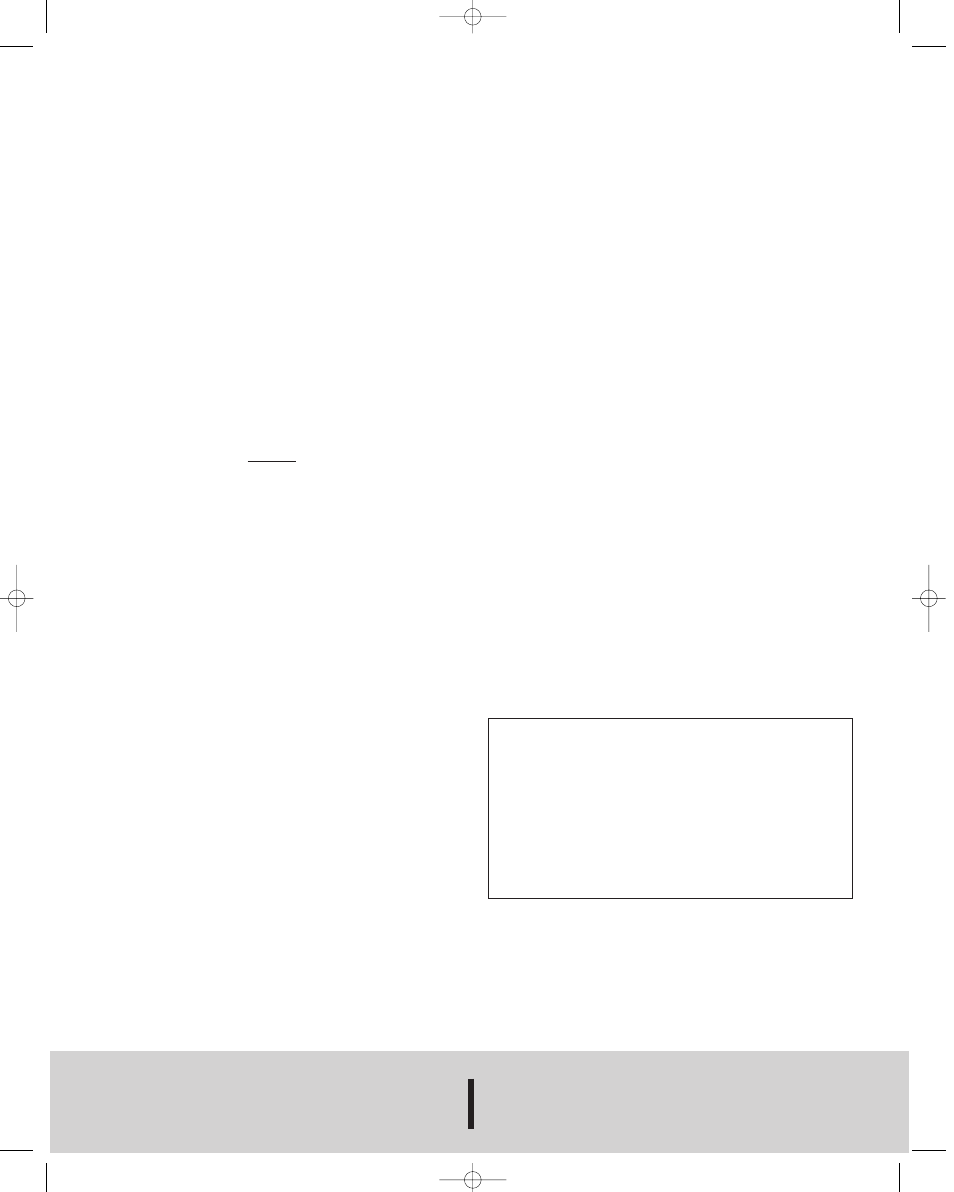
you know the absolute static pressure you can compute the
corrected velocity using the following equation:
Where:
P0 is the standard pressure of 29.9 in. Hg. or 760 mm Hg.
PA is the absolute pressure reading
Vrdg is the indicated velocity
Vcor is the corrected velocity
4 mA Setting
To make this setting you will need a milliammeter connect-
ed in the current loop. It is not required to use a known air
flow velocity to make this calibration setting. The calibration
settings of the velocity and the mA outputs are independent
of each other. Press SELECT until the 4 mA LED indicator is
illuminated then press ENTER. The milliammeter will now
read approximately 4.0 mA. Adjust the control for a 4.0 mA
reading on the milliammeter. Press and hold ENTER to save
the new setting. Pressing SELECT before pressing ENTER
will restore the previous calibration value.
20 mA Setting
It is not required to use a known air flow velocity to make
this calibration setting. The calibration settings of the veloc-
ity and the mA outputs are independent of each other. Press
SELECT until the 20-mA LED indicator is illuminated. Press
ENTER to begin adjustment of the 20-mA set point. The 20
mA LED will now be blinking. Adjust the control until the mil-
liammeter reads 20.0 mA. Press and hold ENTER to save
the new setting. Pressing SELECT before pressing ENTER
will restore the previous calibration value.
Restoring Factory Default Settings
The 4 mA, 20 mA, and Range settings override factory
default values. To restore these to the factory default set-
tings, start with the unit in the RUN mode. Press and hold
the ENTER button. The RUN LED indicator will begin to
blink. After about 2.5 seconds all LED indicators will flash
indicating the factory settings have been restored. Range
and Filter settings are not affected by this operation. If you
are unsure whether any have been altered, press the
SELECT button six times to sequence through all settings.
When you return to the RUN mode, the RUN LED indicator
will blink several times if either the 4 mA, 20 mA, or span
settings have been changed. The RUN LED will otherwise
remain on.
MAINTENANCE
In general the Series 641 AVT should require very little main-
tenance. In some installations dust may accumulate on the
sensor over time. This can be removed by carefully brush-
ing the probe with a small camel hairbrush. If too much force
is applied during cleaning, the sensor of the Series 641 AVT
may be damaged. Therefore, a trained technician should
perform the cleaning operation. A jet of air may also dis-
lodge the accumulated buildup however, again, the sensor
is delicate and this operation should be done carefully with
clean regulated air. Using a shop air supply may exert
enough force to damage the sensor. Most air supplies of
this sort will also contain water or oil that could damage the
sensor. Technical grade denatured or isopropyl alcohol may
be used where the dust accumulation does not respond to
brushing. Do not use water. Always disconnect the power
when performing a cleaning operation.
Aside from field calibrations for span, 4 mA and 20 mA set-
ting as described above, the Series 641 cannot be fully fac-
tory calibrated in the field. Because of specialized comput-
er instrumentation required, these units must be returned to
Dwyer Instruments for factory calibration. Contact customer
service to receive a return goods authorization number
before shipping.
CE
The following standards were used for CE approval:
IEC 61000-4-2: 2001
IEC 61000-4-3: 2002
IEC 61000-4-4: 1995
IEC 61000-4-5: 2001
IEC 61000-4-6: 2003
IEC 55011: 1998
IEC 61326: 2002
89/336/EEC EMC Directive
©Copyright 2004 Dwyer Instruments, Inc.
Printed in U.S.A. 11/04
FR# 443205-10 Rev. 1
Page 4
P
o
P
A
V
rdg
V
cor
=
DWYER INSTRUMENTS, INC.
Phone: 219/879-8000
www.dwyer-inst.com
P.O. BOX 373 • MICHIGAN CITY, INDIANA 46361, U.S.A.
Fax: 219/872-9057
e-mail: [email protected]
641-CE bulletin 11/9/04 3:49 PM Page 4