Dwyer DL7 User Manual
Page 4
The process can be speed up by selecting the Set Baud rate,
Fastest Available from the Communicate menu. (If you have
problems backing up a logger, try a slower baud rate. On some
computers, choosing the fastest available baud rate causes tim-
ing conflicts. NOTE: The IC-200 module automatically transmits
at 1200 baud and cannot be adjusted.
Backing Up a Logger
From the Communicate menu, choose Preferred Logger SR+.
To access the logger window, double click on the logger icon or
click communicate on the menu bar and choose the highlighted
Open COM from the menu. To backup a logger, click Backup in
the logger window. A dialog box appears showing the baud
rate, the serial number of the logger, and the progress of the
backup. (You may cancel the backup procedure by clicking
Cancel).
Opening a Graph after Backup
If you want to view the transferred information as a graph imme-
diately after backup, open the Options menu in the main window
and make sure a check mark is in front of Open Graph after
Backup. NOTE: See the Trendreader software manual for details
on manipulating graphs.
Naming a File
When backup is completed, the Save As dialog box appears to
enable you to name the file. the default name is always the serial
number of the logger. If you want to keep the logger’s serial
number as the filename, click OK. If you want to give the file a
different name, type the new name and click OK. NOTE: You
cannot type anything after the dot in the Trendreader filename.
The three letter extension, is automatically assigned.
Backing Up Additional Loggers
You can daisy-chain the DL7 loggers together and back them up
one by one. You may want to disable the opening a graph after
backup function when you are backing up several loggers. If this
function is not disabled, a graph will be opened after backing up
each logger, increasing the total backup time. To disable this
function, open the Options menu and make sure there is no
check mark in front of Open Graph After Backup.
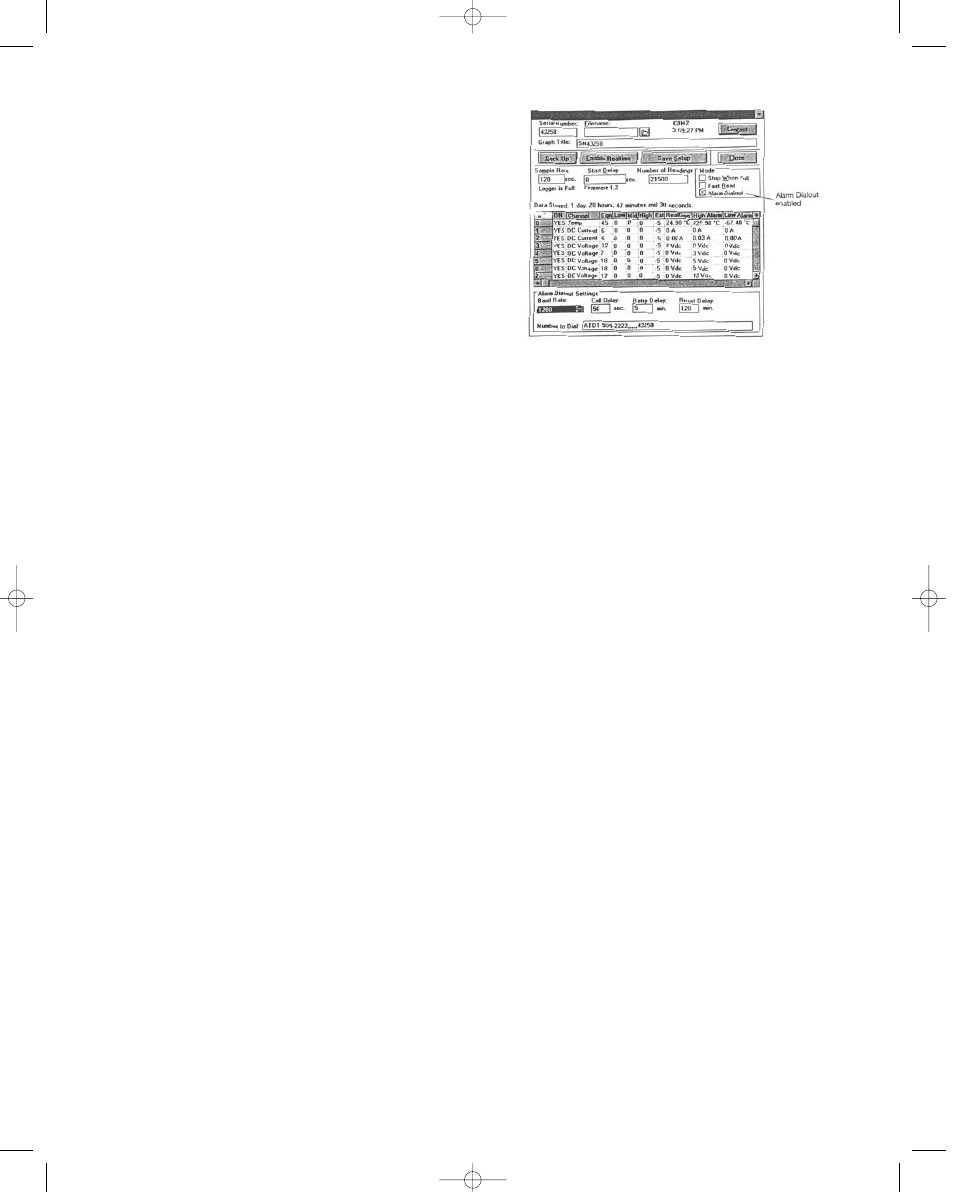
ALARM DIALOUT
Alarm Dialout enables you to setup the logger at a remote site so
that it will dial a phone number when readings have exceeded
preset alarm thresholds. It can be setup to dial a telephone or
pager. The receiving telephone requires caller ID to use this fea-
ture.
If sending the alarm to a pager, the pager system must accept
touch-tone codes that can be displayed on the pager.
Alarm Dialout is enabled by setting high and low alarm thresh-
olds, entering the number that is to receive the alarm call, and
sending the setup to the logger. When an alarm condition
occurs, the logger will dial out and leave the remote site number
on the receiver’s telephone caller ID or on the pager’s display.
(Alarm Dialout does not leave a verbal message). To activate
Alarm dialout, click Alarm Dialout in the logger window so that
there is a check in the Alarm Dialout box. A dialog box will
appear at the bottom of the window. See figure 2.
Setting High and Low Alarm Thresholds
Set high and low alarm thresholds for each active channel on the
logger. Any reading lower than the low alarm threshold or higher
than the high alarm threshold will cause the logger to dial out
from the remote site. Set the high alarm to the highest possible
value and low alarm to the lowest possible value if you do not
want the alarm activated on that channel.
Choosing a Baud Rate
Baud rate is a measure of the transmission speed of the dial
commands that the logger sends to the modem. The default
baud rate is 1200, which is reliable and accurate for most situa-
tions. Higher baud rates are available in the baud rate box.
Entering the Number to Dial
A. Calling a telephone: Remember the telephone must have
caller ID to receive the alarm.
1. Type a dial command in the Number to Dial box. If
the phone line at the remote site has tone dial, type ATDT. If
pulse dial, type ATDP.
2. After the dial command, type the number of the tele-
phone that is to receive the alarm call.
FIGURE 2
Bulletin E-90-DL7 6/22/05 3:52 PM Page 4