Dwyer DL7 User Manual
Page 2
If more than one logger icon appears on the screen or more than
one Open COM is highlighted on the Communicate menu, this
means you have more than one COM port available on your
computer. Choose the port that the particular logger is connect-
ed to.
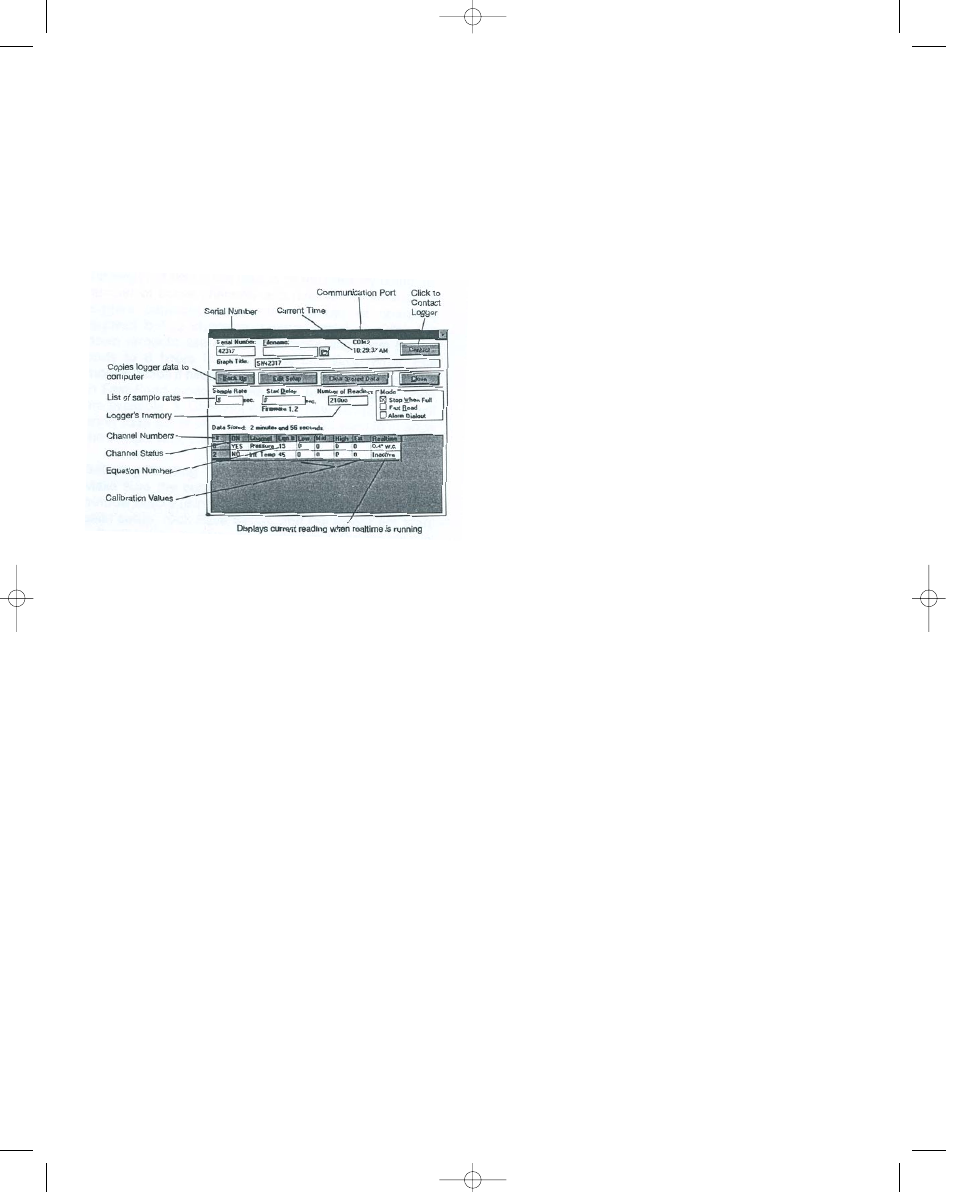
The logger window will display the serial number of the logger
Trendreader software is communicating with. See Figure 1. To
contact another logger connected to the compuet. 1. Double-
click the serial number displayed to highlight it. 2. Type the serial
number of the logger you want to contact. 3. Click the Contact
button.
Enabling and Disabling Channels
Enabling a channel activates that channel and it will continually
record and store readings in memory. In the channel ON col-
umn, Yes means the channel is active, No means it is not. Click
on the channel being changed to toggle between yes and no.
Disable any channels not required to conserve memory space.
Equation Numbers
Equations are calculations the software uses to convert raw log-
ger data to understandable units. Refer to page one (Table 1) for
the appropriate equation number.
To see a list of standard equations available, double click one of
the equation numbers in the Eqn column. The Select an
Equation dialog box will appear, enabling you to scroll through
the standard equations. If you want to choose one of the equa-
tions on the list, click it to highlight, and click Accept (or Enter).
You can also choose an equation by typing the number in the
selected Equation Number box and clicking Accept (or Enter).
Custom equations can be created and assigned to specific log-
ger channels. For additional information on creating custom
equations, please refer to the instruction manual included with
the Trendreader software.
Calibrations
The calibration values displayed in the low, med, high columns
are factory set and match the sensor supplied.
Viewing Realtime Readings
The realtime function allows the user to view measurements as
they are being recorded. Viewing current readings can be useful
when monitoring remote loggers by modem. In realtime mode,
the logger reads and displays the variable every 8 seconds. If
the sample rate is greater than 8-seconds, the average value for
the sample interval is stored (based on 8-second readings).
Do not leave realtime running if you want to perform other tasks
in Trendreader or if you want to switch to another Windows
application. The operation of Trendreader of other Windows pro-
gram will be slowed considerably with realtime funning. To stop
or start realtime, click the Edit Setup button. Stopping realtime
has no effect on the logger’s information gathering.
Units of Measure
The units of measure can be changed to fit your particular
needs. To change the units displayed in Realtime and on the
logged data choose the Options menu, hightlight Units, and
highlight the parameter being measured. The units appropriate
for that particular parameter will be displayed in the units win-
dow. Select the box corresponding to the desired units of mea-
sure and press Enter.
Filename
You cannot name the file during setup. Name the file when you
are backing up the logger.
Current Time
Make sure the current time is correct. To change the time,
access the Program manager on your computer and follow
instructions in your computer setup manual.
Stop When Full Continuous Mode
The logger can be set to stop taking readings when the memory
is full, or to continue to take readings when the memory is full.
To choose the first option, click the box in front of Stop When
Full so that there is an “X” in it. To choose the continuous mode,
click the box in front of Stop When Full so there is no “X” in it.
The logger will continue to take readings when the memory is
full, discarding the oldest reading as it records new readings.
Stopping Realtime
When the logger window is opened, the logger is operating in
realtime mode, which means current readings are being dis-
played in the window. Before changing any settings, click Edit
Setup.
Clearing Stored Data
To empty stored data, click Clear Stored Data.
FIGURE 1
Bulletin E-90-DL7 6/22/05 3:52 PM Page 2