Dwyer RSM User Manual
Page 4
7.0 STARTUP AND OPERATION
The RSM is designed with an easy to use touch screen interface. In its
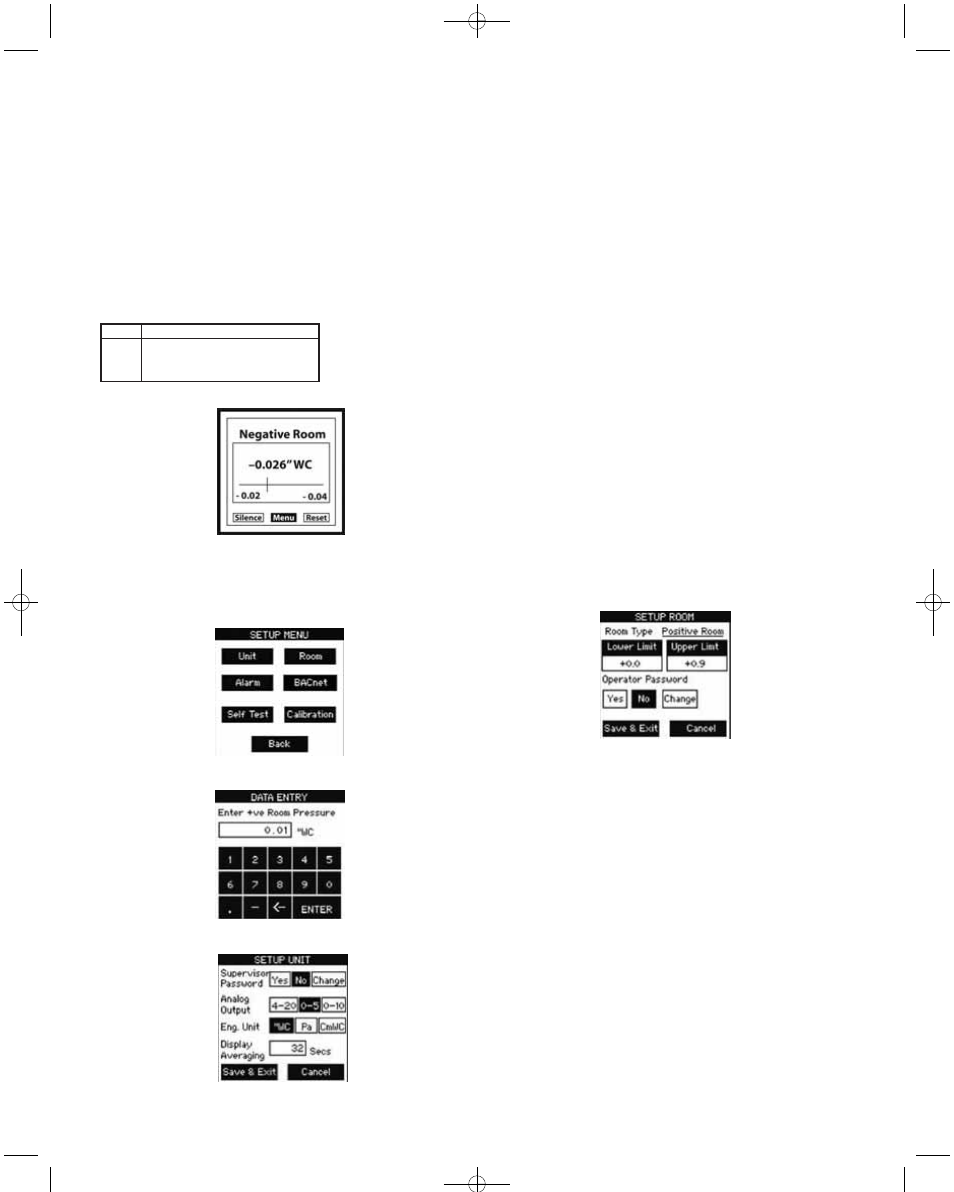
normal state the Monitoring Screen displays the actual room static
pressure. The buttons at the bottom of the screen give you access to the
functions that can be performed.
7.0.1. MENU TREE
See section 14.0.
7.1 POWER-UP
Apply power to the RSM and observe the welcome screen and subsequent
transition to the pressure monitor screen. The actual room static pressure
is shown as a number on the LCD and visually as a moving bar indicator
operating between the preset alarm units. The vertical bar is an indicator of
the pressure.
Monitoring Screen
7.2 MAIN MENU SCREEN
7.3 SETUP UNIT SCREEN
7.3.1 SETUP UNIT OPERATION
Press (or tap) button to select an output or engineering unit. Selected
button background will change from clear to black.
7.3.2 ENTERING DATA
Press (or tap) button to select an output or engineering unit. Selected
button background will change from clear to black.
7.3.2.1 PASSWORD PROTECTION
Lightly pressing (or tapping) the “Yes” button activates the “Data Entry
Screen” (see 7.3.3 to enter your password). Enter password, then press
“Enter”. “Password Setting Screen” will pop-up. Enter a new password, and
enter the new password again to confirm, then press “Save”.
7.3.2.2 DISPLAY AVERAGING
Lightly pressing (or tapping) the “Display Averaging” box activates the
“Data Entry Screen” (see 7.3.3). Enter from 0 to 60 seconds. Display
averaging affects the analog output. Increase the display averaging time to
smooth out the pressure readings.
7.3.3 DATA ENTRY SCREEN
Enter numbers by pressing each key in sequence until the desired
character is displayed in the data entry box above the keypad. (Note: The
cursor will blink for one to two seconds then stop and display the
character.) Erase any mistakes by using the “Back Space” key. When
finished entering data, press the “Enter” key to return to SETUP UNIT
screen.
Example:
Enter number 3, press (or tap) 3/DEF key once.
Enter the letter T, press (or tap) the 8/STU key three times in succession.
Note: Use the eraser end of a pencil or back-end of a pen to press (or
tap) box on screen to increase accuracy of inputs.
7.4 SETUP ROOM SCREEN
7.4.1 SETUP ROOM OPERATION
Setup alarm limits for “protective” positive room static pressure, “isolating”
negative room static pressure or neutral (where the limits can be - to +).
7.4.2 ENTERING DATA
Press lightly or tap in the lower limit data entry box. Enter the lower limit
pressure. Enter the Upper Limit pressure. The Room type box will change
depending on the lower and upper limits. If both entries are positive, the
room will be a Positive Room. If both are negative, the room will be a
Negative Room and if the lower limit is negative and the Upper Limit is
positive the room will be a Neutral Room.
Lightly pressing (or tapping) the “Yes” button activates Operator password
protection. With Operator password protection enabled, room Occupied/No
Isolation status can not be changed without entering a valid Operator
password. Pressing “No” disables password protection. Pressing “Change”
will open “Password Setting Screen”. To change the password, enter the
present password, followed by the new password in the “New Password”
and “Confirm New Password” entry boxes, then press save.
Button
Silence
Menu
Reset
Description
Shuts off Alarm
Access to Setup Functions
Resets the unit in “Latched” mode.
P-3-RSM:TEMPLATE 2/17/11 2:22 PM Page 4