Opera, Control p, Control p control panel anel anel anel anel – SHIMPO DT-205L-S12 User Manual
Page 2
INSTRUMENTS
INSTRUMENTS
INSTRUMENTS
INSTRUMENTS
INSTRUMENTS
1701 Glenlake Avenue Itasca, IL 60143 · phone: (800) 237-7079 · fax: (630) 924-0342 · www.shimpoinst.com
OPERA
OPERA
OPERA
OPERA
OPERATING PROCEDURES
TING PROCEDURES
TING PROCEDURES
TING PROCEDURES
TING PROCEDURES
Non-Contact Measurement
1. Place a small piece of reflective tape
(included) on the shaft or moving
element (disc, pulley, etc.) whose
speed is to be measured. If the
element's surface is highly reflective
it may need to be painted a darker
color in order to ensure reliable
results. If the distance to the object
is less than 5" (127 mm), reflective tabs (optional) should
be used instead of reflective tape.
2. Aim the tachometer at the reflective tape from a distance
of 5" (127 mm) to 14' (4.3 m).
3. Press and hold the power switch for several seconds
(
when power button is depressed, laser is
active) to observe the display as it changes according
to the speed of the shaft or rotating element (as soon as
the laser hits the reflective tape, the unit will start to
indicate the speed). If the beam is “on target” the RPM
indicator will be flashing.
4. After observation is completed, retain the reading by
releasing the power switch (to turn off laser) before
removing the tachometer from its position. The last
reading is displayed for a period of 5 minutes and can be
extended any number of additional 5 minute increments
by pressing the memory switch.
NOTE: When switching from the contact to the non-contact mode,
the unit RPM will show on the display and also 5 dashes (-----).
Press the power switch to cancel the dashes.
Contact Measurement
For both RPM measurements and non-RPM
measurements, screw the 200L Adapter
(included) into the front of the tachometer.
NOTE: Hand tightening is sufficient; do not
use excessive torque when mounting
RPM Measurement
1. Place rubber cone tip on the shaft of
the 200L adapter. Make certain that
the pin on the shaft is properly
aligned with the slot on the cone’s
sleeve.
2. Bring cone into contact with the
shaft. Apply only enough pressure
to avoid slippage.
3. Press and hold the power switch. During engagement
the display will reflect the proper RPM while the unit RPM
will be flashing above the display digits.
4. Release the power switch prior to removal of tachometer
from rotating object to capture the last reading.
5. After release of the power switch, the last reading (with
a non-flashing RPM unit) will remain on the display and
in memory for 5 minutes, and can be extended any
number of additional 5 minute periods by pressing the
memory switch.
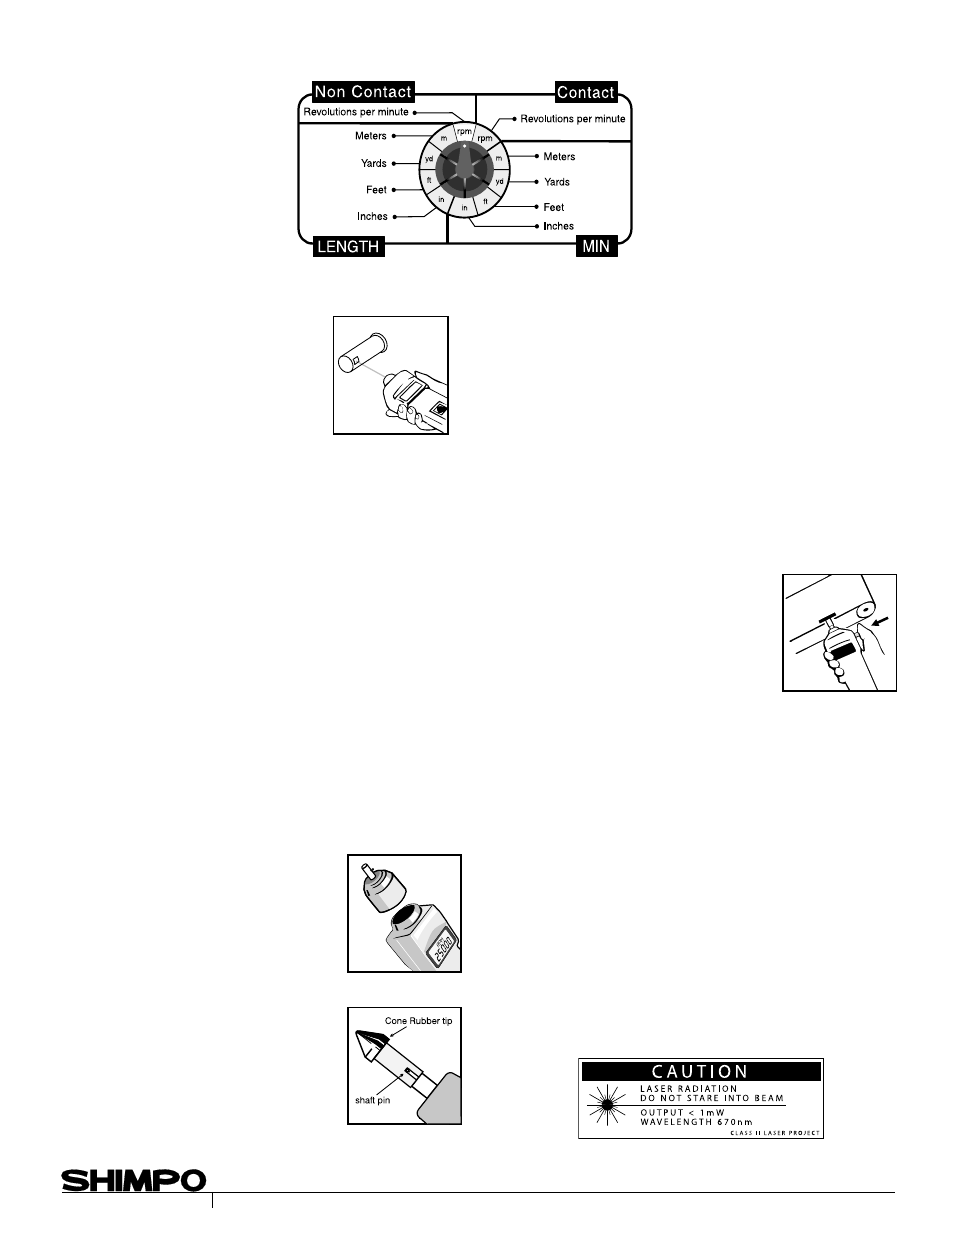
Rate & Length Measurement
1. Attach the master wheel and select the desired function
using the selector switch located just below the LCD
display.
2. Press and hold the power switch;
while the wheel is turning and the
tachometer is measuring the selected
function, the function will be
indicated, and the unit of measure
function will be flashing.
3. Release the power switch before
disengaging the tachometer in order to capture the last
reading.
4. After release of the power switch, the last, maximum,
and minimum readings will be stored in memory for 5
minutes and can be extended any number of additional
5 minute periods by pressing the memory button.
NOTE: The memory will clear in 5 minutes after the release of
the power switch.
For steps 1-4 described above, it was assumed that the selector
switch was in the rate mode region. If the selector switch is
moved from the rate mode to the count mode (length), the
display will show the selected function (m, ft, yd, or in) and also
5 dashes (-----). Press the power switch to cancel the dashes
and start measuring the same way as was described above. Once
in the counting mode, the measurement can be stopped at any
time and the last reading will be retained for 5 minutes. There is
no maximum or minimum reading when in the count (length)
mode.
CONTROL P
CONTROL P
CONTROL P
CONTROL P
CONTROL PANEL
ANEL
ANEL
ANEL
ANEL
2