Playing your first track, Preparing your files, Virtual deck – Rane Serato Scratch Live User Manual
Page 9
Manual-7
Playing your first track
Before launching the Scratch
LIVE
software, close all other pro-
grams on your Mac or PC.
When you first run Scratch
LIVE
, your library contains only
the pre-installed tracks. Load files into Scratch
LIVE
by pressing
the
import
button. Navigate the hard drive of your computer to
locate your audio files. Click on these files (or folders containing
files) and drag them onto the
✽
All
… icon.
You can also import by dragging files and folders directly
from Windows Explorer (PC version) or Finder (Mac version)
into the Scratch
LIVE
library (see pic below).
Scratch
LIVE
supports importing M3U playlists.
Loading tracks
Click on the
✽
All
… icon to show all the tracks in your library.
To load a track on to one of the decks, drag the track from the
track list on to either deck. You can drag the same track on to
both decks.
Tip: Use the keyboard shortcut
shift
to load the high-
lighted track on to the left deck, and
shift
to load the high-
lighted track on to the right deck.
Supported file types
Scratch
LIVE
supports fixed and variable bit rate .MP3, Ogg
Vorbis, .AIFF, and .WAV file types. iTunes™ library and iTunes
playlists can be automatically imported in the
setup
screen by
clicking
read iTunes library
(see page Manual-17). You can
also play audio direct from CD. See
Rescan ID3 tags
on page
Manual-18.
Using tool tips
Click on the ? icon to enable tool tips (right of the Scratch
LIVE
logo). Tool tips provide a handy way to learn the various features
of Scratch
LIVE
. Move the mouse over a section of the screen to
bring up a context-sensitive tool tip.
Tool tips are available in several languages. Scratch
LIVE
will
display the tool tips in the language that your computer is set to.
If your language is not available, the tool tips will be displayed in
English.
Tip:
Holding the mouse over the ? button with tool tips turned
on will show you a list of all keyboard shortcuts.
Preparing your files
Build overviews
If you run Scratch
LIVE
with the hardware interface discon-
nected, you will notice a button labeled
build overviews
on
the main screen. Click this to automatically build the overviews
for all the tracks in your library. The track name (and location)
are shown in the bar immediately below the button. Below this
are three more bars. The first bar shows track reading progress,
the second bar shows overview building, and the third bar shows
track writing progress. This process prepares the overviews of all
your tracks, and alerts you to any corrupt files you might have.
These are indicated by Status Icons, shown on page Manual-16.
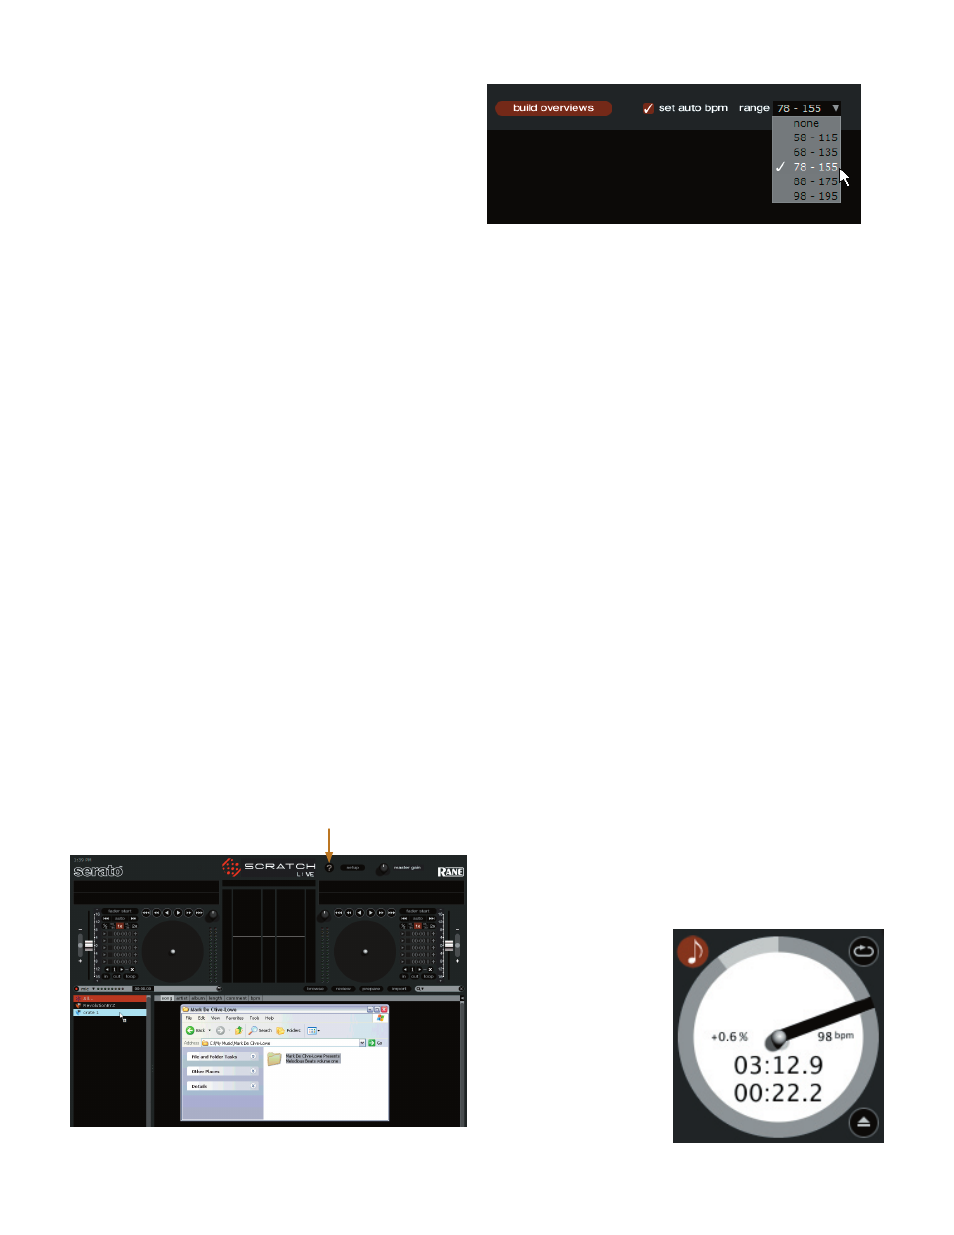
Set auto BPM
If this option is checked, building overviews will include the
estimated tempos of your files. If Scratch
LIVE
is confident that
the auto BPM estimate for a file is accurate, it will be written to
an ID3 tag in the file. The auto BPM function will not be applied
if the track already contains BPM information. If you know your
files BPM will fall within a certain range, use the range dropdown
to avoid double or half value BPMs being calculated. Note: As
auto BPM
is part of the overview building process, files in your library
with overviews already built will not be processed by clicking the
build overviews
button. To rebuild overviews and use auto gain or
auto BPM on those files drag them onto the
build overviews
button.
Reset track gain
If you want to reset any track gain tags to 0 dB, drag them onto
this button to reset them to 0. To regenerate new values as you
build overviews, see Set auto gain on page Manual-19.
Virtual Deck
Virtual Deck shows everything about the speed and position
of a track. The circular progress bar around the edge is a visual
representation of the position within the song, and can be set to
flash to warn you that the track is nearing its end. The time and
remaining time are displayed in minutes and seconds. You can
also choose to display the
playback speed as a percent-
age pitch shift, or the pitched
BPM (BPM with pitch ad-
justment multiplier applied).
If the track has no BPM
information, percentage pitch
shift will be displayed.