Front panel description, Manual-3, Control: adjusts the level of the – Rane Serato Scratch Live User Manual
Page 5: Input. the, Selectors: provide selection of, Inputs for each of the, Channels, Inputs may each be set for, And the amplifier. 4 program, Controls: set the volume of each
Manual-3
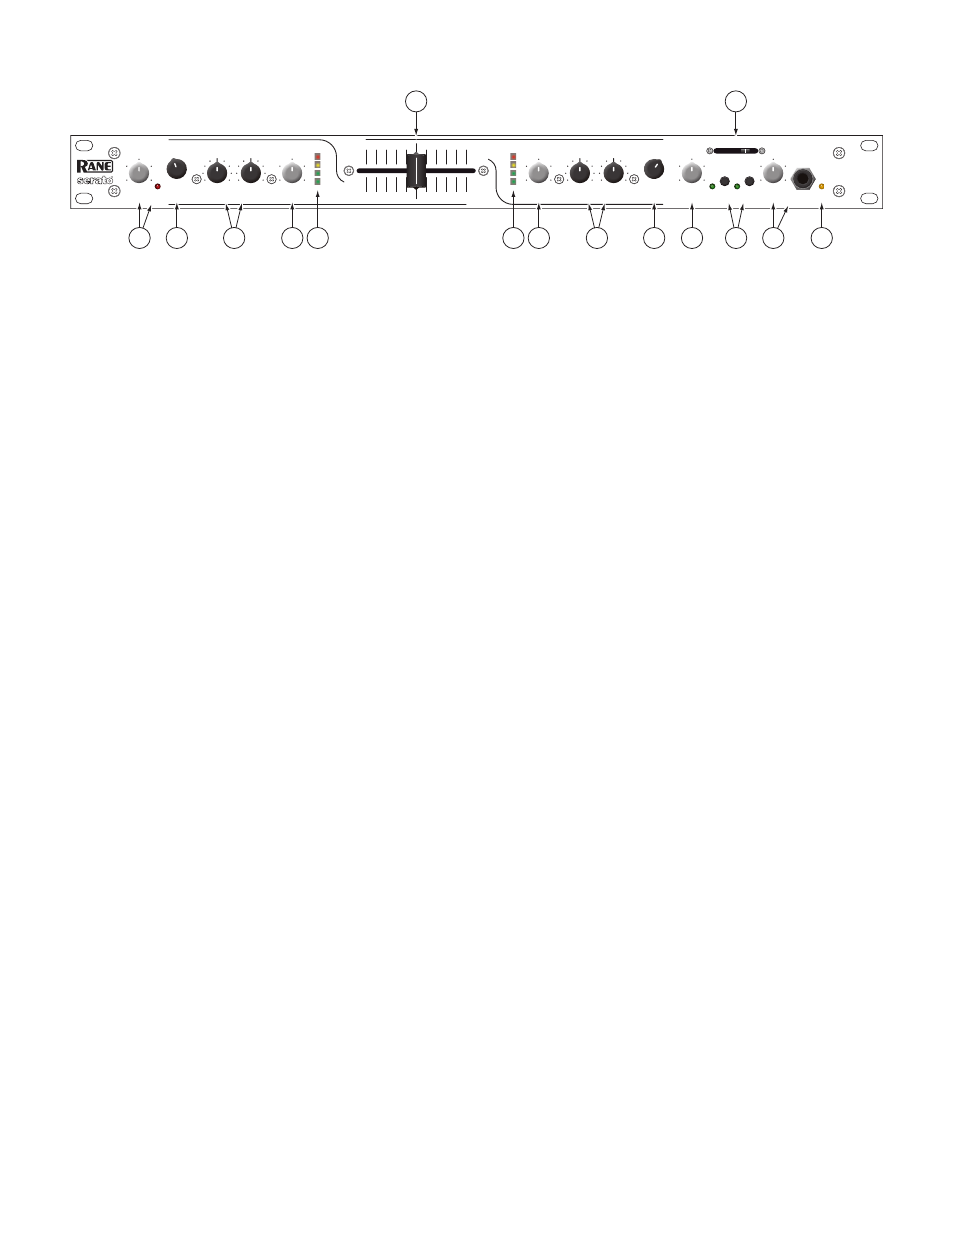
Front Panel Description
1
MIC LEVEL
control:
Adjusts the Level of the
MIC
Input. The
OL
(overload) indicator lights when the maximum mic level has
been reached, 3 dB before clipping. If this lights up, either turn the MIC LEVEL down, or stop yelling.
2
Program
INPUT
selectors:
Provide selection of
LINE 1
,
LINE 2
,
USB 1
or
USB 2
Inputs for each of the
PROGRAM A
or
PROGRAM B
channels.
LINE
Inputs may each be set for
PHONO
or
LINE
level via the rear panel switch (see Rear Panel 6).
3
Program
LOW
and
HIGH
tone controls:
adjust the equalization for each of the
PROGRAM
channels. Pointing these controls
straight up at their center detents takes the tone controls out of the signal path. This is not designed to be the only equalizer in the
system, this is intended to provide EQ between varying program materials. We recommend an external graphic equalizer for the
best system sound, connected between the
HOUSE OUTPUTS
and the amplifier.
4
Program
LEVEL
controls:
set the volume of each
PROGRAM INPUT
, as you would expect! These controls are pre-Crossfader, so
both Program Level controls also depend on the Crossfader setting (see 6).
5
Program meter:
This four-segment meter shows signal presence (at -24), optimum signal level (at around 0), and a warning to
turn down the associated LEVEL control if the +12 indicator lights up.
6
Active Crossfader:
Controls the mix of
PROGRAM A
and
B LEVELS
in a logical manner. When the Crossfader is all the
way left, only
PROGRAM A
is heard. When it's all the way right, only
PROGRAM B
is heard. When it's in the middle, both
PROGRAM A
and
B
are mixed together equally. This is an Active Crossfader™ which uses a VCA to deliver an extended life with
reduced travel noise, but to insure trouble-free operation, see Fader Cleaning on page Manual-4.
7
HOUSE LEVEL
control:
Adjusts the Output Level of the Main-mix to the
HOUSE
Outputs.
8
CUE
switches:
Select Program
A
or
B
in any combination to the
PHONES
. The associated yellow indicator lights when a
CUE
is
activated and pressed in. Depressing a button sends Program signals to the
CUE
side of the
PAN
control. For example, when the
Crossfader is to the left (playing Program A to the House), listen to
CUE B
(Program B) on the headphones to audition, match
beats or prepare a starting point.
9
PAN
control:
Changes the relative levels of the Cue and Program mixed together in stereo to the
PHONES
. Adjust this control
anywhere between Program and Cue:
PGM
follows the Main-mix (House) Output.
CUE
is determined by the
CUE
switches and only goes to the headphones.
0
PHONES LEVEL
and headphone jack:
As you guessed, plug your headphones in here and adjust the overall volume with the
LEVEL
control.
CUE
8 and
PAN
9 select the source.
q
POWER
indicator:
Illuminates to let you know the MP 4 is plugged in and ready to go.
OL
MIC LEVEL
A LEVEL
B LEVEL
LEVEL
LOW
10
8
6
4
0
2
LOW
HIGH
HIGH
0
2
4
6
10
8
LINE
USB
LINE
USB
INPUT
INPUT
PGM
CUE
A
B
MP 4
MIXER
A
PROGRAM A
PROGRAM B
CUE
PHONES
MIC
B
PAN
HOUSE
LEVEL
POWER
1
2
2
1
1
2
2
1
10
0
2
4
8
6
10
0
2
4
8
6
10
0
2
4
8
6
10
0
2
4
8
6
10
0
2
4
8
6
0
–24
–12
+12
–12
+12
–12
+12
–12
+12
–12
+12
0
-24
-12
+12
1
7
9
6
8
10
11
2
2
3
3
4
4
5
5