Ft7000 edu a – Triton FT7000 EDU Installation Manual User Manual
Page 14
14
M
oDEl
Ft7000 EDU a
ssEMbly
F
iElD
i
nstallation
G
UiDE
1. Mount the EDU Bezel at the lowest position possible,
with the LED assembly at the top. Secure it with 2 (two)
screws in the lowest position.
i
nstallation
oF
tHE
b
aCKinG
p
latEs
anD
b
EzEls
2. Mount the rain guard to the top of the EDU Bezel with 2
(two) screws.
3. Remount the 5 in. Bezel with 4 (four) screws, but DO NOT
tighten. Ensure the Bezel is interlocked with the printer
Bezel above and the EDU Bezel below.
4. Press fit the cable guide into the hole available in the rain
guard.
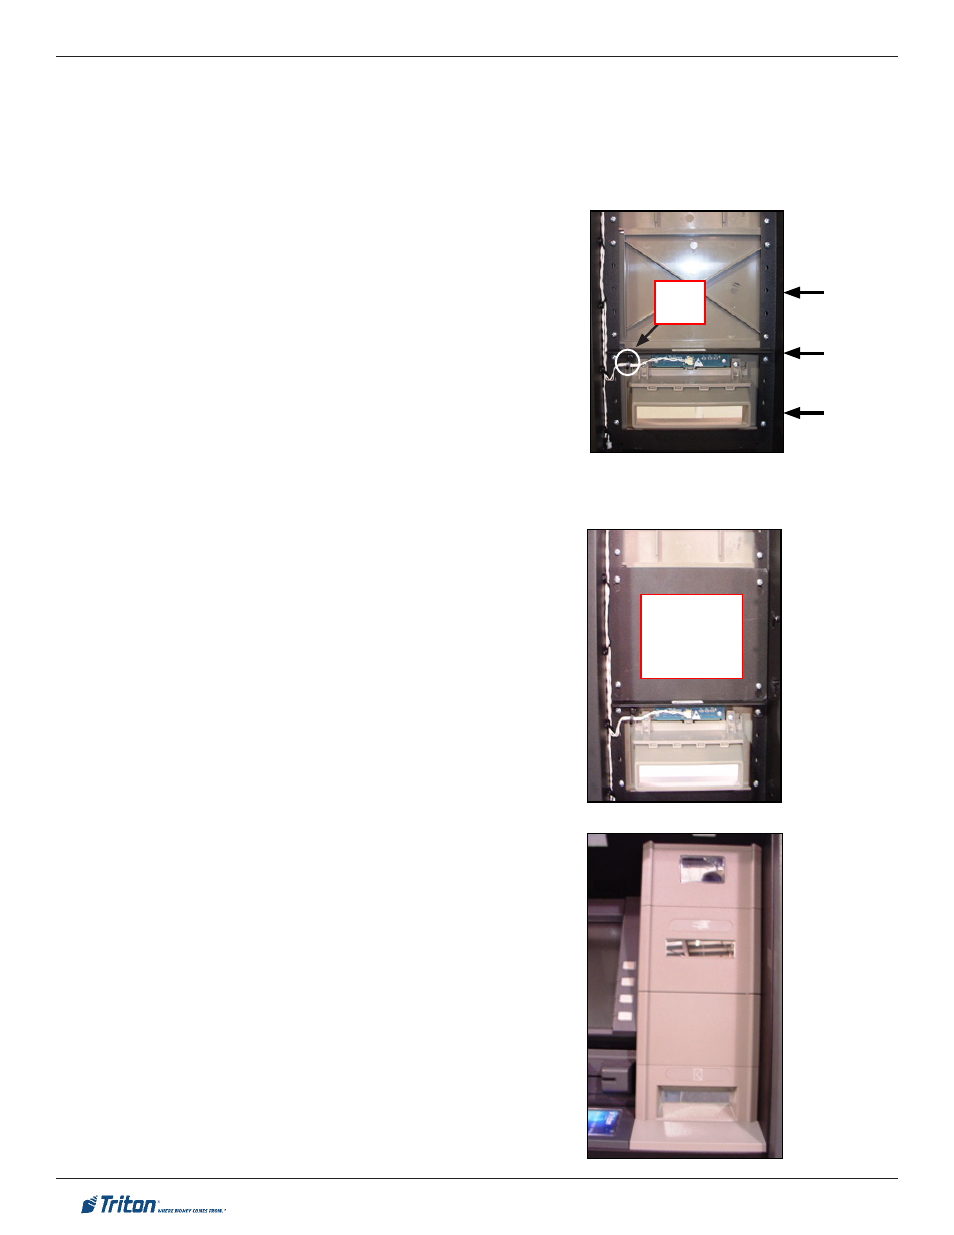
5. Plug the EDU LED power cable into the EDU LCD printed
circuit board on the EDU Bezel.
7. Lay the EDU LED power cable in the cable guide and then
press fit the cable guide into place to secure the power
cable.
8. Reinstall the 5 in. Backer plate over the 4 (four) mount-
ing screws. Push the Backer plate down until it is snug
against the EDU Bezel rain guard, and tighten the 4 (four)
Backer plate screws.
9. Front view of completed EDU Bezel installation.
5 in
Bezel
Rain
Guard
EDU
Bezel
Cable
Guide
5 inch
Backer Plate
Reinstalled
- X-SCALE/X2 Configuration Manual (419 pages)
- ARGO Installation Manual (35 pages)
- ARGO User Manual (97 pages)
- ARGO G60 Installation Manual (31 pages)
- ARGO Quick Reference Guide (10 pages)
- RL331X TRAVERSE User Manual (74 pages)
- FT5000 X2 User Manual (105 pages)
- FT5000 X2 Quick Reference Guide (10 pages)
- 81XX/91XX (including X2)/97XX/RL16XX (5 pages)
- RL1600 Installation Manual (41 pages)
- RL1600 Quick Reference Guide (7 pages)
- RL1600 User Manual (72 pages)
- RL2000 POWER CORD Installation Manual (1 page)
- RL2000 User Manual (124 pages)
- RL2000 Installation Manual (45 pages)
- RL2000 Quick Reference Guide (10 pages)
- RL5000 X2 Series User Manual (122 pages)
- RL5000 X2 Series Installation Manual (55 pages)
- RL5000 X2 Series Quick Reference Guide (12 pages)
- 8100/9100/97XX/RL5000 (X-SCALE/XP) (10 pages)
- 8100 Quick Reference Guide (6 pages)
- 8100 User/Installation Manual (150 pages)
- 9100 Installation Manual (50 pages)
- 9100 Quick Reference Guide (8 pages)
- 9100 User Manual (172 pages)
- 9100 Electronic Lock Installation Manual (8 pages)
- 96XX CASH DISPENSER CABINET Installation Manual (6 pages)
- 9650 Operation Manual (264 pages)
- 9600 Series Quick Reference Guide (2 pages)
- 9640 Operation Manual (265 pages)
- 9600 Operation Manual (209 pages)
- 9610 Series Quick Reference Guide (2 pages)
- 9610 Operation Manual (210 pages)
- 97XX Series Operation Manual (265 pages)
- 9710 Series Quick Reference Guide (2 pages)
- 9700 Series Quick Reference Guide (2 pages)
- 9705 Series Quick Reference Guide (2 pages)
- 9200 Installation Manual (26 pages)
- 9200 Operation Manual (179 pages)
- MAKO 2000 Operation Manual (217 pages)
- MAKO PEDESTAL Installation Manual (8 pages)
- MAKO EXTENDED CABINET Installation Manual (7 pages)
- RT2000 X2 User Manual (109 pages)
- RT2000 X2 Installation Manual (36 pages)
- RT2000 X2 Quick Reference Guide (8 pages)