Assembly instructions – Agri-Fab Tine De-Thatcher 45-02951 User Manual
Page 4
4
ASSEMBlY INSTRUCTIONS
TOOlS REQUIRED FOR ASSEMBlY
(2) 1/2" wrenches
(1) 9/16" wrench
(1) 3/4" wrench or adjustable wrench
(1) Pliers
(1) Phillips screw driver or a round punch
Before assembling the de-thatcher, lay out all of the parts
and hardware as shown on the previous pages.
The 40" dethatcher is shown in the drawings. The assembly
procedure is the same for the 48" dethatcher.
1. Assemble the lift plate to the top of the tine shield
using four 5/16" x 1" hex bolts and 5/16" nylock nuts
as shown in figure 1.
Tighten.
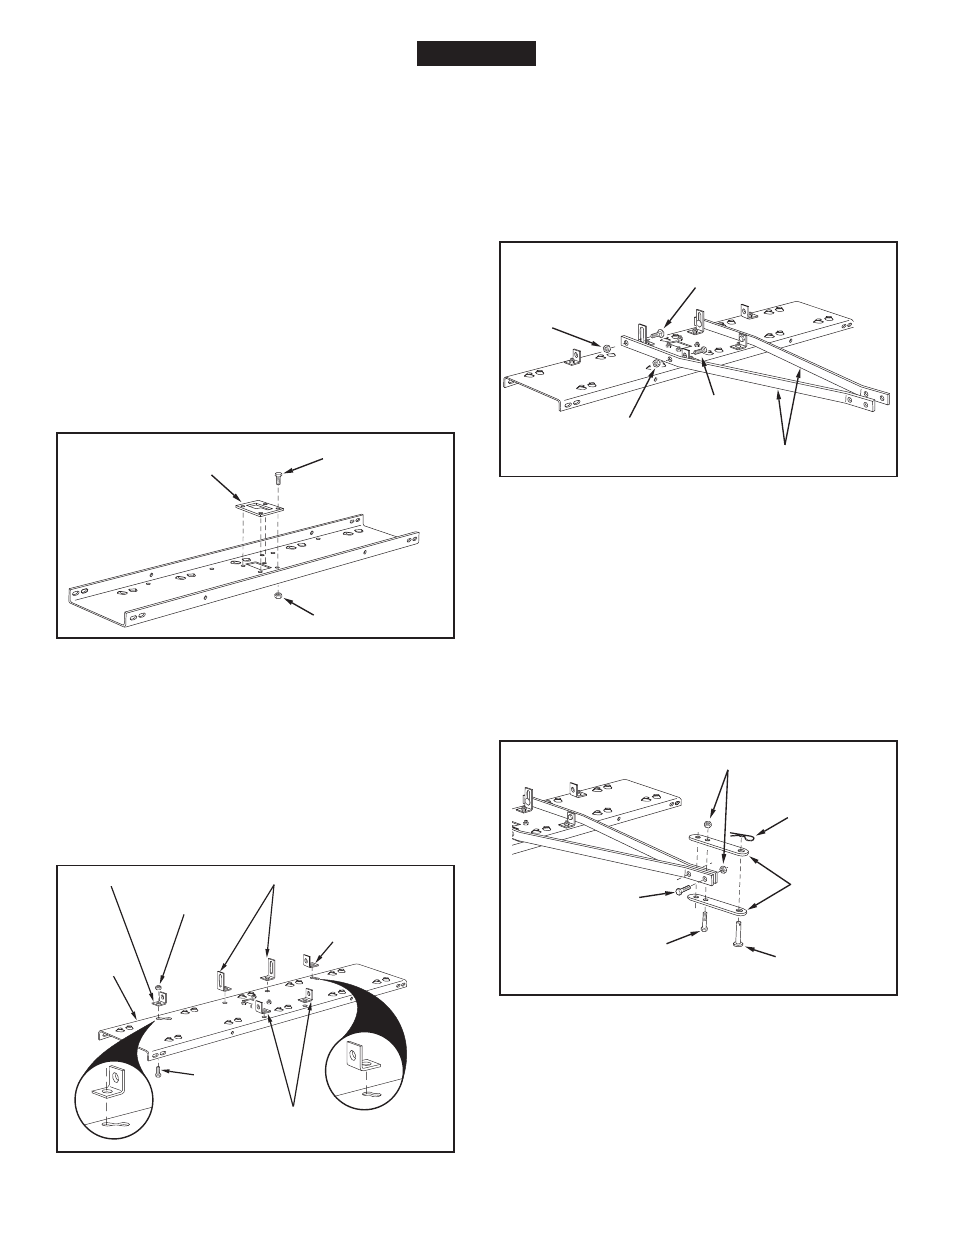
FIGURE 2
5. Fasten the hitch mount arms to the outside of the
angle brackets at the front of the tine shield. Use two
5/16" x 1" hex bolts and 5/16" nylock nuts.
Tighten
and then
loosen the nuts slightly. See figure 3.
6. Fasten the hitch mount arms to the outside of the hitch
arm mount brackets at the rear of the tine shield. Use
two 5/16" x 1" carriage bolts, and 5/16" nylock nuts.
Do not tighten yet. See figure 3.
10.
Tighten the bolts and nuts assembled in step 8.
Tighten the bolts and nuts assembled in step 7.
Tighten the bolts and nuts assembled in step 3.
Tighten the bolts and nuts assembled in step 4.
Tighten and then loosen slightly the bolts and nuts
assembled in step 5.
Tighten the bolts and nuts assembled in step 6.
FIGURE 3
7. Assemble the front ends of the hitch mount arms
together using two 5/16" x 1-1/4" hex bolts and 5/16"
nylock nuts.
Do not tighten yet. See figure 4.
8. Assemble the hitch brackets to the top and bottom of
the hitch mount arms using two 5/16" x 2" hex bolts
and 5/16" nylock nuts.
Do not tighten yet. See figure
4.
9. Assemble the 3/8" hitch pin through the hitch brackets
and secure it with a 1/8" hair cotter pin. See figure
4.
FIGURE 4
FIGURE 1
2. Turn the tine shield upside down. See figure 2.
3. Assemble two (tall) hitch arm mount brackets and
two (short) angle brackets to the bottom of the tine
shield at the rear. Use four 5/16" x 1" hex bolts and
5/16" nylock nuts.
Do not tighten yet. Position the
brackets as shown in figure 2.
4. Assemble two angle brackets to the bottom of the
tine shield at the front. Use two 5/16" x 1" hex bolts
and 5/16" nylock nuts.
Do not tighten yet. Position
the brackets as shown in figure 2.
5/16" x 1"
HEX BOLT
LIFT PLATE
5/16" NYLOCK NUT
5/16" x 1"
CARRIAGE BOLT
5/16"
NYLOCK
NUT
5/16" x 1"
HEX BOLT
5/16" NYLOCK NUT
HITCH MOUNT ARMS
5/16" NYLOCK NUT
1/8" HAIR
COTTER PIN
5/16" x 1-1/4"
HEX BOLT
5/16" x 2"
HEX BOLT
3/8" HITCH PIN
HITCH
BRACKET
ENGlISH
HITCH ARM MOUNT BRACKETS
5/16" x 1"
HEX BOLT
5/16" NYLOCK NUT
ANGLE BRACKET
ANGLE BRACKET
ANGLE
BRACKETS
REAR