0 troubleshooting, 4 maintenance schedule, 1 troubleshooting toolbars – Seed Hawk TOOLBAR 2014 User Manual
Page 28
SEED HAWK
®
2014 TOOLBAR OPERATOR’S MANUAL
SEED HAWK
®
2014 TOOLBAR OPERATOR’S MANUAL
48
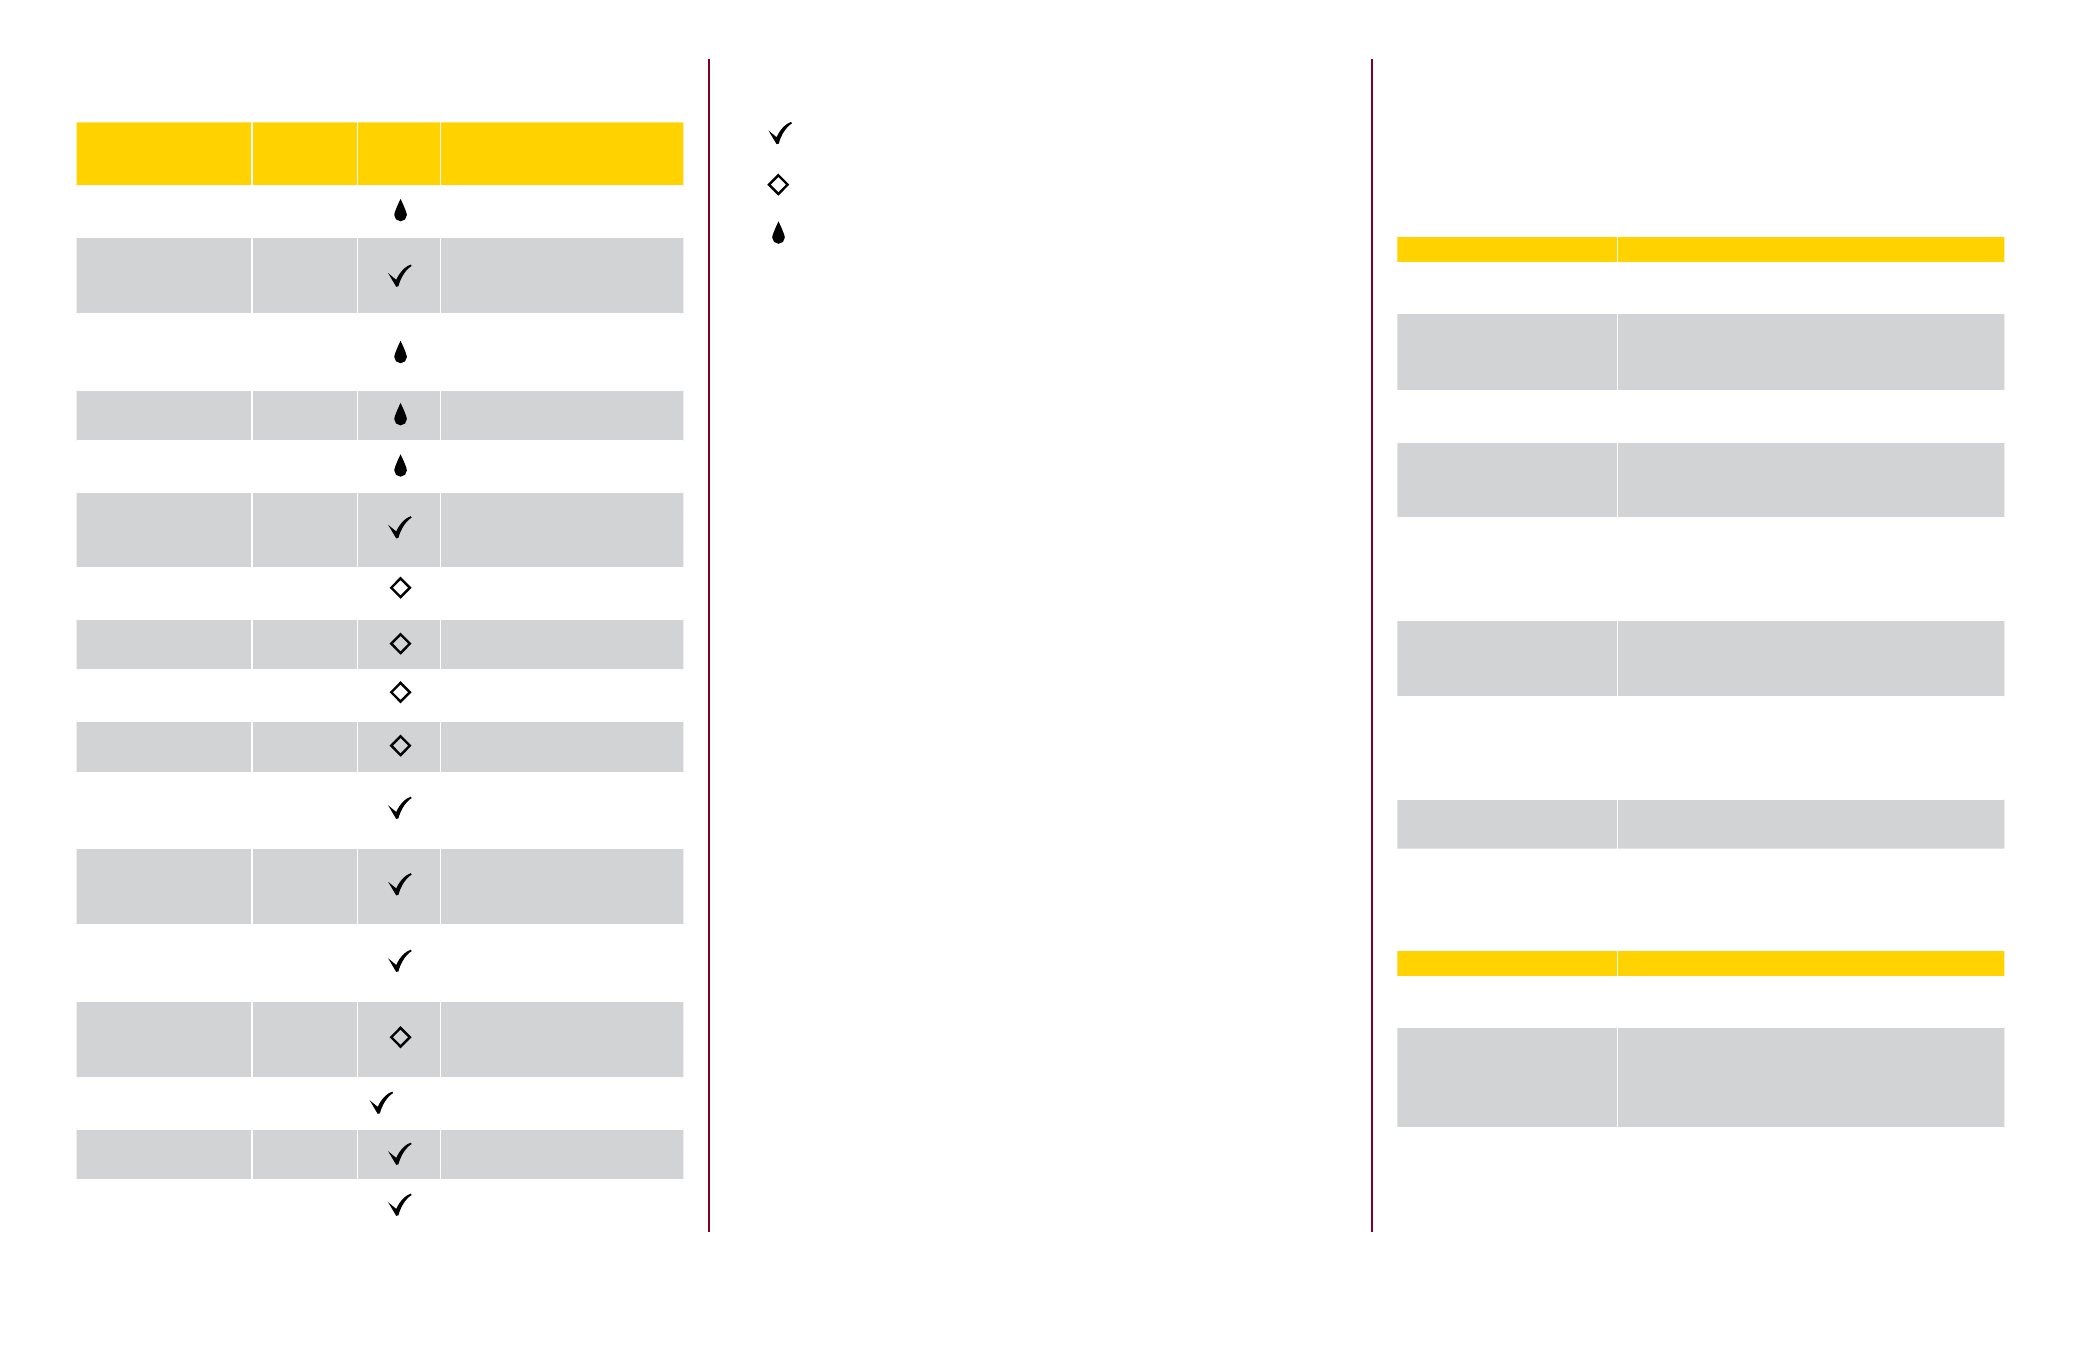
Item
Frequency
(hours)
Service
Notes
Castor Wheel Plate
grease fittings
12
Daily
2 fittings: 1-top, 1-bottom
Castor Wheel
Plate gap
100
1/8” (3mm) max
tighten castor bolt if max
exceeded
Wheel Hubs
main frame
100
100 hrs or annually re-pack
bearings or 2 pumps grease
Wheel Hubs wing
100
100 hrs or annually
Wheel Hubs
packer wheel
100
100 hrs or annually
Seed/Fertilizer
Knives & related
components
10/100
10 hrs or inspect daily, and,
100 hrs or before seeding
Liquid Fertilizer (opt)
main filter screens
100
100 hrs or before seeding, or
between chemical changes
Liquid Fertilizer (opt)
basket filter(s)
50
50 hrs or before seeding, or
between chemical changes
Liquid Fertilizer (opt)
system flush
100
100 hrs or before seeding, or
between chemical changes
Liquid Fertilizer (opt)
nozzle bodies
100
100 hrs or before seeding, or
between chemical changes
Wings down
(if configured)
100
At end of seeding season, or
when stored for long periods
of time
Ball Lock Valves
open
100
At end of seeding season, or
when stored for long periods
of time
Dump Line
open - drain in pail
100
At end of seeding season, or
when stored for long periods
of time
Dump Line
open - drain in pail
100
At end of seeding season, or
when stored for long periods
of time
Hydraulic Cylinders
cylinder seals
10 /
A/R
10 hrs or daily; inspect &
replace as required (A/R)
Tires
air pressure
10
10 hrs or daily; inflate to
proper pressure
Opener Pivot Points
100
Annually re-torque
6.4 Maintenance Schedule
A/R
Replace as
Required
A/R
Check
Clean
Lube
49
7.1 Troubleshooting Toolbars
7.0 Troubleshooting
Probable Cause
Solution
Incomplete engagement of
hydraulic quick couplers.
Inspect quick couplers to ensure complete en-
gagement.
Lock valves for shanks are
set in closed position.
Ensure that both lock valves, one at the manifold
and one at the tractor quick coupler, are set to
the open position.
No electrical power to
shank solenoid valve.
Check for broken wire in harness to solenoid
coil.
No electrical power to
shank pressure adjustment
motor.
Check for broken wire to shank pressure adjust-
ment motor.
Tractor hydraulic selector
valve not holding pressure.
Disconnect coupler at Circuit #1. If pressure is
now adjustable, repair the tractor selector valve
(make sure the lever is in working position not
float).
Solenoid coil
malfunctioning.
Activate solenoid valve manual override. If the
shank pressure responds properly, replace the
coil also check for power going to coil.
Shank solenoid valve
cartridge contaminated.
Remove solenoid valve cartridge per repair in-
structions in the maintenance section of this Op-
erator’s Manual, inspect to make sure all o-rings
are not damaged, then clean and replace.
Shank pressure gauge
malfunctioning.
Remove and replace pressure gauge if not re-
sponding to increase and decrease of pressure.
Cannot Adjust Shank Pressure
Shanks do not maintain trip/packing pressure on hilly
terrain
Probable Cause
Solution
The “IN” pressure gauge
indicates less than 1200 psi.
Inspect quick couplers to ensure complete en-
gagement.
Excessive field operating
speed.
Reduce field operating speed. Note: Trip/packing
pressure may be momentarily increased by acti-
vating hydraulic Circuit #1 while passing through
a shallow dip in the terrain.
Intermittent electrical
power supply to shank
solenoid coil.
Ensure all electrical connections are fully engaged
and no open electrical circuits to coil.