En g l is h english, Ab c – Pfister VTP-E51W User Manual
Page 3
E
N
G
L
IS
H
ENGLISH
ENGLISH
9
8
7
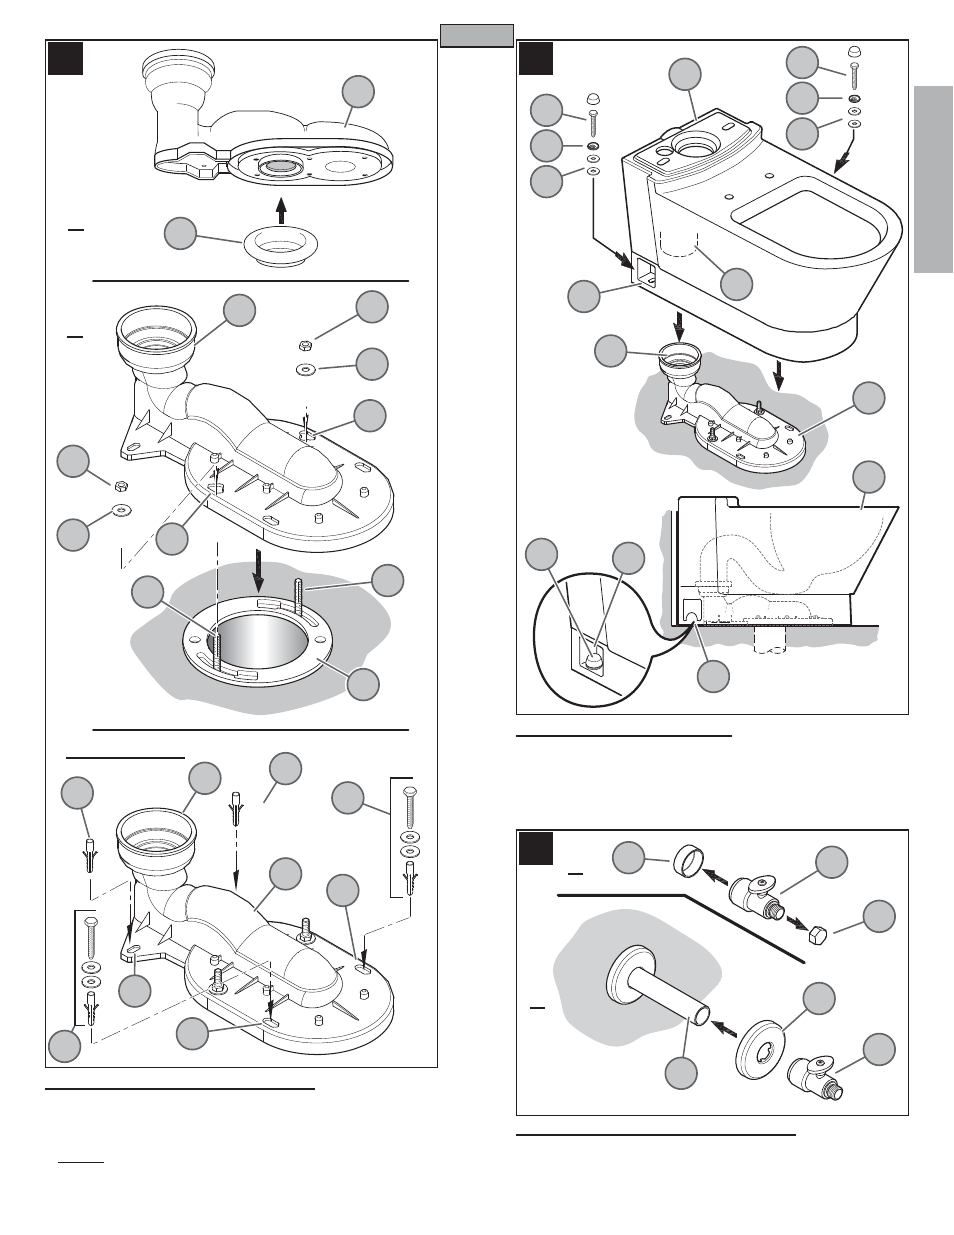
7 OUTLET CONNECTOR INSTALLATION
A. Place Wax Seal (7A) fi rmly into groove on the base of Outlet Connector (7B) as shown.
B. Place Outlet Connector (7B) onto Waste Outlet Hole (7C) with Tee Bolts (7D) passing
through Fixing Holes (7E). Place Washers (7F) and Nuts (7G) into Tee Bolts (7D).
Secure Outlet Connector (7B) by tightening Nuts (7G).
C. Optional: For additional support, mark and drill a set of Mounting Holes (7H & 7J).
Install Screws, Washers and Anchors (7K) into Holes (7H) and install Anchors (7L)
into Holes (7J).
8 TOILET BOWL INSTALLATION
Carefully set Toilet Bowl (8A) over Outlet Connector (8B) aligning the Bowl Outlet Hole
(8C) with Outlet Connector Hole (8D).
Place Washers (8E), Plastic Washer (8F) and Screw (8G) into Hole (8H) located on the
base of Toilet Bowl. Secure by Tightening Screw (8G) until Toilet Bowl (8A) adheres to
the bracket inside fi xture. Place Decorative Cap (8J) over Plastic Washer (8F) as shown.
9 WATER SUPPLY VALVE INSTALLATION
A. Remove Sleeve (9A) and Cover Nut (9B) from Supply Valve (9C).
B. Slide Flange (9D) through Water Supply Pipe (9E) until it is tight to the wall. Insert
Supply Valve (9C) into Water Supply Pipe (9E) until the end of Pipe sits fl ush inside
Supply Valve (9C).
3
9B
9C
9E
9C
9D
9A
8A
98
98
8C
8J
8D
8G
8G
8F
8F
8E
8E
8H
7B
7A
7G
7F
7E
7G
7F
7B
7D
7E
7D
8C
7H
7H
7l
7K
7J
7J
7K
7B
7L
8H
8J
A
A
B
C
OPTIONAL
B