WARN WIRELESS CONTROL SYSTEM 90287 User Manual
Page 4
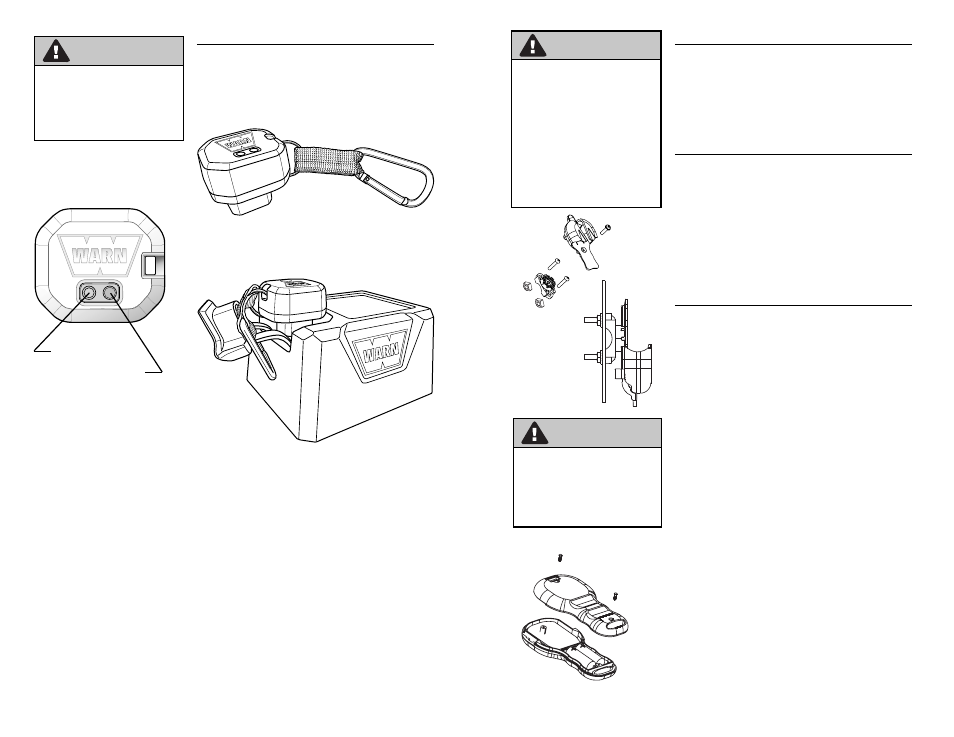
6
STEP 2: MOUNT THE RECEIVER
The receiver must be correctly installed to work properly.
The receiver must be mounted to the control pack,
allowing access to the programming button.
Mounting Steps:
1. Secure retention strap provided in kit to side of receiver
as shown in picture.
2. Plug the wireless receiver into “D” plug of control pack.
3. Loop carabiner around “D” cover plug to secure if
receiver comes unplugged.
4. Remove receiver from winch when not in use.
Programming LED
Programming button
W A R N I N G
TO PREVENT SERIOUS INJURY
OR DEATH FROM EXPLOSION:
• Do not drill into gas tank.
• Verify the area is clear behind the
mounting location before drilling.
7
STEP 3: MOUNT THE HOLSTER
•
Find a suitable location to mount the holster. The
holster can be mounted to a shaft or a flat surface.
•
The holster clamp must be mounted before assembly.
•
Do not mount over any hoses, cables, or wiring.
•
Assemble the holster as shown. Holster may be
oriented in any one of eight positions.
STEP 4: SYSTEM CHECK
1. Check winch for proper operation using a standard
remote. The wire rope should spool in and out in the
direction indicated on the switch. If winch functions
correctly, proceed to the next step. Otherwise
troubleshoot.
2. Press and hold both buttons on the wireless handheld
remote until the GREEN indicator light illuminates.
The wireless system is now active and ready to use.
3. By pressing the buttons on the remote, verify that the
winch powers IN and powers OUT properly.
REPLACING BATTERIES
If the indicator light on the handheld remote flashes RED
during winching, the batteries are low and should be
replaced.
1. Remove the two screws from the handheld remote.
2. Separate the top and bottom sections of the remote
using a coin or screw driver.
3. Remove the old batteries and dispose in accordance
with local environmental regulations.
4. Insert new alkaline batteries as shown with the positive
terminals facing the switches. Do not mix old and new
batteries.
5. Join the top and bottom sections making sure that they
snap together and rubber seal remains intact.
6. Secure with the two screws.
W A R N I N G
TO AVOID
SERIOUS INJURY OR DEATH:
• Always use caution when moving
or repositioning any vehicle controls
so as to not compromise the safe
operation of the winch or vehicle.
Select a mounting position that will
provide clearance for all vehicle
controls.
• Never attempt to bypass receiver
by connecting switches directly to
contactor.
ALWAYS KNOW YOUR WINCH:
Take time to fully read and understand
the included Installation and Operations
Guide, and Basic Guide to Winching
Techniques, in order to understand your
winch and the winching operation.
C A U T I O N