WARN ENDURANCE 12.0 XE User Manual
Page 7
WARN INDUSTRIES * WINCH
9
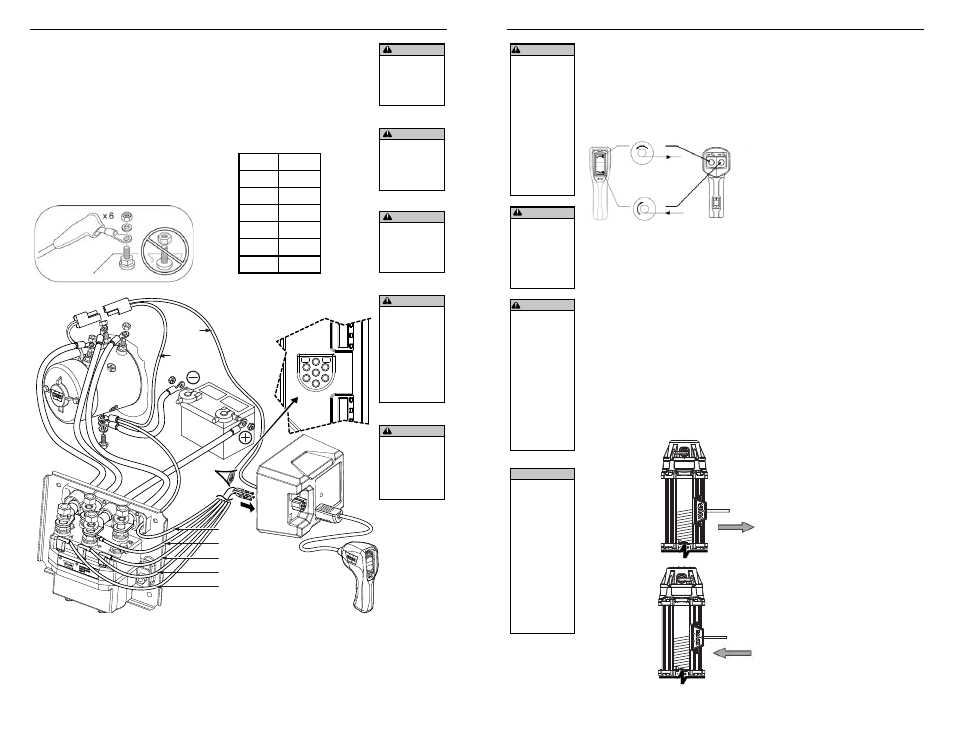
ELECTRICAL CONNECTIONS
Electrical Diagrams:
ELECTRICAL CONNECTIONS
Use the included insulating
boots on exposed connections to
prevent electrical shorting. Route
battery connection cables in areas
which will not cause them to
chafe or cut through the insulation
causing a potential short circuit.
Upon completion of
installation, check winch for proper
operation.
WARNING
Never route
electrical cables
across sharp
edges.
WARNING
Never
route
electrical cables
near parts that
get hot.
WARNING
Never
route
electrical cables
through or near
moving parts.
WARNING
Always place
the supplied
terminal boots
on wires and
terminals as
directed by
the installation
instructions.
Battery Recommendations
A fully charged battery and
good connections are essential
to the proper operation of your
winch. The minimum requirement
for a 12 volt DC battery is 650 Cold
Cranking Amps.
WARNING
Always insulate
and protect all
exposed wiring
and electrical
terminals.
Pin #
Color
1
Brown
2
White
3
Black
4
Green
5
Blue
6
Red
1
2
3
6
5
4
Black
Black
Red
Green
Brown
White
Blue
A
F1
F2
WARN INDUSTRIES * WINCH
10
OPERATING INSTRUCTIONS
Remote Control Switch
Do not leave the remote
plugged into the winch when not in
use. Leaving the remote plugged
in, may result in a dangerous
condition and/or battery drain.
Clutch Operation
When the clutch is engaged,
the gear train is coupled to the
wire rope drum and power can be
transferred from the winch motor.
When the clutch is disengaged it
is in the freespool position and the
gear train and wire rope drum are
uncoupled allowing the drum to
rotate freely.
The clutch lever, located on
the winch housing opposite the
motor, controls the clutch position.
To prevent damage, always fully
engage or fully disengage the clutch
lever.
Vertical/Horizontal Remote:
Disengaged:
Engaged:
WARNING
Never engage or
disengage clutch
if winch is under
load, winch rope
is in tension or
drum is moving.
Spooling Out
Freespooling is generally the
quickest and easiest way to spool
out wire rope. Before freespooling
wire rope out from the winch,
power out enough rope to remove
any tension the wire rope might be
under. Disengage the clutch. Then
freespool by manually spooling out
enough wire rope for the winching
operation. See The Basic Guide
to Winching Techniques for more
information.
Always leave at least 5 wraps
of rope on the drum.
Spooling In Under Load
Never exceed winch’s rated
line pull.
Power-in the wire rope evenly
and tightly on the drum. This
prevents the outer wire wraps
from sinking into the inner wraps,
binding, and damaging the wire
rope.
Avoid shock loads when
spooling, by pulsing the control
switch to take up wire rope slack.
Shock loads can momentarily far
exceed the winch and rope ratings.
Spooling In Under No Load
Spooling with an Assistant: Have
the assistant hold the hook strap
putting as much constant tension
on the wire rope as possible. While
keeping tension, the assistant
should walk toward the winch while
you operate the control switch
spooling in the wire rope. Release
the switch when the hook is a
minimum of 6 ft. (2 m) from the
fairlead opening.
Spool in the remainder for
storage as directed below.
Spooling Alone: Arrange the wire
rope to be spooled so it will not
kink or tangle when spooled. Be
sure any wire rope on the drum is
tightly and evenly layered. Spool
enough wire rope to complete the
next full layer on the drum.
Tighten and straighten the layer.
WARNING
Never operate
winch with less
than 5 wraps
of rope around
the drum. Rope
could come
loose from the
drum, as the
rope attachment
to the drum is
not designed to
hold a load.
WARNING
Always
take time to
fully understand
your winch and
the winching
operation by
reviewing The
Basic Guide
to Winching
Techniques
included with
your winch.
NOTICE
Do Not power-
out rope more
than 30 ft.
without allowing
the winch to cool
for 20 minutes
before powering
rope back in.
Instead, place
the clutch in
freespool and
pull the rope off
by hand.