Steelcraft Automotive 230940 3 ROUND SIDE BAR User Manual
Steelcraft Automotive For the car
3" SIDEBAR
2000-06 TOYOTA TUNDRA ACCESS CAB
Page 1 of 3
1/17/12 (DP)
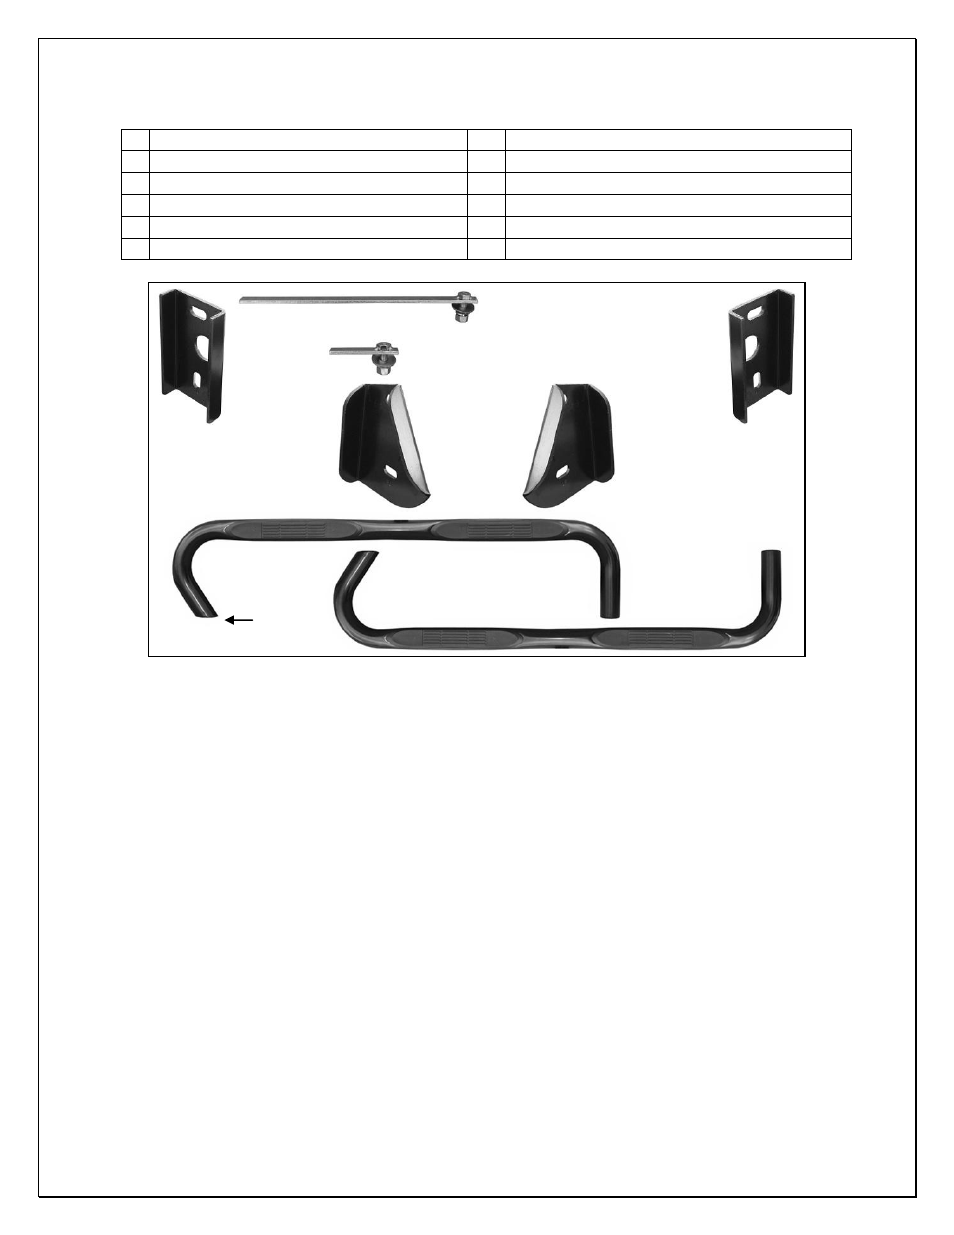
PARTS LIST:
1 Driver/Left Sidebar
1 1/2" x 1-1/2" x 15" Long Bolt Plate
1 Passenger/Right Sidebar
1 1/2" x 1-1/2" x 4" Short Bolt Plate
1 Driver/Left Front Mounting Bracket
10 1/2" x 1-3/8" OD x 3/32" Flat Washers
1 Passenger/Right Front Mounting Bracket
8 1/2" Lock Washers
1 Driver/Left Rear Mounting Bracket
4 1/2" Hex Nuts
1 Passenger/Right Rear Mounting Bracket
6
1/2” x 2” Hex Bolts
PROCEDURE:
1. REMOVE CONTENTS FROM BOX. VERIFY ALL PARTS ARE PRESENT. READ INSTRUCTIONS
CAREFULLY BEFORE STARTING INSTALLATION.
2. Start installation from under the driver side of the vehicle. Locate the rectangular factory hole in the side
of the frame behind the front body mount, (Figure 1).
3. Select the 1/2" x 15" Long Bolt Plate, (Figure 3B). NOTE: Use the Long Bolt Plate for driver side
installation and the Short Bolt Plate for passenger side front bracket installation. From the back of the
frame, insert the bolt plate into the open end of the boxed frame, (Figure 2), and up to and out of the
rectangular opening in the outside of the frame, (Figure 3A). Line up the top hole in the driver front
Mounting Bracket with the Bolt Plate. Attach the Bracket to the Bolt Plate with (1) 1/2" Flat Washer, (1)
1/2" Lock Washer and (1) 1/2" Hex Nut, (Figure 4). Hand-tighten only at this time.
4. Move towards the rear of the vehicle and locate the factory hole in the frame below the rear body
mount, (Figure 5). Select the driver side Rear Mounting Bracket. From the back of the frame channel,
insert (1) 1/2" x 2" Hex Bolt with (1) 1/2" Flat Washer through the factory hole. Line up the horizontal top
slot in the Bracket with the Hex Bolt, (Figure 6). Attach the Rear Mounting Bracket to the Hex Bolt with
the supplied (1) 1/2" Flat Washer, (1) 1/2" Lock Washer and (1) 1/2" Hex Nut, (Figure 7). Hand-tighten
hardware only at this time.
5. Carefully unwrap the driver Sidebar. Bolt the Sidebar to the Mounting Brackets using the included (2)
1/2
” x 2” Hex Bolts, (2) 1/2” Lock Washers and (2) 1/2” Flat Washers, (Figure 8). IMPORTANT: Curved
end of Sidebar will bolt to front Bracket and 90-degree bent end will bolt to rear Bracket. Leave loose at
this time.
6. Level and adjust Sidebar properly and tighten all hardware.
7. Repeat Steps 2
– 6 to install the passenger Sidebar onto the vehicle. NOTE: Use the provided (1) 1/2"
x 4" Bolt Plate to secure the passenger side Front Bracket to the frame channel.
Passenger/Right Front
Mounting Bracket
Passenger/Right Rear
Mounting Bracket
Driver/Left Rear
Mounting Bracket
Driver/Left Front
Mounting Bracket
Bolt Plate (Pictured with hardware)
Long Bolt Plate (Pictured with
hardware)
Passenger/Right
Sidebar
Driver/Left Sidebar
Front