B. commissioning the system, Part 9, Service/maintenance procedures – HTP PHE199-119S User Manual
Page 24: A. shutdown procedures, Part 9 – service/maintenance procedures
24
LP- 204 REV. 3.25.14
drain valves open, run the low flow diaphragm pump until the HTF begins flowing into the empty bucket. Quickly switch the hose from
the empty/return bucket to the bucket containing the glycol mixture. Continue to circulate the fluid using the pressure pump until the
bubbling has stopped and the air has been purged.
After charging the collector loop, shut the lower drain valve (#10) and let the pressure pump drive up the loop pressure to the
appropriate level (in glycol systems, in the range of 25 psi). To more accurately calculate the proper pressure, measure the height of
the solar collector above the solar water heater and divide this number by 2.31. Then add 20 psi to this number.
The pressure in a glycol loop should not exceed 45 PSI when the system is in operation on a sunny day. Contact your solar contractor if
the loop exceeds this threshold.
After pressurizing the solar system, run the circulator and allow the air to purge out of the air vent. Once purged, monitor pressures and
check for leaks before insulating pipes. Pressure should then be about 25 PSI.
Above ground piping must be insulated with a wall thickness of at least ¾”. A 1”
thickness is required in areas prone to hard freeze conditions. Above ground
insulation must be protected from ultraviolet degradation. All piping must be
supported at a maximum interval of 10 feet and the piping supports must not
crimp or compress the insulation.
B. COMMISSIONING THE SYSTEM
After the collector loop has been charged and pressure is around 25 PSI (check
gauge on solar heat exchanger) set the solar control to the desired settings.
Solar controls come with default settings that will work in most installations. If it
is a cloudy day, the circulator pump may have to be activated manually. Once
the pump is running and the system is fully purged of air, set the control to the
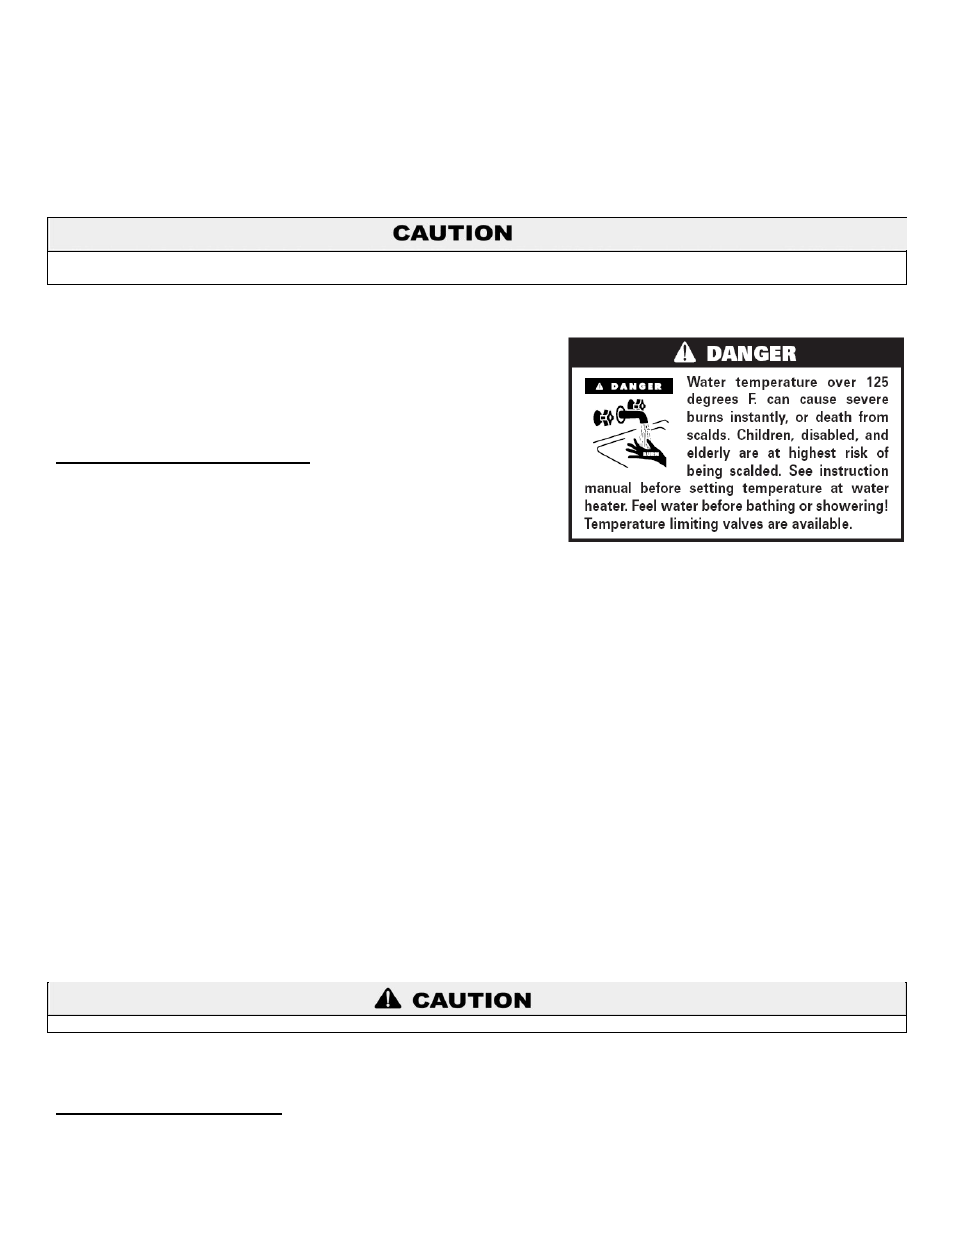
desired settings. It is recommended not to set the storage tank high limit set point any lower than 160
o
F. A lower set point could lower
the performance of the solar water heater and cause overheating of the collector system. You must install a mixing valve on the hot
water outlet, as temperature within the storage tank can cause injury.
PART 9 – SERVICE/MAINTENANCE PROCEDURES
A properly maintained solar water heating system can provide years of dependable, trouble-free service. It is suggested that a routine
preventive maintenance program be established and followed by the end user with the solar contractor. Listed below is the
maintenance check list that outlines the primary components of the solar system that need to be inspected annually.
1. HTF Glycol (if used)
– It is very important that the quality of the glycol is maintained to avoid damage to the collector loop and related
components. See the manufacturer’s data sheet for further details.
2. Water quality can affect the operation of the solar heat exchanger over time. In very hard water areas, it is recommended to drain
(#14) a few gallons of water from the bottom of the tank to keep the water heater free of sediment.
3. Clean and inspect the solar collector (#1). Dirt or film may settle on the surface and affect performance. Check collector supplier for
cleaning procedures.
4. Check piping and component insulation for deterioration.
5. Check solar tank sensors and the boiler back
up aquastat sensors (#’s 15 and 23). Assure these sensors are secure and have not
moved or loosened.
6. Inspect the T&P valve (#19) on the water heater. Lift the release handle lever. Make sure discharge is directed to an open drain.
Never open the pressure relief valve while the system is in operation or hot water is present. Allow to cool prior to opening.
7. The area near the water heater must be kept free of flammable liquids such as gasoline, paint thinners, adhesives, or other
combustible materials.
A. SHUTDOWN PROCEDURES
The solar system is designed to be easily isolated for emergency repairs or routine maintenance. To isolate the water heater, simply
shut down supply water shut off valve (#24) which isolates the water heater from the pressurized cold water supply.