Quick start guide for harmoni g3, Remove processor card – Sonnet Technologies HARMONi G3 Processor Upgrade Card User Manual
Page 4
4
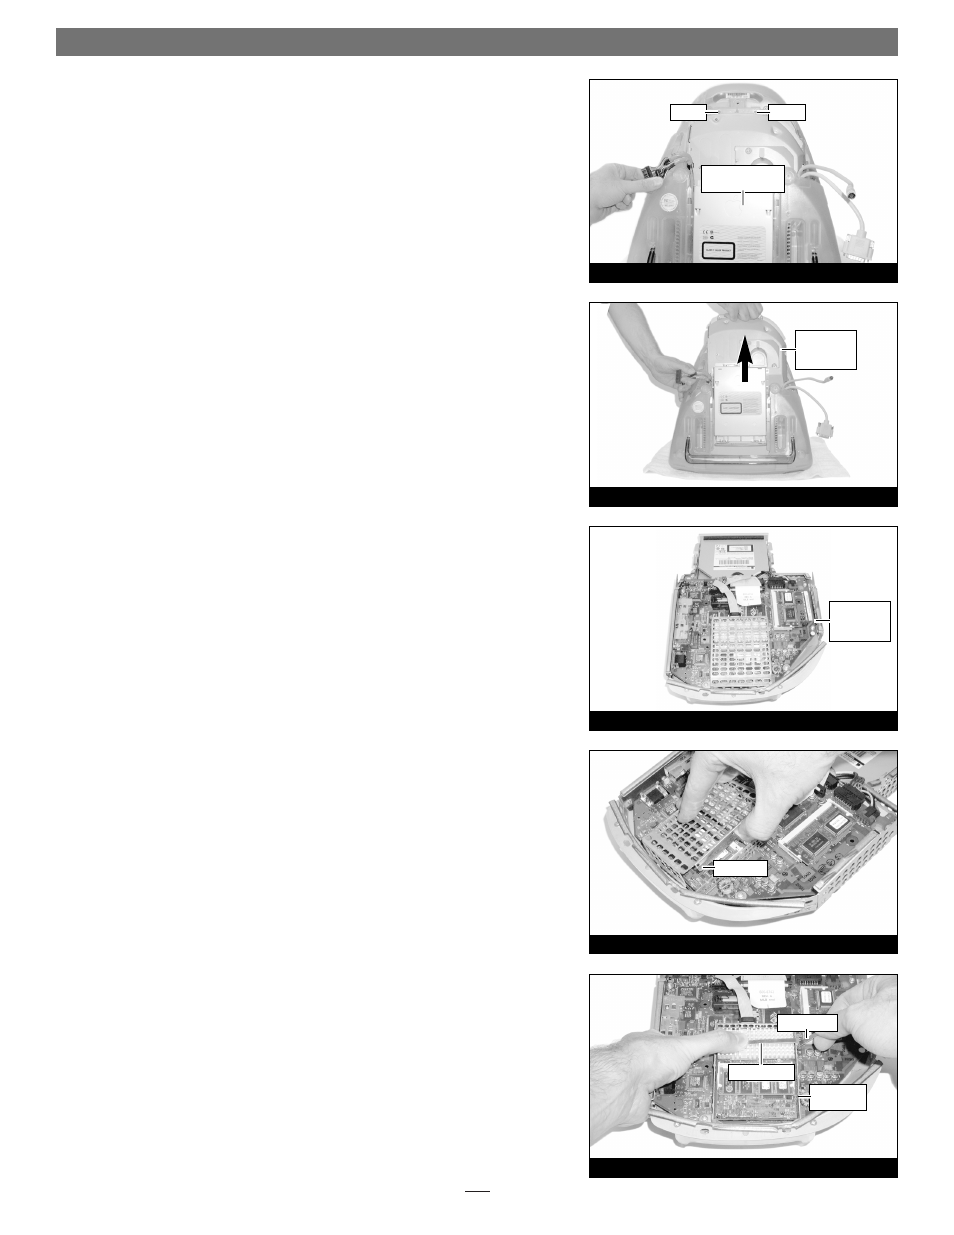
4. Move the cables off to the sides of the logic board/drive assembly (Figure 6).
5. Locate the two screws (#2 Phillips) inside the plastic handle (Figure 6), then
remove them; set the screws aside.
6. Using the handle, carefully lift the logic board/drive assembly out of the
computer (Figure 7); when it becomes possible, use both hands to support the
assembly.
7. Set the logic board/drive assembly on a clean, flat surface, with the curved
portion of the assembly facing you (Figure 8).
Remove Processor Card
1. Unhook a long edge of the metal shield covering the processor card, then
remove it from the logic board/drive assembly (Figure 9).
2. While grasping the underside the logic board/drive assembly and the top of
the heat sink clip with one hand, use a flat blade screwdriver to carefully
unhook the heatsink clip from the processor card shield (Figure 10). Remove
the clip and set it aside.
Quick Start Guide for HARMONi G3
Figure 10
Figure 9
processor
card shield
top shield
heat sink clip
screwdriver
Figure 7
Figure 8
Figure 6
logic board/drive
assembly
logic
board/drive
assembly
logic
board/drive
assembly
screw
screw
- Aria extreme CardBus (4 pages)
- Aria extreme CardBus and PCI Card Windows (86 pages)
- Pro Dual CompactFlash Adapter ExpressCard_34 (2 pages)
- Presto Gigabit Ethernet Pro ExpressCard_34 Quick Start (2 pages)
- Presto Gigabit Ethernet Pro ExpressCard_34 (2 pages)
- FireWire 800, FireWire 800 Pro, FireWire_USB, and 4-Port USB 2.0 ExpressCard_34 (2 pages)
- USB 3.0 ExpressCard_34 (3 pages)
- Tempo SATA Pro 6Gb ExpressCard_34 (2 pages)
- Tempo edge SATA Pro 6Gb ExpressCard_34 (2 pages)
- Tempo SATA Pro ExpressCard_34 (8 pages)
- Tempo SATA ExpressCard_34 (2 pages)
- Tempo SATA Edge ExpressCard_34 (2 pages)
- Tempo SATA 6Gb_s ExpressCard_34 (2 pages)
- Tempo edge SATA 6Gb_s ExpressCard_34 (2 pages)
- Allegro FW400 FireWire PCI Adapter Card (2 pages)
- Allegro FW800 FireWire 800 PCI Adapter Card (2 pages)
- Allegro USB 2.0 PCI Adapter Card (2 pages)
- Aria extreme PCI Adapter Card (4 pages)
- Aria Extreme N PCI Adapter Card (5 pages)
- Presto Gigabit PCI Adapter Card (2 pages)
- Presto Gigabit Pro PCI Adapter (3 pages)
- Presto Gigabit Server Dual-Channel Gigabit Ethernet PCI-X Adapter Card (3 pages)
- Tango 2.0 FireWire_USB 1.1_2.0 PCI Combo Adapter Card (6 pages)
- Tempo HD (With or Without Drive) Mac Version (6 pages)
- Tempo HD (With or Without Drive) Mac Version (9 pages)
- Tempo HD (With or Without Drive) Windows Version (12 pages)
- Tempo SATA X4i Serial ATA Host Adapter Card (7 pages)
- Tempo SATA X4P Serial ATA Host Adapter (8 pages)
- Tempo-X eSATA 4+4 8-Port Serial ATA PCI-X Host Adapter Card (8 pages)
- Tempo-X SATA 4+4 8-Port Serial ATA PCI-X Host Adapter Card (6 pages)
- Tempo-X eSATA 8 8-Port Serial ATA PCI-X Host Adapter Card (7 pages)
- Tempo Trio PCI Adapter Combo Card (Mac) (9 pages)
- Tempo Trio PCI Adapter Combo Card (Windows) (16 pages)
- Tempo Ultra ATA66 Host Adapter (43 pages)
- Tempo ATA100 PCI Host Adapter Card (6 pages)
- Tempo RAID66 ATA Hardware RAID Controller Card (6 pages)
- Tempo RAID133 ATA Hardware RAID Controller Card (8 pages)
- Tango PCIe Quick Start Guide (2 pages)
- Allegro USB 3.0 PCIe (3 pages)
- Presto Gigabit PCIe Basic Gigabit Ethernet Adapter Card (3 pages)
- Presto Gigabit PCIe Pro Gigabit Ethernet Adapter Card (4 pages)
- Presto Gigabit Pro PCIe (4 pages)
- Presto Gigabit Server PCIe (4 pages)
- Presto Gigabit PCIe Server (4 pages)
- 3Gb_s RAID Controller Card (6 pages)