Warning – Rivers Edge RE703 Outpost User Manual
Page 2
TREESTANDS
10' Outpost
™
Tower w/ Blind Kit (RE703)
Page
HuntRiversEdge.com
HuntRiversEdge.com
800-450-EDGE (3343)
rivers edge Treestands are engineered with you the hunter in mind.
We appreciate your purchase of one of our world class tower stands.
Follow these few simple instructions and your stand will provide you
many years of trouble-free pleasure. Instructions should be kept in a
safe place and reviewed at least annually.
If for any reason you have a problem with your product,
DO NOT
return to the retailer, contact the rivers edge customer service
department at 800-450-eDGe (3343) for assistance.
SELECTING A GOOD LOCATION
Assemble this product only in areas that meet the following criteria! No over-
head power lines near area; open, flat, level, dry ground of sufficient size to
allow for assembly, uprighting and climbing. Approximate area needed for
this is 14’ X 24’.
ASSEMBLY INSTRUCTIONS
Tools needed – two 7/16” wrenches, two 1/2” wrenches and a tape measure
to measure level ground area needed & cross brace length.
NOTE: It is highly recommended that as much assembly as possible be
done in a garage setting because of hardware amount and time involved!
Allow two-four hours for assembly.
IMPORTANT ASSEMBLY TIP: Do not tighten any nut and bolt combina-
tions completely until all parts are assembled together! Finger tighten
plus one turn of a wrench only! This will temporarily hold the lock nut
on the bolt while helping alignment of all parts! After all parts are as-
sembled together, all nut & bolt combinations must be completely
tightened.
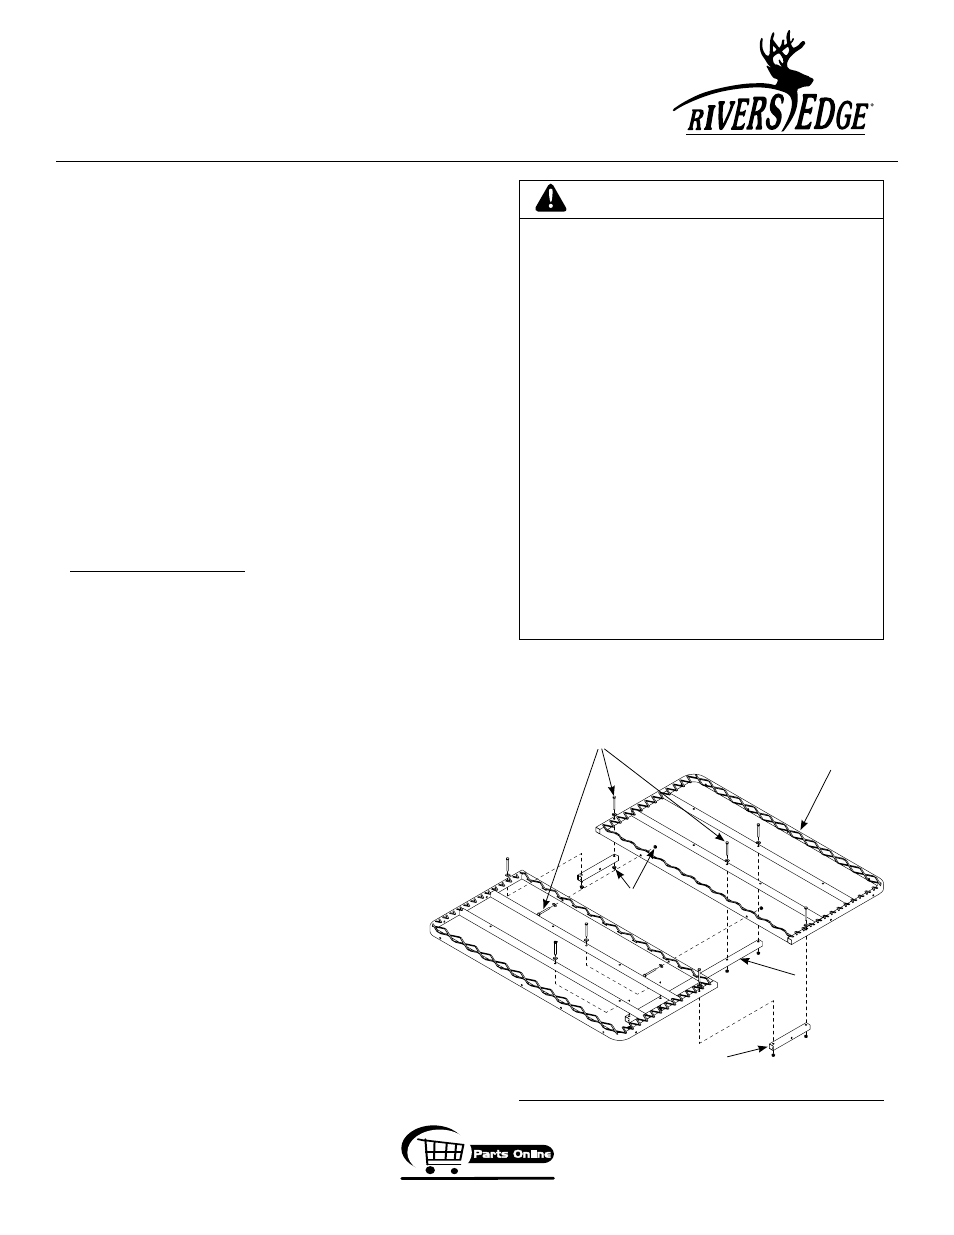
1. Attach the (2) platforms (TWr15) together using (2) provided 1/4-20 x
2-1/2" bolts, locknuts and washers.
SEE fIGURE 1. DO NOT tighten all
nut & bolt assemblies completely!
2. Attach the center platform joiner tube (TWr32) to the bottom of assembled
platforms using (4) provided 1/4-20 x 2-1/2" bolts, locknuts and washers.
SEE fIGURE 1.
3. Attach (2) outside platform joiner tubes (TWr31) to the bottom of
assembled platforms using (4) provided 1/4-20 x 2-1/2" bolts, locknuts
and washers.
SEE fIGURE 1.
wARNING
READ, UNDERSTAND AND fOLLOw ALL ASSEMBLY,
INSPECTION, MAINTENANCE, & USE INSTRUCTIONS
PROVIDED BEfORE EACH USE. fAILURE TO fOLLOw
ALL wARNINGS AND INSTRUCTIONS COULD RESULT
IN SERIOUS INJURY OR DEATH.
ALL ASSEMBLY MUST BE DONE BY THREE PEOPLE IN
THIS ORDER AT GROUND LEVEL BEfORE UPRIGHT-
ING. DO NOT CRUSH TUBING wHEN TIGHTENING BOLT
ASSEMBLIES! IDENTIfY AND fAMILIARIZE YOURSELf
wITH ALL PARTS BEfORE YOU START. A BOLT IDENTI-
fICATION CHART CAN BE fOUND IN THE BACK.
DO NOT POSITION THIS PRODUCT ON A SLOPE, UNLEV-
EL, OR wET GROUND. IT MAY TIP OVER AND YOU COULD
BE SERIOUSLY INJURED OR DEATH MAY OCCUR!
GROUND SHOULD BE SUCH THAT GROUND STAKES
(NOT INCLUDED) CAN BE DRIVEN INTO THE GROUND
THROUGH HOLES PROVIDED IN fOOT PADS. THIS wILL
HELP PREVENT TOwER fROM TIPPING OVER IN STRONG
wINDS. YOU wILL NEED TO MAKE (4) GROUND STAKES,
STAKES SHOULD BE 3/8” ROD X 4” LONG.
IT IS HIGHLY RECOMMENDED THAT YOU PURCHASE
AND USE THE UNIVERSAL TIE-DOwN KIT wITH GROUND
STAKES (RE758) wITH THIS PRODUCT TO HELP PREVENT
PERSONAL INJURY AND/OR PRODUCT DAMAGE fROM
TIPPING OVER IN STRONG wINDS!
1/4-20 x 2-1/2" bolts
locknuts
fIGURE 1
cutout view
of platforms
center platform
joiner tube
outside platform joiner tubes