Basic installation – Aastra Telecom 9116 User Manual
Page 6
5
Basic Installation
Basic Installation
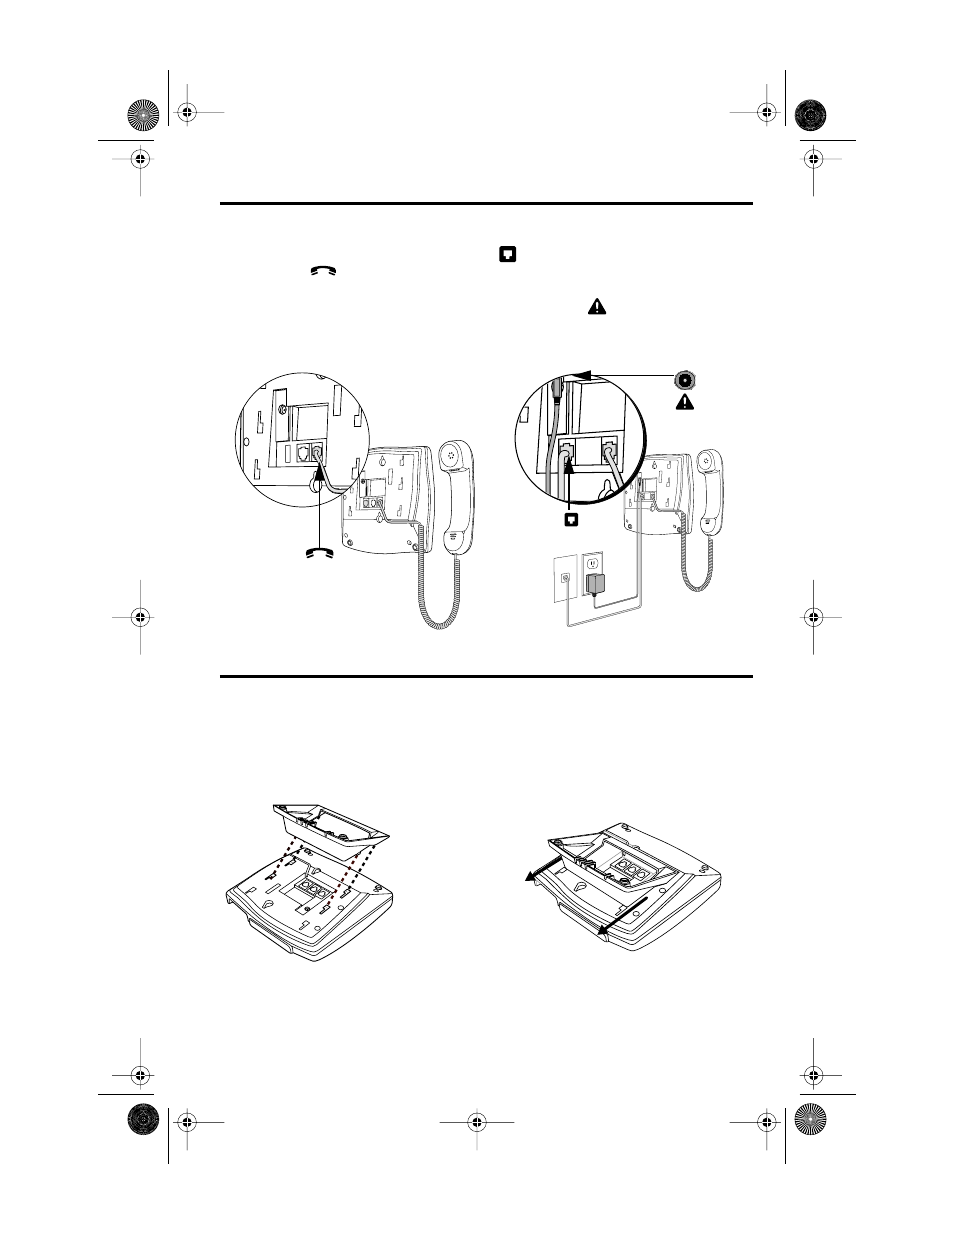
1. Connect the Handset
2.Connect the Cords
Attach one end of the coiled handset cord
to the handset and the other end to the
handset port
on the back of the tele-
phone.
Route the handset cord along the groove
leading off the side of the telephone as
shown in the illustration.
Plug one end of the telephone cord into
on the back of the telephone and the
other end to the phone jack.
Connect the small end of the power
adaptor to the
port on the back of the
telephone, and plug the other end into
an electrical outlet.
3. Attach the Stand for Desk Mount
If you plan to mount the telephone on the wall, you do not need to attach the stand.
Lower the stand as shown below into
the slots on the back of the telephone.
Slide the stand in the direction shown
below until it clicks into the locked position.
1
9116 E UG.fm Page 5 Thursday, April 17, 2003 4:16 PM
- 57i CT IP Phone (166 pages)
- 9112I (22 pages)
- AastraLink RP 500 (16 pages)
- SIP 480I CT (504 pages)
- 6739I (32 pages)
- 9110 (15 pages)
- AastraLink RP 6753i RP (2 pages)
- AASTRA 9133 I (60 pages)
- 5i Series (16 pages)
- 9316CW (2 pages)
- AastraLink RP 6757i CT RP (110 pages)
- SIP 57I CT (818 pages)
- 8009 (2 pages)
- IP Phone (210 pages)
- 9112i IP PHONE (47 pages)
- 9133i (USER GUIDE) (53 pages)
- 536M (2 pages)
- 480i (54 pages)
- 9143i (72 pages)
- M760E (60 pages)
- 57I (2 pages)
- 6755i (276 pages)
- MERIDIAN 9417CW (52 pages)
- Telephone 9110 (2 pages)
- 9116LP (28 pages)
- 53i IP Phone (102 pages)
- AastraLink RP 6751i RP (2 pages)
- 57i IP Phone (142 pages)
- 480i CT (Release 1.4.2) (18 pages)
- VentureIP (48 pages)
- M6320 (48 pages)
- AastraLinkRP IP-PBX (2 pages)
- Aastra 51i (9 pages)
- SISIP 57I (602 pages)
- 480i SIP (21 pages)
- 57I CT (40 pages)
- POWERTOUCH 390 (2 pages)
- 6751I (128 pages)
- 470 (27 pages)
- 53I (124 pages)
- 55i IP Phone (152 pages)
- Dialog 4000 (4 pages)
- IP TELEPHONES 51I (2 pages)
- 9417CW (52 pages)
- 6757I (276 pages)