SPP Pumps Auto Prime Q Series - QI200 User Manual
Page 12
Manual No/Rev
W72-008E / 9
Operators Instructions for
AUTOPRIME Q Range Pump Unit
Our policy is one of continuous improvement and we reserve the right to alter specifications at any time
Page 12 of 18
drive plate and the rubber coupling.
Remove the old belts, if still present.
Check both sets of pulleys for any signs of
wear or contamination with oil or grease,
clean or replace if necessary.
Note: Gauges are available for checking the
pulley grooves.
Fitting new belts to worn or
damaged pulleys will lead to
premature belt failure.
Carefully fit the new belts. These will be a
tight fit and care must be taken not to
damage them by using excessive force.
Replace the three screwed pins to connect
the rubber coupling to the engine drive plate.
Replace the belt tensioner and re-tension the
belts as in Section 7.9.
Replace the drive belt guard.
Run the pump for 30 minutes and recheck
the belt tension as in Section 7.9
For new belts, check the tension after the
first 50 hours of operation.
Under tensioning of the belts will
lead to premature belt failure.
Over-tensioning of the belts may
lead to premature failure of belts, or
the
vacuum
pump
clutch
or
bearings.
7.11 Priming Tank Air Filter Maintenance
The priming air filter is mounted in the filter
housing on top of the priming tank. Access is
from left hand side of pump.
With the pump stopped, open the volute
drain valve to ensure that priming tank
pressure is dissipated. Unscrew the three
knobs holding the end cap and remove the
end cap. Ensure that the sealing O-ring is
not lost. Undo the knurled knob retaining the
filter and carefully withdraw the filter
element. Inspect for mechanical damage or
blockage. Ensure that the central stud
holding the filter has not been loosened or
bent.
Washing in water and drying before re-use
should clean stainless steel filters. If white
fibrous filter is fitted, this must be replaced.
Replace filter with care and do not over
tighten the retaining knob as this can
damage the filter.
AIR FILTER
BODY
AIR
FILTER
RETAINING
KNOB
AIR FILTER
END CAP
AIRFILTER1
Ensure that the O-ring is in position in the
end cap and replace the end cap. Replace
the three knobs and tighten.
7.12 Priming Tank Knitmesh Replacement
The priming tank is mounted at the front of
the pump behind the moulded panel.
Drain the volute. Disconnect suction and
delivery hoses. Remove the suction quick
release connection if required for easier
access or handling purposes. Disconnect
the battery negative lead.
.
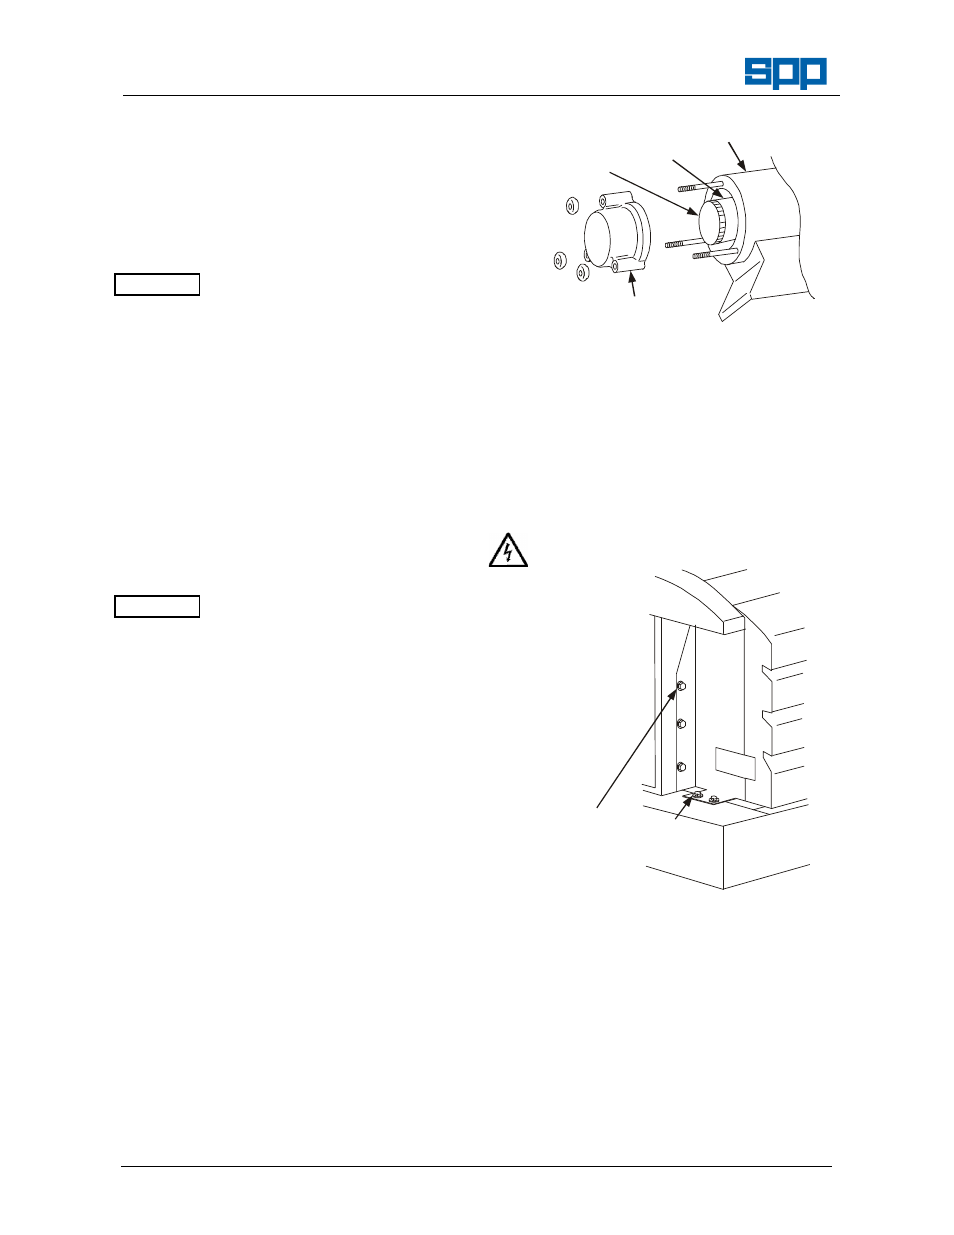
FRONT PANEL
SUPPORT BOLTS
(FIVE EACH SIDE)
FPA
NEL
Open the doors and remove the ten bolts
(five each side) holding the front panel
support to the canopy frame (six off) and
tank shroud (four off). Lift off the front panel
and its support
Loosen the clamps that hold the vacuum
pipe to the solenoid valve and the top of the
vacuum pump. Disconnect the vacuum pipe.
ATTENTION
ATTENTION