PASCO OS-8524 APERTURE ACCESSORIES User Manual
Page 2
2
Aperture Accessories
012-05882A
®
➁
Repeat this procedure using a smaller aperture to show
that “stopping down” gives a greater depth of field
(i.e., the image will stay in focus over a larger range of
screen positions).
Spherical Aberration Attachments
The spherical aberration attachments press into any lens
holder in the Basic Optics System (OS-8515).
Suggested Experiments:
Show spherical aberration of a lens
➀
Use the 100 mm lens to focus the image of the lighted
object on the screen.
➁
Put the outer-mask spherical aberration attachment on
the lens and refocus the image by moving the screen.
Note which way the screen must be moved to bring
the image into focus.
➂
Put the center-mask spherical aberration attachment
on the lens and refocus the image by moving the
screen. Note which way the screen must be moved to
bring the image into focus. Are the rays that pass
through the outer edge of the lens bent more or less
than those that pass through the center portion of the
lens?
Show color aberration
➀
Use the 100 mm lens with the center-mask to focus
the image of the lighted object on the screen.
➁
Move the screen away from the lens until the image is
blurred. What color does the image appear to be?
➂
Move the screen toward the lens passing through the
focused point until the image is blurred again. Now
what color does the image appear to be? Which color
(red or blue) is bent more as it passes through the
outer part of the lens?
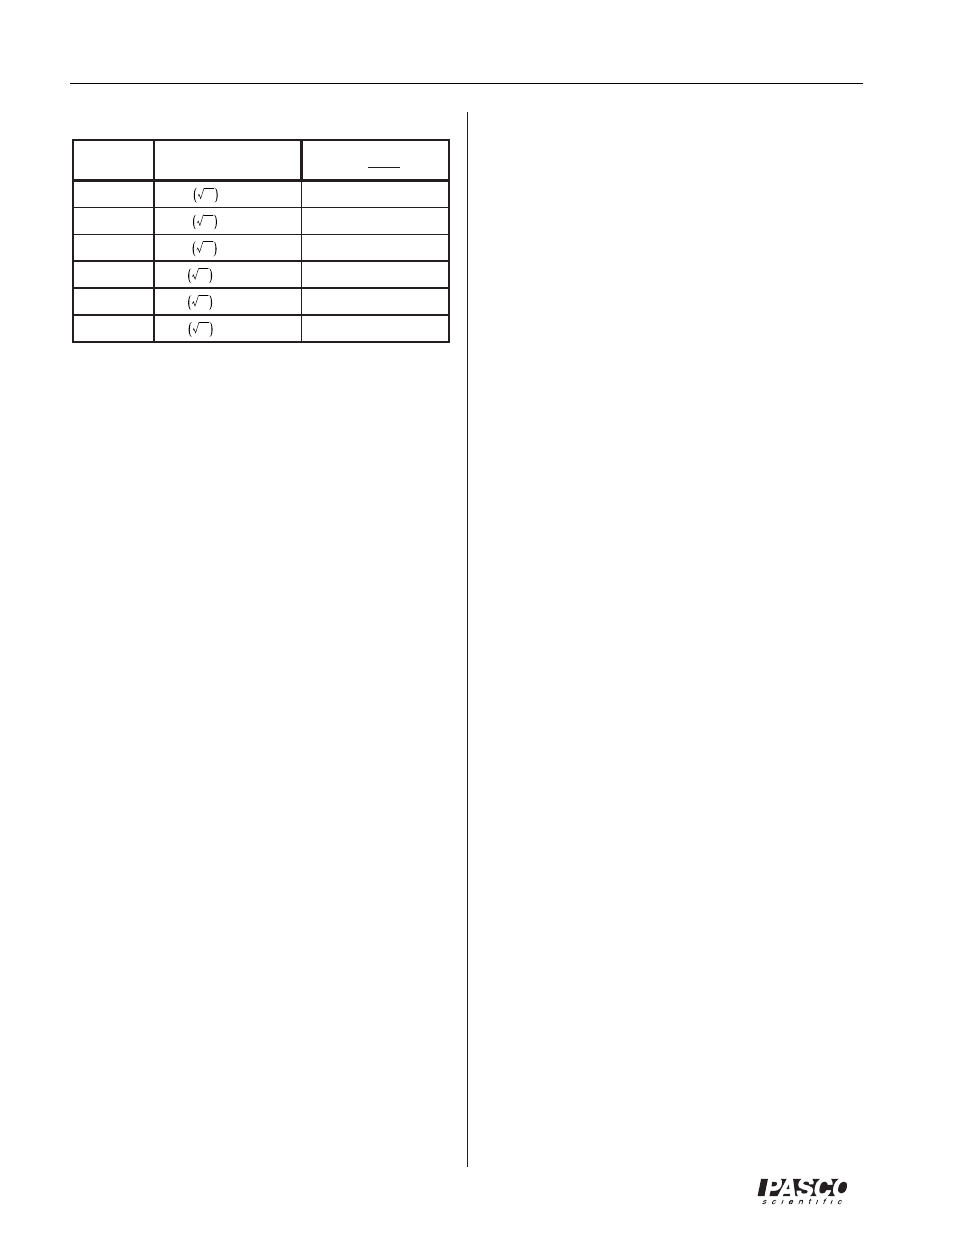
The ƒ values are chosen to be powers of the square root
of 2. This disk is designed to be used with a lens of focal
length 100 mm (10 cm). See Table 1 for the correspond-
ing ƒ-stops and diameters.
Using the Aperture Disk
To mount the aperture disk to the optics bench (OS-
8515), press the mounting ring into the lens holder that
contains the 100 mm focal length lens (see Figure 1). To
select different apertures, the disk is rotated until it clicks
into place with the desired aperture positioned at the cen-
ter of the lens.
Suggested Experiments for the Aperture Disk:
Show that the intensity of an image is halved with each
incremental decrease in aperture size
➀
Using the 100 mm lens with the aperture disk set on
its largest aperture (ƒ-4), focus the image of the
lighted object on the screen.
➁
Use a digital photometer (such as SE-9087) at the po-
sition of the screen to determine the intensity of the
image. Or use a comparative photometer (such as OS-
8520) at the position of the screen (with the screen re-
moved) and find the intensity relative to a second light
source.
➂
Select the next smaller aperture (ƒ-5.6) and measure
the new light intensity to show that the light intensity
is half of the previous value. Repeat this for all the ap-
ertures.
Show how the aperture size affects the depth of field
➀
Put the screen 50 cm from the light source. Use the
100 mm lens with the ƒ-4 aperture to focus the object
on the screen. Check how far the screen can be moved
without noticeably changing the sharpness of the im-
age.
Table 1: Aperture Disk Specifications
ƒ-stop
ƒ-stop calculation
aperture diameter
=
XXX
ƒ-4
ƒ-5.6
ƒ-8
ƒ-11
ƒ-16
ƒ-22
25.0 mm
17.7 mm
12.5 mm
8.8 mm
6.3 mm
4.4 mm
2
4
= 4.00
2
5
= 5.66
2
6
= 8.00
2
7
= 11.31
2
8
= 16.00
2
9
= 22.63
100 mm
ƒ-stop