Constructing the vertical accelerometer, Step 0, Step 1 – PASCO ME-9426A Constructing the Horizontal Accelerometer User Manual
Page 2: Step 2, Step 3, Step 4, Step 5, 2 g step 6, 2 g 1 g step 7, Step 8
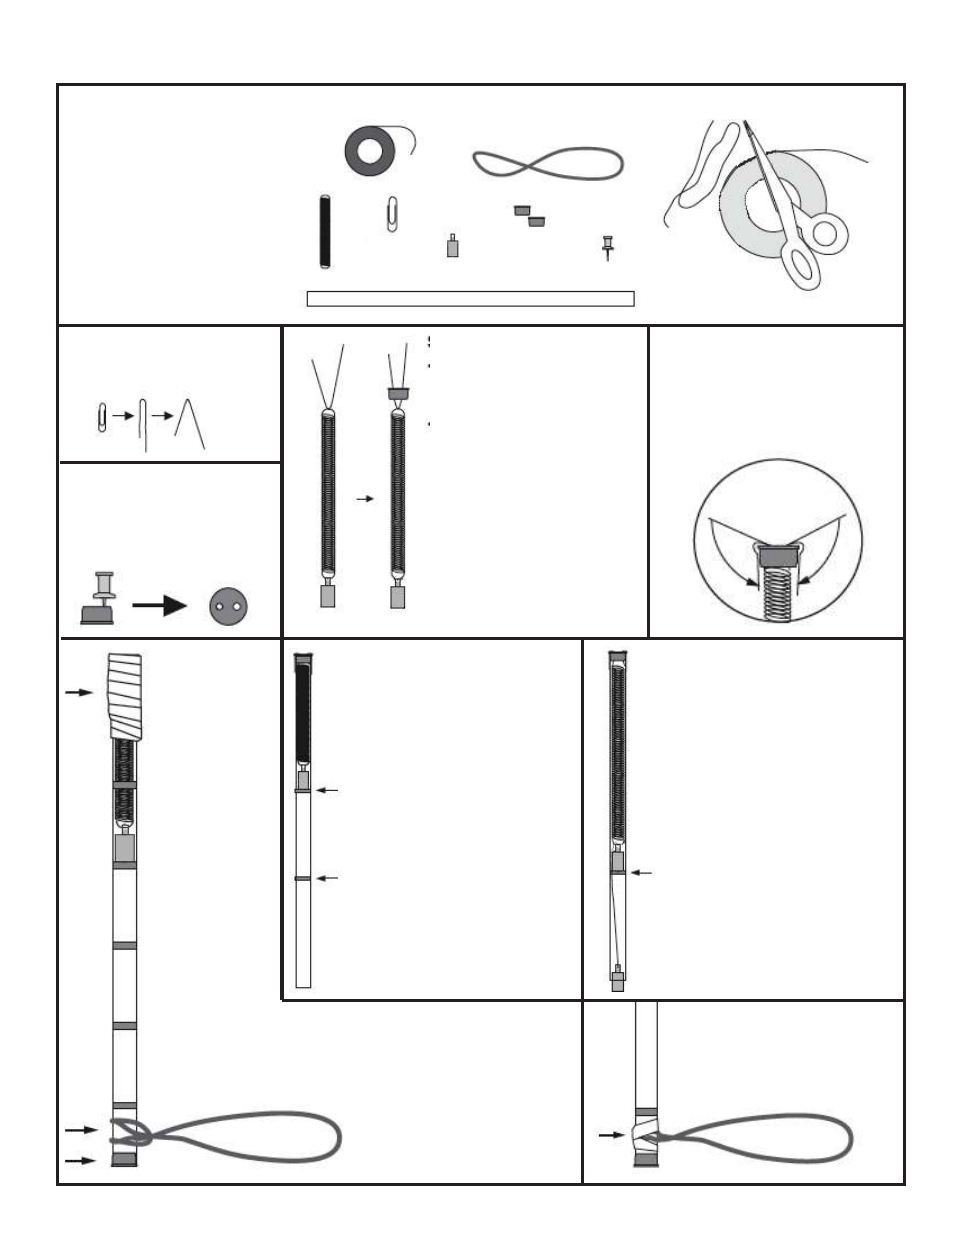
Constructing the Vertical Accelerometer
Step 0
Materials Needed:
• Plastic tube
• Spring
• Red tape
• Rubber band
• Paper clip
• Weight
• End cap
• Masking tape,
scissors, and wire
Red tape
Rubber band
End caps
Pushpin
Plastic tube
Weight
Paper clip
Spring
Masking tape,
scissors, and wire
Step 1
• Unbend the paper clip
and form a “V” with it.
Step 2
• Use the pushpin to poke
two holes in one of the plastic
end caps from the inside.
Step 3
• Attach the weight to the
spring and suspend both
from the paper clip.
• Push the ends of the paper
clip through the holes in the
end cap.
Step 4
• Bend the ends of the paper clip
outward forming “ears”.
• Bend the ends of the paper clip
downward as shown.
Step 5
• Tie a second weight to a
piece of fine wire, and hook
this wire onto the spring as
well.
• Insert the spring, weights,
and end cap into the plastic
tube. Squeeze the ends of
the paper clip against the
sides of the plastic tube.
• Hold the tube vertically.
Place a piece of red tape
around the tube, aligned
with the bottom of the
weight which is firmly
attached to the spring.
2 g
Step 6
• Remove the second
weight (the one held on by
the wire).
• Place a second piece of
red tape around the tube,
aligned with the bottom of
the remaining weight.
• You now have the 2 g
and 1 g points marked.
Place additional pieces of
tape around the tube, with
equal spacing, to mark the
0 g, 3 g, and 4 g levels..
2 g
1 g
Step 7
• Wrap masking
tape around the
ends of the
paper clip.
Step 8
• Place the other end
cap on the bottom of
the tube.
• Secure the rubber
band to the bottom of
the tube as a lanyard.
Step 9
• Tape the rubber band
to hold it in place.
PASCO scientific