Bulb replacement, Bulb alignment, Primary colors – PASCO OS-8470 Basic Optics Light Source User Manual
Page 3
®
M o d e l N o . O S - 8 4 7 0
B u l b R e p l a c e m e n t
3
Primary Colors
Place the light source flat on a sheet of white paper and turn
the wheel so that the colored bars are in the lowest position.
Red, green, and blue parallel beams are projected onto the
paper or a vertical surface placed in front of the light source.
Use a prism or convergent cylindrical lens to combine all three
colors. Block one of the beams with a pencil to see the combi-
nation of two colors.
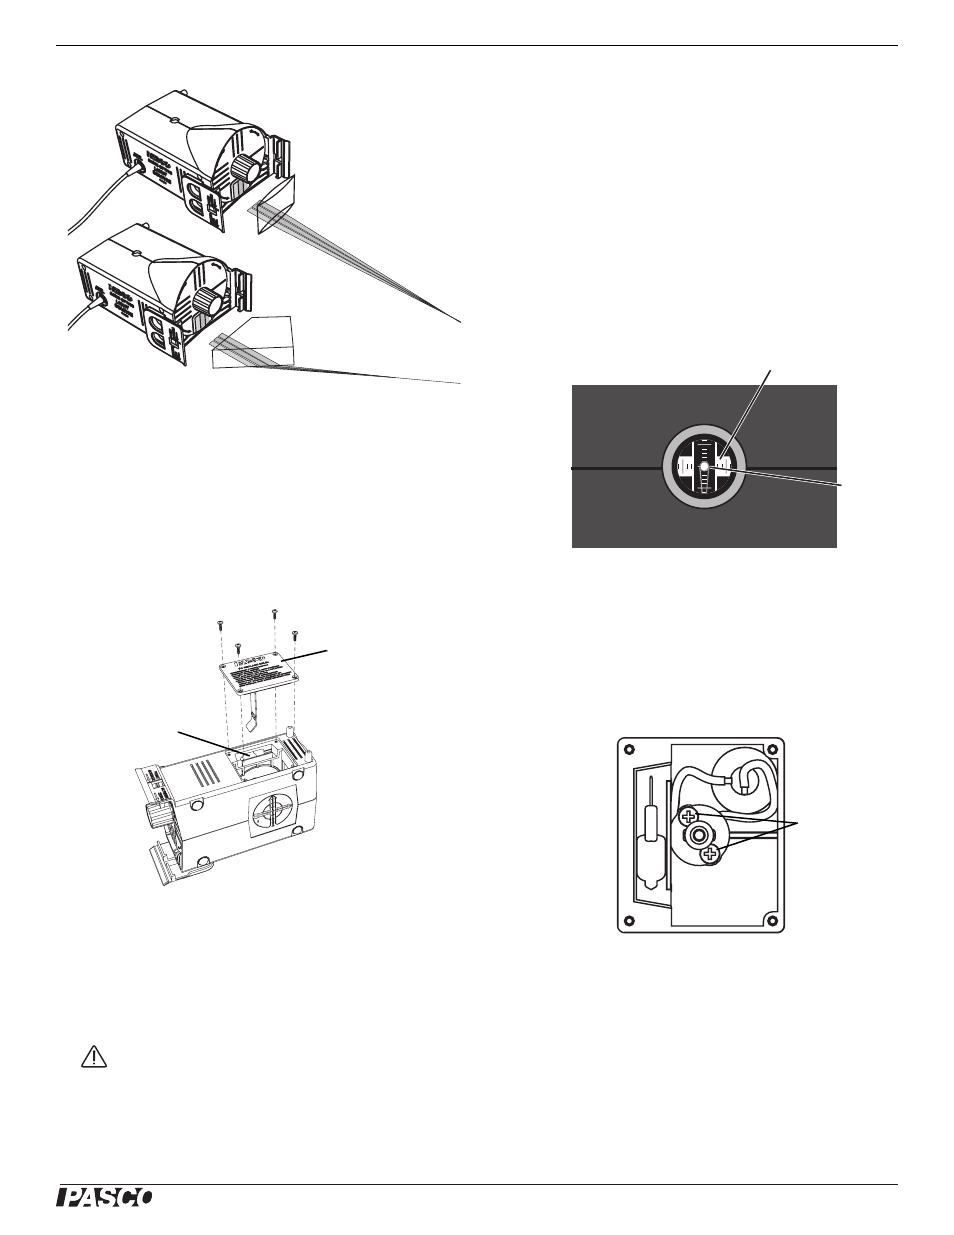
Bulb Replacement
The light source includes a spare bulb, which is stored under
the access cover. Use a #0 Phillips screwdriver to unfasten the
screws securing the access cover and remove the cover.
Remove the old bulb by pulling it straight out. Install the new
bulb by pushing it straight into the socket. Align it approxi-
mately with the round opening in the case; then proceed to the
alignment instructions below.
Caution: If the burned-out bulb has been in use recently, it may
be hot. Allow it to cool before removing it.
Important: Handle the replacement bulb with clean tissue paper and
avoid touching it. Oils transferred from your skin to the bulb may cause
the glass to overheat and break. If the new bulb has been touched,
clean it with alcohol before installing it.
Bulb Alignment
To produce parallel rays, the filament of the bulb must be
located on the imaginary line running through the center of the
round opening and the center of the crossed-arrow object
screen.
To check the alignment, with the light source un-powered,
look into the unit through the round opening. Viewed end-on,
the filament looks like a small loop. Sight through the filament
to the center of the crossed-arrow object (viewed from the
back). If the filament does not appear in the center of the
round opening, then it is out of alignment. It is helpful to tape
a pair of crossed threads over the opening to mark its center.
View into round opening showing the properly aligned filament
To adjust the alignment, use a Phillips screwdriver to turn the
screws on the light bulb socket. To move the filament up or
down (as you are looking down through the access hatch) turn
both screws equally in the same direction. To move the fila-
ment side-to-side, turn the screws by the same amount in
opposite directions.
View into access hatch
Spare bulb
Access cover
Back of object screen
Filament
Alignment screws