Accel 2 – Mallory Ignition Mr_Gasket 52000 SERIES MAGNETIC BREAKERLESS DISTRIBUTORS User Manual
Page 2
www.mrgasket.com
ACCEL
2
assembly out of the distributor about two inches. If necessary,
push the pick up plate back down. Now you have better access
to remove the retainer clip on the bottom of the advance
assembly, see figure #5. Install a stop bushing and reinstall the
retainer clip. If you have disassembled the shaft and advance
assembly, reassemble them in the reverse order.
Locking out the Mechanical Advance
You may also decide to run the ACCEL 52000 distributor with a
locked out mechanical advance. To do so, first remove the cap
and rotor. Remove the advance springs and weights from the
advance assembly. Remove the roll pin from the drive gear,
remove gear and thrust washer from the shaft (if so equipped).
Make sure not to misplace the roll pin and thrust washer. Lift the
shaft assembly out of the distributor about two inches. Remove
the retaining clip and the stop advance bushing, if any are
installed. Rotate the shaft assembly 180 degrees and
reposition the stop bushing pin into the small hole in the pickup
plate using a slight amount of pressure. This is a press fit to
maintain stable timing. See figure #6. Reinstall the thrust
washer, drive gear and roll pin.
Vacuum Advance
The vacuum advance operates independently from the
mechanical advance. The vacuum chamber is factory adjusted to
installed length. How quickly the mechanical advance comes in
(or the slope of the advance curve) is controlled by the stiffness of
the springs. The stiffer the springs used, the slower the rate of
the mechanical advance. The advance stop bushing controls the
total amount of mechanical advance. The larger the size of the
bushing used, the smaller the amount of total mechanical
advance. You can also lock out the mechanical advance
altogether if you wish.
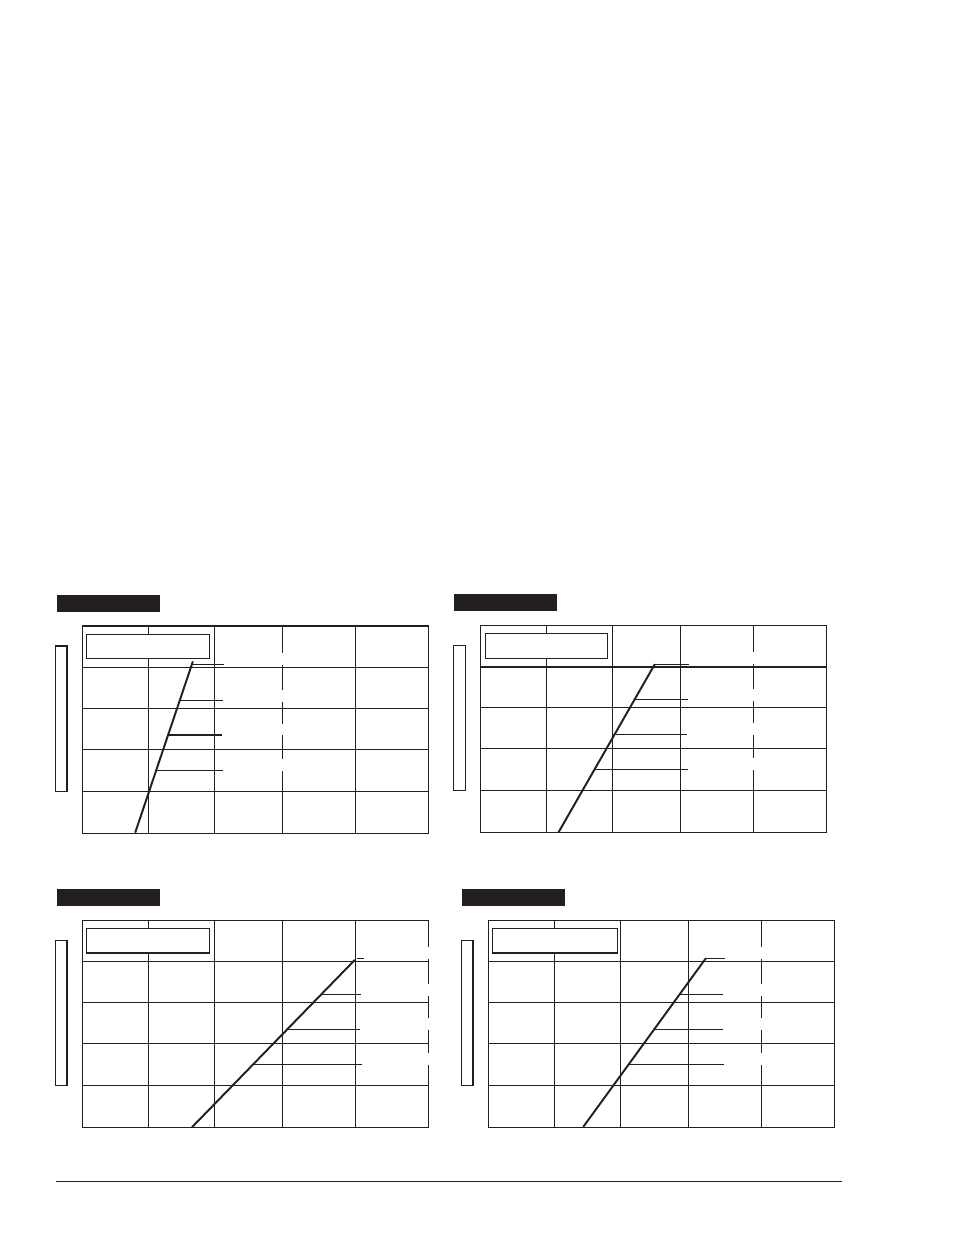
The ACCEL 52000 distributors are equipped from the factory with
two heavy gold springs. The parts kit included contains three
addition pair of colored springs; black, silver and light weight
gold. See advance curve charts Figures 2A through 2D.
Selecting and Changing the Advance Stop Bushing
There are three different advance stop bushings are supplied in a
kit with the ACCEL 52000 distributor. No stop bushings are
factory installed which yields approximately 22° degrees of
advance. If a different amount of mechanical advance is desired,
see advance stop bushing chart figure #3 to select the stop
bushing that meets your requirements. To change the mechanical
advance stop bushing, first remove the cap and rotor. Although it
is not absolutely necessary, it is easier if you also remove the
advance springs and weights from the advance assembly, see
figure #4 and also remove the roll pin from the drive gear, remove
gear and thrust washer from the shaft (if so equipped). Make
sure not to misplace the roll pin and thrust washer. Lift the shaft
Curve w/2 Light Gold Springs-
Set Initial Timing at 800 RPM
25
20
15
10
5
0
C
R
A
N
K
S
H
A
F
T
D
E
G
R
E
E
S
0
1,000
2,000
3,000
4,000
5,000
RPM
With No Stop Bushing
With Black Stop Bushing
With Silver Stop Bushing
With Gold Stop Bushing
FIGURE 2A
Curve w/2 Silver Springs-
Set Initial Timing at 1,200 RPM
25
20
15
10
5
0
C
R
A
N
K
S
H
A
F
T
D
E
G
R
E
E
S
0
1,000
2,000
3,000
4,000
5,000
RPM
With No Stop Bushing
With Black Stop Bushing
With Silver Stop Bushing
With Gold Stop Bushing
FIGURE 2B
Curve w/2 Black Springs-
Set Initial Timing at 1,600 RPM
25
20
15
10
5
0
C
R
A
N
K
S
H
A
F
T
D
E
G
R
E
E
S
0
1,000
2,000
3,000
4,000
5,000
RPM
With No Stop Bushing
With Black Stop Bushing
With Silver Stop Bushing
With Gold Stop Bushing
FIGURE 2C
Curve w/2 Heavy Gold Springs-
Set Initial Timing at 1,400 RPM
25
20
15
10
5
0
C
R
A
N
K
S
H
A
F
T
D
E
G
R
E
E
S
0
1,000
2,000
3,000
4,000
5,000
RPM
With No Stop Bushing
With Black Stop Bushing
With Silver Stop Bushing
With Gold Stop Bushing
FIGURE 2D