Liquid Controls T650N SERIES User Manual
Page 11
Sponsler, Inc.
T650N Series Cryogenic Truck Totalizer
pg
11 DOC# MN-650
System Setup and Installation
The Temperature Compensator has been calibrated for the RTD and tested in the factory. Once the unit is installed,
the product selector switch must be set to the correct position for the product being delivered.
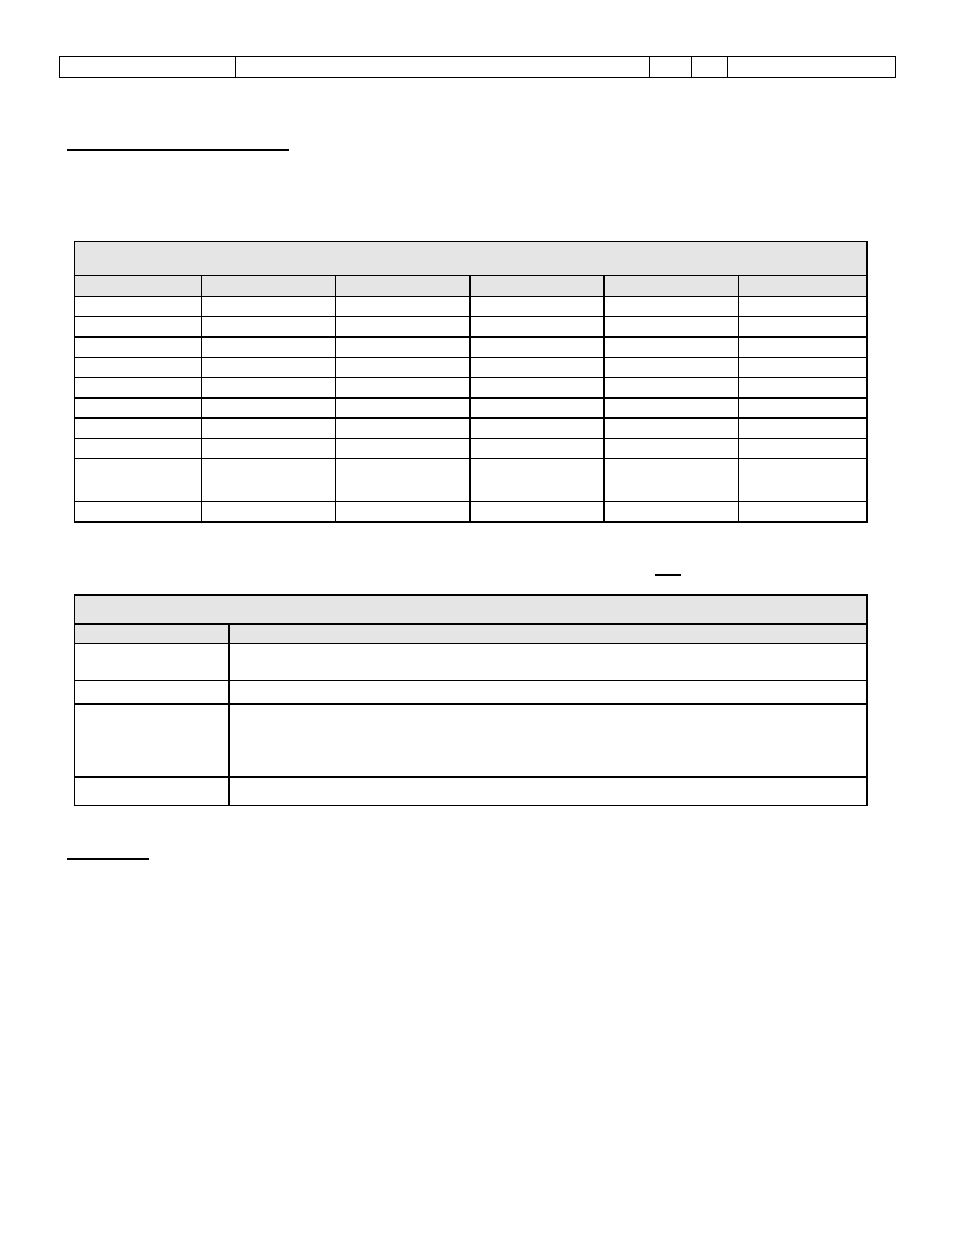
The following table summarizes the various positions of the product selector switch and the corresponding product.
MODEL 820 OPTION ‘IC’ EPROM
POSITION
PRODUCT
LOW LIMIT
REF TEMP
ALARM TEMP
HI LIMIT
0
Oxygen
-200.00
-183.11
-168.00
-140.50
1
Nitrogen
-210.00
-195.930
-182.00
-155.30
2
Argon
-189.00
-186.046
-168.00
-140.50
3
CO
2
-40.050
-16.388
-6.30
-6.30
4
N
2
O
-51.087
-34.679
15.30
15.30
5
Calif. CO
2
-40.00
-25.817
-7.00
-7.00
6
MAPP
-17.871
15.384
50.50
15.50
7
LPG
-40.00
15.384
49.50
49.50
8
Calibrate &
switch test
9
Self test
The following table summarizes the option jumpers and their functions. NOTE: Only one jumper should be installed!
OPTION JUMPERS
Jumper
Description
A
(*do not install) Momentarily shorted in probe calibration mode starts the dip switch
verification test.
B
When this jumper is installed the unit will not totalize if the alarm LED is on.
C
When the alarm LED is on... If the jumper is installed the compensator reverts to the
‘alarm’ temperature and corresponding TCF for the product selected. If the ‘C’ jumper is
not installed, the compensator will set the correction factor for no compensation (TCF =
1.00) and will output the actual temperature without modification.
D
When jumper is installed the pump control time delays will be activated.
Calibration
To calibrate the unit, first set the product selector switch to position 8 (calibrate). Next replace the temperature probe
with a 100 ohm .1 resistor and observe the (-) and (+) LED’s on the PCB. If the (-) LED is on, turn the calibrate pot
clockwise until the LED goes off. If the (+) LED is on, turn the calibrate pot counterclockwise until the LED goes off.
Once both LED’s are off, the unit is calibrated properly and is ready for use.
NOTE: Be sure to set the product selector switch back to the correct position for the product being delivered