Iom-148 – Cashco Premier User Manual
Page 11
IOM-148
11
LOAD
VENT
CLOSE
OPEN
Rotation
4. Loosen all casing (1,2) fl ange bolting (27, 28,
41, 42) two revolutions. Pry apart the casings
(1,2) if “stuck” together.
5. In one revolution increments loosen all op-
pos ing nuts (41, 42) until the short bolting
(27, 41) disengages and can be removed.
Con tin ue loosening extension nuts (42) in
the alternating, one revolution pattern ensur-
ing that the cas ings (1, 2) are being “pushed
apart”, until the extension bolting (28, 42) is
disengaged and removed.
6. Lift the upper casing (1) upwards and away
from the lower casing (2) and set upper case
(1) aside.
VENT
LOAD
OPEN
Rotation
CLOSE
CCW-TO-OPEN
ATC-FO
(DIRECT)
Push Down-to-Close
CCW-TO-OPEN
ATO-FC
(REVERSE)
Push Down-to-Open
CCW-TO-OPEN
ATC-FO
(DIRECT)
Push Down-to-Close
CCW-TO-OPEN
ATO-FC
(REVERSE)
Push Down-to-Open
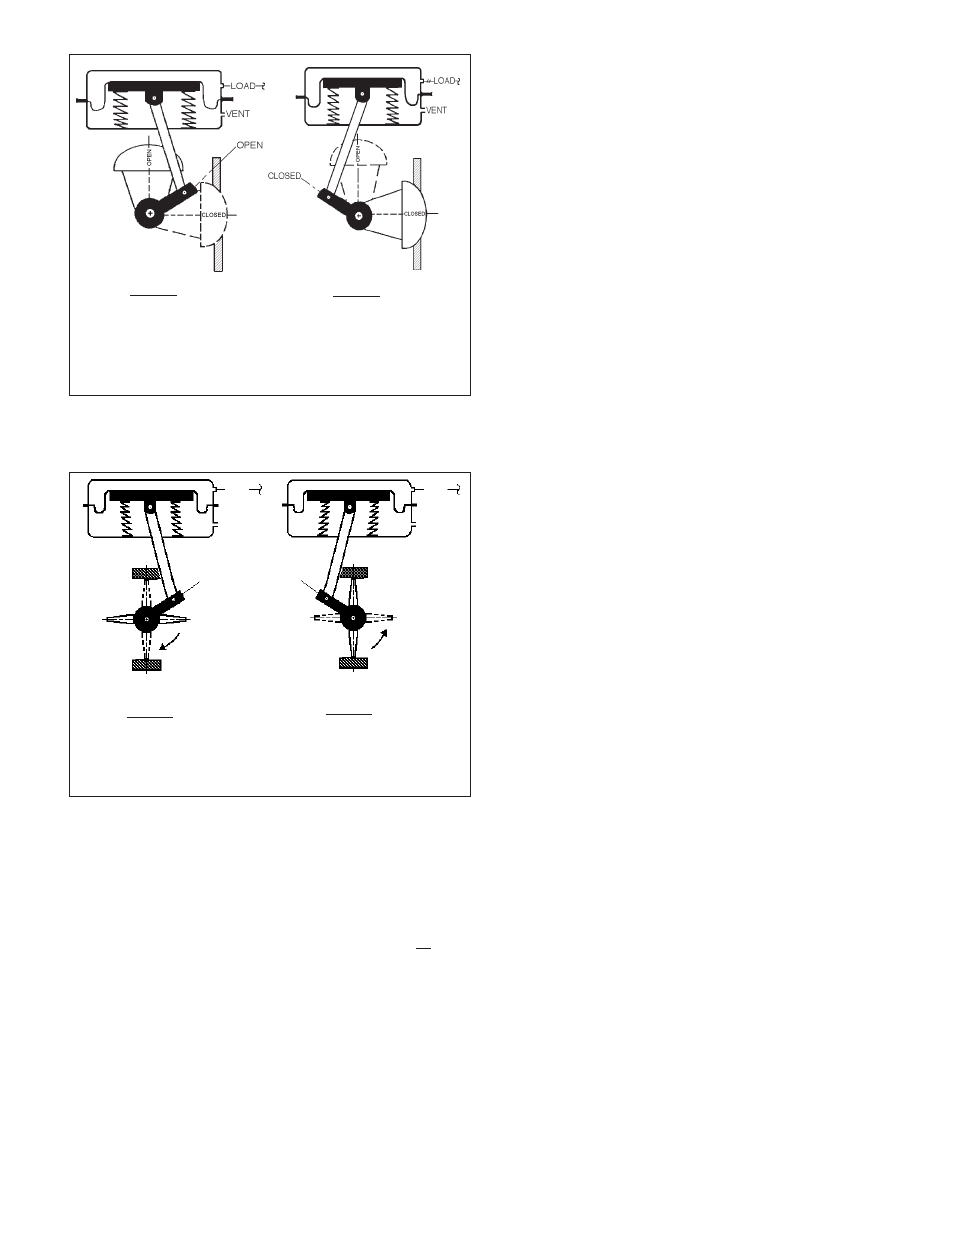
Figure 10
Ranger Plug vs. Lever Arm vs. Actuator Ori en ta tion
Figure 11
Premier Plug vs. Lever Arm vs. Actuator Ori en ta tion
NOTE: To switch “action” requires locating actuator stem
to opposite side of valve stem.
NOTE: To switch “action” requires locating actuator stem
to opposite side of valve stem.
7. Remove pivot screw (25) by rotating CCW
(viewed from above), and seal (56).
8. Pry diaphragm washer (52) loose. Clean
wash er (52) of any rubberized sealant.
9.
Prior to diaphragm (6) removal, inspect to see
where a diaphragm (6) leak may have been
caused by wearing against the upper case (1)
at any point. Inspect the upper case (1). NOTE:
The diaphragm (6) is a rolling di a phragm and
should NOT touch the upper case (1) at any
point of the piston’s (3) up wards/downwards
travel. If there is side move ment of the piston
(3), further dis as sem bly for inspection of range
springs (11) is man da to ry. If there is topside
wear, uptravel stop washer (54) is not prop er ly
adjusted.
10. Remove diaphragm (6) and discard.
11. Clean surface of piston (3) of any foreign ma-
terial that could cause a premature failure of
diaphragm (6) if cov ered. Turn diaphragm (6)
“inside-out”. Place diaphragm (6) onto piston
(3) centered over the center bolt hole in piston
(3); ensure that the smooth black sur face of
di a phragm (6) is on the “pressurized air-side”.
12. Place silicone sealant, Dow-Corning “Silastic”
#732 RTV or equal, around the diaphragm’s
(6) center bolt hole opening. Lay diaphragm
washer (52) onto sealant and centered over
bolt hole. Replace seal (56) on top of washer
(52).
13. Place a tool around the skirt circumference
of the piston (3) to secure during tightening;
use tape or similar material to prevent this tool
from leaving sharp edges that could damage
the new diaphragm (6). Place Locktite #242,
or equal, thread sealant onto the threads of
pivot screw (25); engage and tighten screw
(25) to 15-20 ft-lbs (21-27 N-m) torque. NOTE:
Piston (3) must be held from rotating to pre vent
the multiple nested range springs (11) from
tilting away from a common vertical centerline
be tween hubs of lower case (2), piston (3) and
range spring (11).
14. Fold the diaphragm (6) skirt from its inside-
out ori en ta tion, down and around the piston’s
(3) skirt. Using a rounded-end tool, push the
diaphragm (6) down between the lower cas ing
(2) sidewall and the piston’s (3) skirt, forming
a “valley”. Work diaphragm (6) to ensure that
all folds or “puckers” are taken away. Press
the di a phragm’s (6) lower/outer beaded edge
into the groove. Again, smooth out all folds or
puckers in diaphragm (6).