Datamax-O'Neil M-Class Mark II Peel & Present Option User Manual
Page 6

4
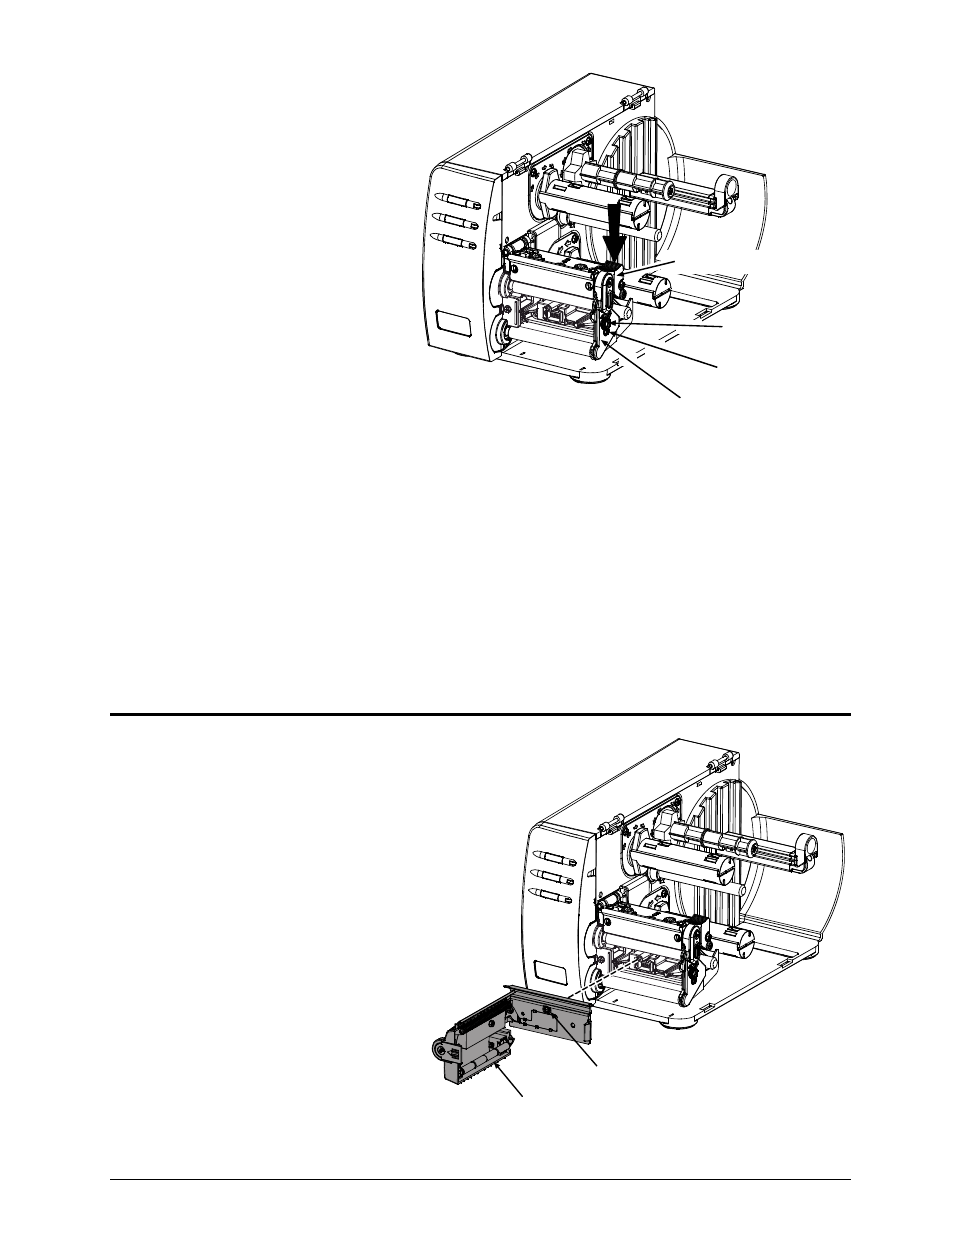
Ensure that the Leveling Cam is
loose, and then close and latch the
Printhead Assembly.
While pushing down on the
Printhead Assembly, as shown, pull
down on the Side Plate and tighten
the Screw.
Printhead Assembly
Leveling Cam
Screw
Side Plate
Verify Latch Operation:
- Open and close the printhead assembly, verify that the latch is fully engaged. If you are unable to get
the printhead to latch, the side plate is too low.
- Pressing down on the printhead assembly should not cause the latch to loosen or reveal any gap at the
latch point. If there is a gap or movement in the latch then the side plate is too high.
- Print some sample labels. If degraded print quality or ribbon tracking problems are observed then the
side plate is not positioned correctly.
Step 3: Installing the Peel & Present Mechanism
Position the Peel and Present Mechanism
for mounting on the front of the printer.
Tighten the Mounting Screw to secure
the mechanism to the printer.
This completes the installation process.
Proceed to Loading Media to begin use.
Mounting Screw
Peel and Present Mechanism
- MF8I 270 User Guide (20 pages)
- MF8I Installation Guide (18 pages)
- MF8I Truck Mount Cable (2 pages)
- MF8I Locking Mounting Bracket (2 pages)
- MF8I Economy Mounting Bracket (2 pages)
- MF8I AN-15 (Line Printer and Easy Print Modes) (7 pages)
- MF8I AN-16 (Single Byte Character Set Font File Format) (8 pages)
- MF8I Quick Reference Programming Guide (72 pages)
- MF8I Configuration Program Installation (1 page)
- MF8I Bluetooth Management Component for Wavelink Avalanche (10 pages)
- A-Class Mark II Operator’s Manual (160 pages)
- A-Class Mark II Installation (2 pages)
- A-Class Mark II DMXrfNetIII (16 pages)
- A-Class Mark II DMXrfNetII (16 pages)
- A-Class Mark II RFID Quick Start Guide (6 pages)
- A-Class Mark II Programmer’s Manual (334 pages)
- ANDES 3 User Guide (32 pages)
- ANDES 3 Quick Start Guide (2 pages)
- ANDES Series Programmer’s Manual (67 pages)
- APEX 2 User Guide (28 pages)
- APEX 2 Quick Start Guide (2 pages)
- APEX 3 User Guide (27 pages)
- APEX 3 Quick Start Guide (2 pages)
- APEX 4 User Guide (30 pages)
- APEX 4 Quick Start Guide (2 pages)
- E-Class Mark III Operator’s Manual (90 pages)
- E-Class Mark III 4xxxxxxx Operator’s Manual (58 pages)
- E-Class Mark III 3xxxxxxx Operator’s Manual (58 pages)
- E-Class Mark III Paper Menu (7 pages)
- E-Class Mark III DPL Programmer’s Manual (296 pages)
- E-Class Mark III Printhead Bracket and Screw Upgrade (11 pages)
- H-Class Operator’s Manual (180 pages)
- Static brush (2 pages)
- H-Class Media Retainer (1 page)
- H-Class Thermal Transfer Option (12 pages)
- H-Class RFID Option (8 pages)
- H-Class Powered Internal Rewind Option (10 pages)
- H-Class Internal Rewind Option (6 pages)
- H-Class Present Sensor Option (8 pages)
- H-Class Peel & Present Option (8 pages)
- H-Class Linear Scanner Option (26 pages)
- H-Class HD Peel & Present Option (10 pages)
- H-Class HD Cutter Option (12 pages)
- H-Class GPIO Option (14 pages)
- H-Class Cutter Option (10 pages)