Operating mode status mode, Connections, Audio connections – Analog Way Octo Value User Manual
Page 3
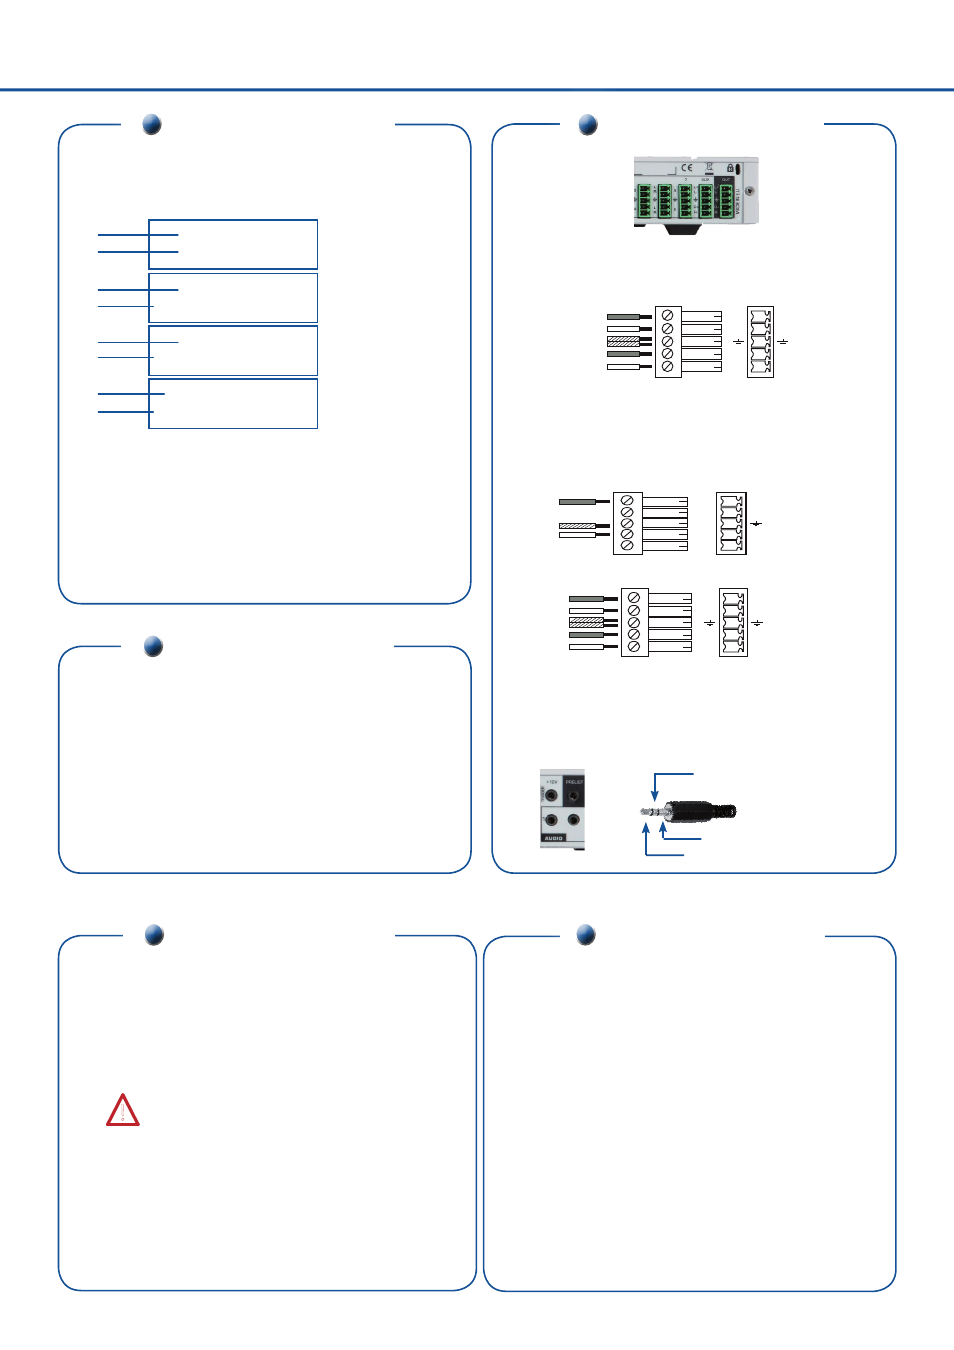
MCO male connector
Inputs # 3,4,5 & 6: UNBALANCED connection only
MCO male connector
Inputs # 7 & AUX: Balanced & unbalanced connection
3
4
L
R
L
R
UNBALANCED
LEFT
LEFT
RIGHT
RIGHT
GROUND(S)
Input #3
Input #4
3
4
L+
L-
R+
R-
BALANCED
L+
R+
L-
R-
GROUND(S)
L+
L-
R+
R-
UNBALANCED
LEFT
RIGHT
GROUND
7
INPUT SELECTION:
• Frame selection can be used only when Fn is activated (LED
blinking quickly).
• The pre-selected source (LED blinking slowly) is displayed
onto the PREVIEW output.
• The pre-selected frame (LED blinking quickly) is displayed
onto the PREVIEW output.
• The source/frame displayed onto the MAIN output is indicated
by a solid LED.
NOTE: a long push (1 second) on the selected/preselected input
button activates the BLACK function. A black screen is displayed
onto the corresponding output. A short push on the same button
allows to inactive this function.
NOTE
The devices can be used in two different switching modes:
•
The seamless mode allows switching seamlessly, fading and
titling between the «reference» computer input and the other
inputs. Other inputs are scaled to the same format as the
«reference» computer format. Only Input #1 or #8 can be used
as the reference Computer input. Titling, fading, and PIP are not
available in this setting.
•
The fast switching mode allows selecting an output format
corresponding to your application. All video inputs are scaled
to the selecting format.
OPERATING MODE
STATUS MODE
OXE831
Version _._
MAIN : 1
XGA 60.1K / 75Hz
PREVIEW : 2
YUV 15.7K / 50Hz
Output : 1024x768
Seamless #1 75Hz
DEVICE STATUS
MAIN STATUS
PREVIEW STATUS
OUTPUT STATUS
1/ Device Reference
2/ Device version
3/ MAIN output : selected input number
4/ Format, line & frame frequency of the selected input
5/ PREVIEW output : pre-selected input number
6/ Format, line & frame frequency of the pre-selected input
7/ Output format
8/ Switching mode & output frame rate
When switching ON, the front panel display shows the product’s
name and firmware versions as follows:
1/
2/
3/
4/
5/
6/
7/
8/
Connect the AC power supply cord to the device and to an
AC power outlet.
Connect your computer & video sources to the 8 universal
inputs of the device.
• If you need to connect a digital computer source, use the
input #1 (DVI-I IN connector).
• Connect your other sources to the unused inputs.
Connect only one source per input.
Connect your MAIN display device (projector, plasma
screen...) to the HD15 or DVI-I MAIN connector.
If required, connect your PREVIEW display device (projec-
tor, plasma screen...) to the HD15 PREVIEW connector.
Turn ON the device (rear panel switch), then turn ON all your
input sources and then your display device.
CONNECTIONS
❶
❷
❸
❹
❺
!
AUDIO CONNECTIONS
3.5 mm JACK connector
RIGHT (ring)
LEFT (tip)
GROUND
Jack connectors
Inputs # 1; #2
This 3,5 mm JACK connector allows connecting UNBALANCED au-
dio source.