Pulse le - ref. pls200 front panel description – Analog Way Pulse LE User Manual
Page 2
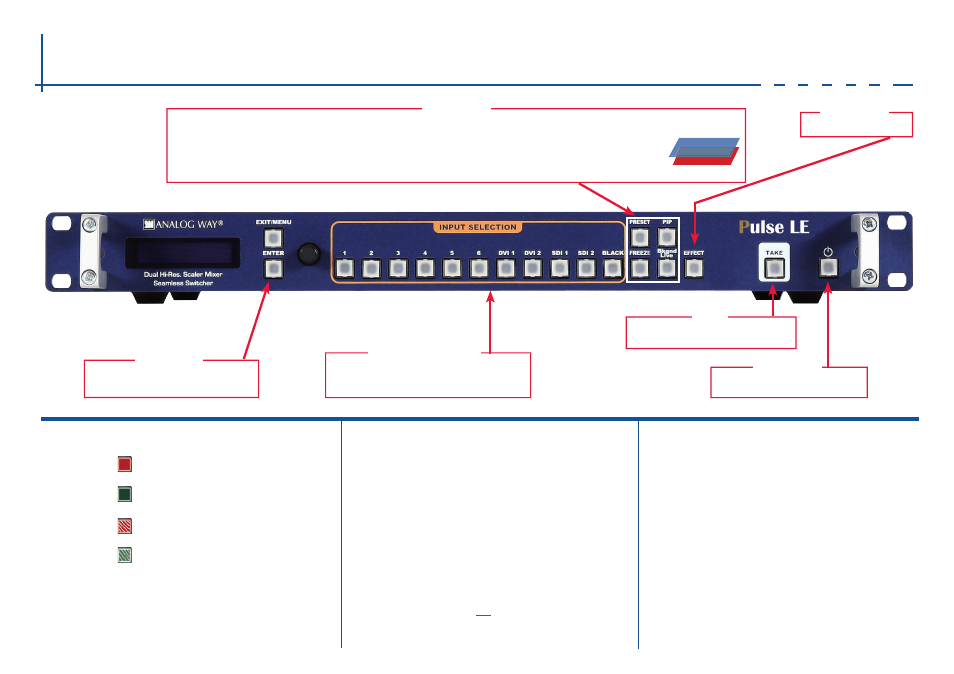
Pulse LE - Ref. PLS200
Front Panel Description
EXIT/MENU: Home Menu or back one level
ENTER: Validates the menu or command
Select a custom transition
Press to select a layer, then choose an input.
PRESET: Recall a custom stored preset (4 memories available). To store a preset, use Menu -> Preset.
PIP: Display a live source
Bkgnd Live: Display a live source
FREEZE: Freeze the input linked to the current layer on MAIN
#1 to #6: Press to access analog source #1 to #6
DVI 1 to DVI 2: Press to access DVI #1 or DVI #2
SDI 1 to SDI 2: Press to access SDI #1 or SDI #2
BLACK: Clear the active layer
Hold for 3 seconds for stand-by Mode
CONTROL
EFFECT
LAYERS
INPUT SELECTION
STAND-BY
I N P U T S E T U P
1
-
Press the
[EXIT/MENU]
button from the Home menu (all functions must be
confirmed by the
[ENTER]
button)
2
-
Press
INPUT
and
AUToSET ALL
3
-
If the acquisition has failed, check all connections and perform a manual setup
4
-
For a comprehensive Input Setup, please refer to user’s Manual
5
-
For a manual input setup, press the
[EXIT/MENU]
button:
a)
Select
INPUT
menu,
b)
Select an input from Input #1 up to SDI #2, then
c)
Select
TyPE
.
NoTE: To adjust input Size or Pos, use the Layer Menus.
To adjust Blanking, use the Auto-Centering or Blanking adjustments in the
Image menu.
Transition the pre-selected sources onto
the MAIN output with the selected effects
TAKE
o P E R AT I o N S o V E RV I E W
WoRKING IN MIXER MoDE
1-
Select Background Live Button then select your
INPUT.
2-
On the preview screen, the input appears
3-
Select an
[EFFECT]
(open/close)
4-
Press
[
TAKE
]
to view the result on the Main screen
5-
Try enabling the ‘Preset Toggle’ from the Control menu to have your preview
replaced by program during each Take
WoRKING WITH PIPs IN MIXER MoDE
1-
Press the
[PIP]
button. On the preview screen, the PIP (layer) appears as a
color rectangle
2-
Select an input. On the preview screen, the input appears in the layer rectangle
3-
Adjust the PIP (layer) with
Layer menu
(Pos & Size or Zoom)
4-
Select a transition (open/close) or an effect into “Layer menu”
5-
Press
[TAKE]
to view the result on the main screen
6-
To remove layer, press
[BLACK]
then
[TAKE]
7-
For another PIP setup, repeat from step #1
o U T P U T S E T U P
1
-
Press the
[EXIT/MENU]
button from the Home menu (all functions must be
confirmed by the
[ENTER]
button)
2
-
Select
oUTPUT
menu
3
-
Select
oUTPUT FoRMAT
menu
4
-
On Format line, select the display’s native resolution, select the rate
5
-
Control or adjust your display device (Monitor or Video Projector)
6
-
If necessary, select
TEST PATTERN
in the Output menu
B U T To N C o L o R U S A G E
#1 = Source is on the main
outputs
Solid red:
#2 = Freeze enable
#3 = Stand-by button
#4 = Preset Selection
Solid green:
#1 = Source is on Preview
#2 = Function available for modification
Blinking red:
Layer/source selected, and is currently active on
the main output
Blinking green:
Layer/source selected, and is not currently active
one the main output
LAyER HIERARCHy
Background Live
PIP