CEMB USA N300 User Manual
Page 83

3) If
3
l
b
<
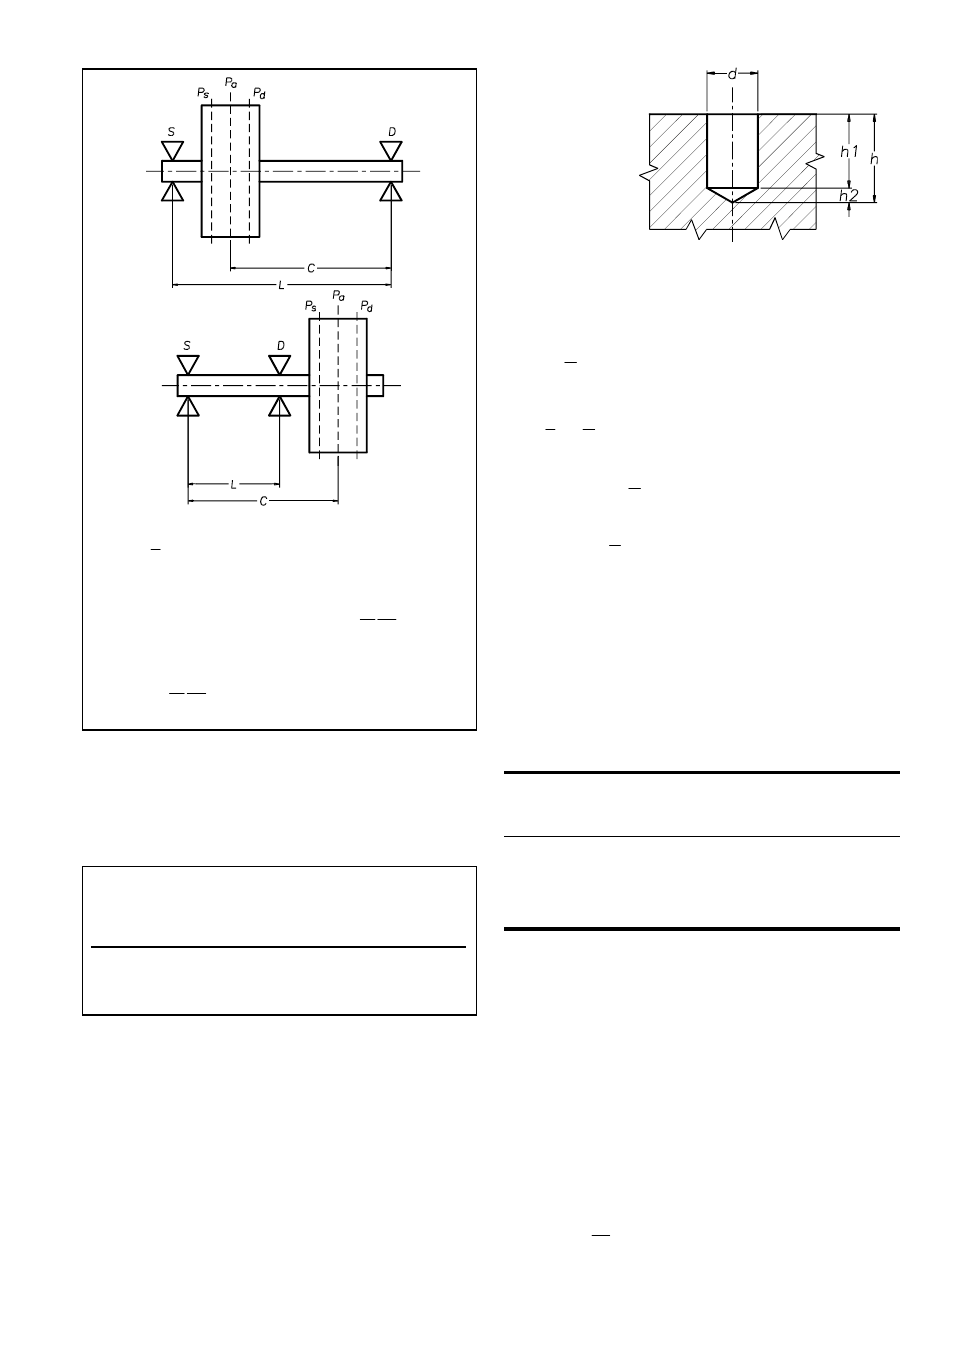
it is advisable to use an auxiliary plane Pa
(which may coincide with Ps or Pd) for which the
maximum permissible unbalance is
c
l
U
U
a
2
2
=
furthermore, for planes Ps and Pd
b
l
U
U
U
d
s
4
3
2
=
=
P in grams
d in mm
h
1
-h
2
-h in mm
The total weight to
4) The permissibile residual unbalance for one correction
plane is usually given by the product of the overall
permissible residual unbalance of the entire rotor and the
relationship between the distance of the other correction
plane from the rotor’s barycentre and the distance between
the correction planes.
If the rotor does not come under any of the simplified
methods listed, you must follow the general method, which
is valid for any rotor and any position of the correction
planes.
The general method is set out in CEMB Technical Booklet
N° 8 (which can be sent f.o.c. on request), and in
International
Standard N° 1940/1 (1986-09-1).
PRACTICAL USE DIAGRAMS FOR
CORRECTING UNBALANCE
DRILLING IN STEEL:
Use diagrams 1 to 5 according to need. Each diagram supplies
the depth of the drill hole (h), as a function of the weight to be
removed (P) and the diameter of the drill bit (d). The curves are
plotted for steel (density 7.85 kg/dm
3
), taking the conical shape
(120°) of the drill bit into account, using the following criterion:
Unit of measurement:
be removed from a
drill hole is:
P = 7.85 10
-3
V (where V is the total volume
of the hole) (1) considering that:
2
1
V
V
V
+
=
where
1
2
1
2
h
d
V
⋅
ч
ш
ц
з
и
ж
⋅
π
=
(Volume of cylindrical pan) and
2
2
2
2
3
1
h
d
V
⋅
ч
ш
ц
з
и
ж
⋅
π
=
(Volume of conical part)
2
1
h
h
h
−
=
;
°
=
30
tan
2
2
d
h
(1) becomes:
ч
ш
ц
з
и
ж
⋅
−
π
⋅
=
−
3
2
3
1511
.
0
4
10
85
.
7
d
h
d
P
(2)
DRILLING IN ALUMINIUM, CAST IRON etc.
Once you know the weight that has to be removed, you must
multiply it by a correction coefficient designed to take the
different densities of the materials into account. The resulting
weight is used in diagrams 1 to 5 to determine the correct value
of hole depth (h).
TABLE OF CORRECTION COEFFICIENTS
MAT
D Reference
Correction coefficient
density
(7.85/D)
(Kg/dm
3
)
ALUMINIUM 2.7
2.91
CAST IRON
7.25
1.09
BRASS
8.5
0.92
COPPER
8.9
0.88
EXAMPLE:
Unbalance to remove P = 10 grams. Drill bit used d = 14 mm.
Rotor material ALUMINIUM. Corrected P value = 10x2.91 =
29.1
Diagram 1 gives us h = 27 mm
CORRECTING BY ADDING WEIGHT TO STEEL:
Use diagram 6. This supplies the weight of a 1 cm long plate, as
a function of the commercial dimensions of thickness (S) and
width (L). Divide the unbalance by the weight obtained from
the diagram to obtain the length (l).
EXAMPLE: Unbalance to add
50 grams
Plate used
50x10 mm.
Diagram 6 gives us a weight of
P = 39 grams/cm
therefore
3
.
1
39
50
=
=
l
cm.
