Remote control, Remote control, cont’d, Manual ip setup – Extron Electronics RCP 2000 User Manual
Page 16: Changing the ip addresses
RCP 2000 • Remote Control
Remote Control, cont’d
RCP 2000 • Remote Control
4-2
4-3
Manual IP Setup
The RCP 2000 unit ships with default server (ISS) and client
(RCP) IP addresses, as well as Subnet Mask and Gateway
Address, already set. These default IP addresses can be
changed to conform to the IP address format required for your
network or designated by your network administrator.
Changing the IP addresses
To change the IP addresses:
1.
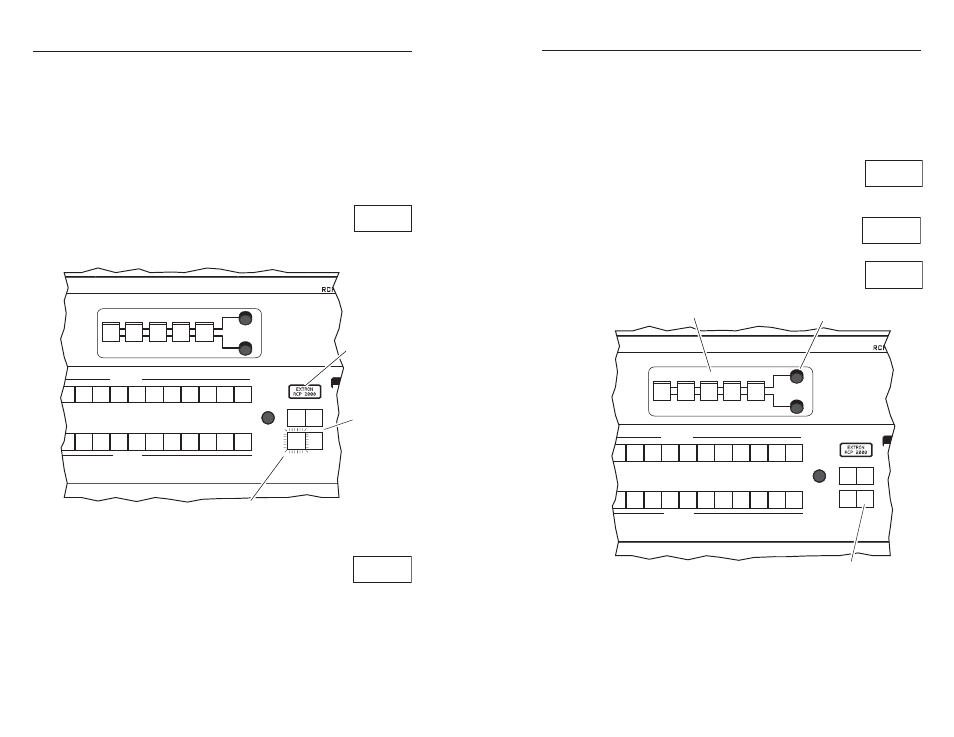
Press the four effects buttons (Wipe, Disolve,
Cut, and Take) simultaneously until the LCD
screen shows the RCP unit’s MAC address
(xx-xx-xx-xx-xx-xx), and the Cut button lights.
2
3
4
5
6
7
8
9 10 11 12
CUT
CONT
BRIGHT
H
V
COLOR
TINT
WIPE
DISOLVE
TAKE
2
3
4
5
6
7
8
9 10 11 12
PROGRAM
ADJUST
PICTURE CONTROLS
PREVIEW
ION
1. Press and hold
all four buttons.
2. After 2 seconds,
the display shows
the MAC address.
CENTER
SIZE
DETAIL
3. The CUT button is lit.
Figure 4-1 — Setting up for an IP address change
2.
Press the Take button. The Cut button stays
on, the Take, Cont/Bright, Size, and Center
buttons light, and the Color/Tint button
blinks. The client IP address (IP) is visible
on the LCD screen.
3.
Using the H adjust knob, change the first block of the IP
address. Then do one or more of the following::
•
Press the Cont/Bright button and use the H adjust
knob to change the second block of the address.
•
Press the Size button and use the H adjust knob to
change the third block of the address.
•
Press the Center button and use the H adjust knob to
change the fourth block of the address.
4
.
Press the Take button again. The server IP address (SI) is
now visible on the LCD screen. Repeat step 3 to change
the server IP address.
5
.
Press the Take button again. The Subnet
Mask (SM) is now visible on the LCD screen.
Repeat step 3 to change the Subnet Mask.
6
.
Press the Take button again. The Gateway
(GM) is now visible on the LCD screen.
Repeat step 3 to change the Gateway.
7
.
Press the Detail button to exit and to save all
address changes.
2
3
4
5
6
7
8
9 10 11 12
CUT
CONT
BRIGHT
H
V
COLOR
TINT
WIPE
DISOLVE
TAKE
2
3
4
5
6
7
8
9 10 11 12
PROGRAM
ADJUST
PICTURE CONTROLS
PREVIEW
ION
3. Use the Picture Controls buttons
to move between address blocks.
2. Use the H adjust knob to
change the address block.
1. Press the TAKE button to
move between IP addresses.
CENTER
SIZE
DETAIL
Figure 4-2 — Making the IP address change
X X - X X - X X
X X - X X - X X
I 1 9 2 . 1 6 8 .
P 1 2 8 . 1 2 8
S 1 9 2 . 1 6 8 .
I 1 2 8 . 1 2 8
S 2 5 5 . 2 5 5 .
M 2 5 5 . 1 2 8
G 2 5 5 . 2 5 5 .
M 2 5 5 . 2 5 5
Remote Control