Extron Electronics PoleVault Systems PVS 200, 300, and 400 User Manual
Page 45
2-33
PoleVault Systems Installation • Optional Accessory Installation
Testing and Adjustment Procedure
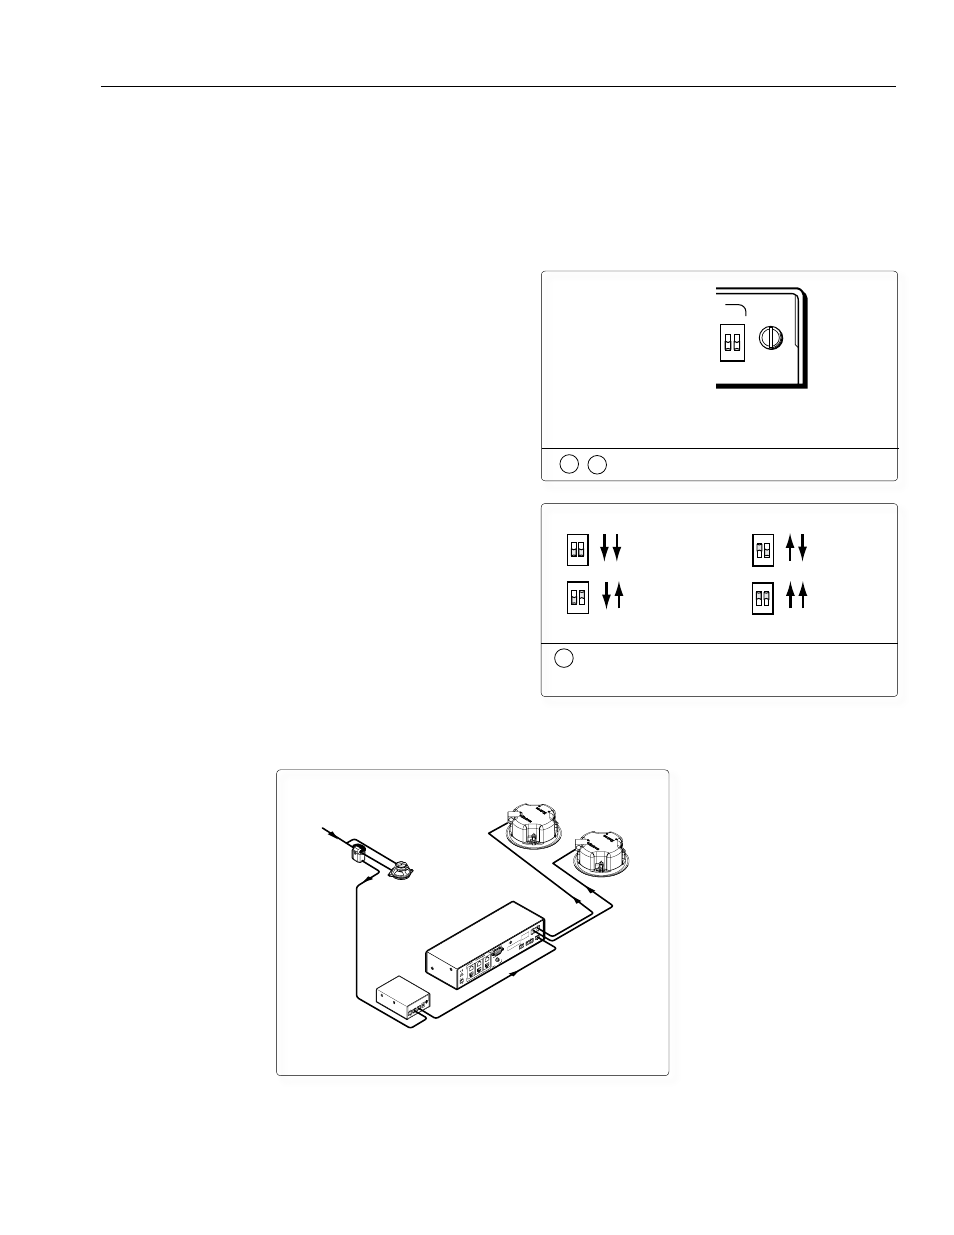
The fully installed system is shown below To test that the
classroom audio is muted when a PA system announcement (page)
occurs:
1
. Turn the classroom audio on.
2
. Speak into the PA system microphone. The classroom audio
should be muted while the PA system page occurs and be
restored when the page ends.
3
. If the Priority Page Controller fails to mute the classroom
audio during a page, turn the Sensitivity adjustment, on the
rear panel of the controller, clockwise.
4
. If the classroom audio is muted without a page occurring,
turn the Sensitivity adjustment counterclockwise
5
. If the classroom audio is muted for too long a time after a
page, or is restored too early, check the Time DIP switch
settings. A short time delay is necessary so that if the PA
system announcer pauses briefly during the announcement,
the classroom audio is not restored prematurely. Set the
switches so that the output relay will remain closed for a set
time after a PA announcement has ended.
PO
WE
R
C
NO
PAGING
RELA
Y
DELA
Y
SENSITIVITY
12V
0.2A
MAX
ON
1
2
L
R
AU
X/MIX IN
DO NO
T GR
OUND
OR SHOR
T
SPEAKER OUTPUTS!
1B
1A
I
N
P
U
T
S
O
U
T
P
U
T
S
2B
2A
3B
3A
RS-232 MLC/IR
DC
VO
L
4/8 Ohms
AMPLIFIED OUTPUT
S
VO
L/MUTE
Tx
A
B
C
Rx
IR
12V
10V
PO
WE
R
12V
3A MA
X
US
LISTED
17T
T
AUDIO/VIDE
O
AP
PARA
TU
S
®
RGB
VIDEO
RGB
VIDEO
Ceiling Mounted
Paging Speaker
Page
Sensor
From Classroom
Paging System
Relay
Output
Remote
Vol/Mute
Control
Extron
PPC 25
Priority Page
Controller
Extron
PVS 204SA
Twisted Pair
Switcher
PV SI 3C LP
Ceiling
Speakers
Plenum Rated UL 2043
Suitable
for Use in Ai
r-Handling Spaces
5
Priority Page Controller Time DIP switch
settings
TIME
ON
1 2
= 2.0 sec (default)
= 4.0 sec
= 6.0 sec
= 8.0 sec
TIME
ON
1 2
TIME
ON
1 2
TIME
ON
1 2
POWER
C NO
PAGING
SENSOR
OUT
TIME
RELAY
SENSITIVITY
12V
0.5A MAX
ON
1 2
Adjusting sensitivity knob:
Clockwise to increase
Counterclockwise to decrease
3
/
4
Sensitivity knob adjustment