Input setup – Extron Electronics ISM HDSDI Output Board User Manual
Page 2
ISM HDSDI Output Board • Setup Guide, cont’d
ISM HDSDI Configuration Menu
Using the front panel menu buttons (Menu and Next), the ISM HDSDI
configuration menu can be accessed. From the Output Configuration screen, press
Next until reaching the #x Univ HDSDI menu (see the image below). Press Menu
and Next to navigate through the menus and use the front panel Adjust knobs
({ [), to change the settings as desired. Refer to the ISM 824 User Guide, online
at
for full details
.
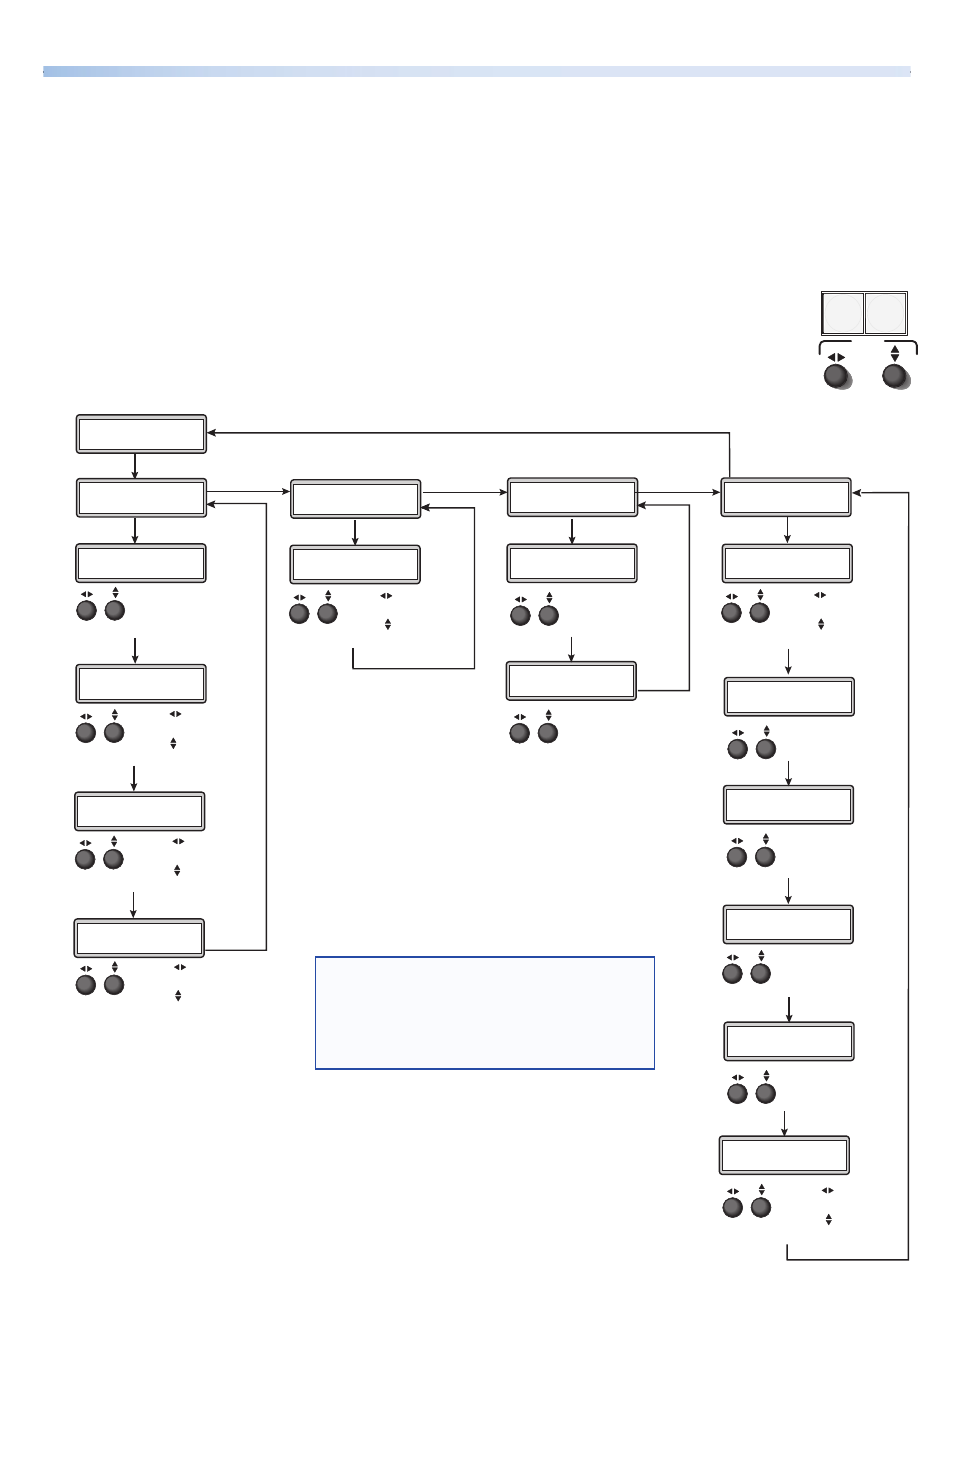
From the default cycle press Menu repeatedly to reach the Output
Configuration menu. Press Next (enters Select Output menu) and rotate
either Adjust knob to select the Univ HDSDI menu. Follow the figure
below to enter each menu and use the Adjust knobs to change the value.
Select Output
#8 Univ HDSDI
Next
Input Setup
#8 Univ HDSDI
Aspect Ratio
4:3
Next
Rotate either knob
to select Aspect Ratio
(4:3 or 16:9).
Next
H
Start V
128
128
Rotate knob to
adjust H(orizontal) start.
Rotate knob to
adjust V(ertical) start.
Next
Total Pix
Phase
1728
00
Rotate knob to
adjust Total Pix value.
Rotate knob to
adjust Phase value.
.
Next
H
Active V
1283
1028
Rotate knob to
adjust H active value.
Rotate knob to
adjust V active value.
Menu
Next
Output Config
#8 Univ HDSDI
Rotate knob to
adjust resolution.
Rotate knob to
adjust refresh rate.
Next
1080i 60 Hz
Resolution
Next
Menu
User Presets
#8 Univ HDSDI
30 sec.
Save Preset
Next
Rotate either knob
to select a preset to
save current settings.
Erase Preset
Next
Rotate either knob
to select a preset
to erase.
Advanced Config
#8 Univ HDSDI
Next
None
Test Pattern
Rotate either knob
to select a test pattern.
Blue Mode
Next
Rotate either knob
to turn blue mode On
or Off.
Next
Off
Film Mode
Rotate either knob
to turn film mode On
or Off.
Next
Menu
Next
Next
Rotate knob to
select input.
Rotate knob to
turn On or Off.
Input #2 Off
Auto Image
Auto Memory
Next
Rotate either knob
to turn auto memories
On or Off.
Off
Input #2 Off
Full Screen
Rotate knob to
select input.
Rotate knob to
turn On or Off.
Next
NOTE:
Within any submenu, press the Menu button
to go directly to the top level (Output Card
Configuration) menu. If, for 30 seconds, no
button is pressed or Adjust knob is rotated,
the menu times out and reverts to the default
display cycle.
Input Setup
The Input Setup submenu allows configuration of aspect ratio, horizontal and
vertical start points, total pixels and phase value, and active horizontal and vertical
areas. Rotate the Adjust knobs as required to change values.
MENU
NEXT
ADJUST
2