Hsa 300 • installation guide (continued), Installing the hsa 300 in the table, Preparing the table – Extron Electronics HSA 300 Hideaway User Manual
Page 2: Choose a method for cutting the hole in the table, Caution, Attention, Read the following information before making a cut
2
HSA 300 • Installation Guide (Continued)
Installing the HSA 300 in the Table
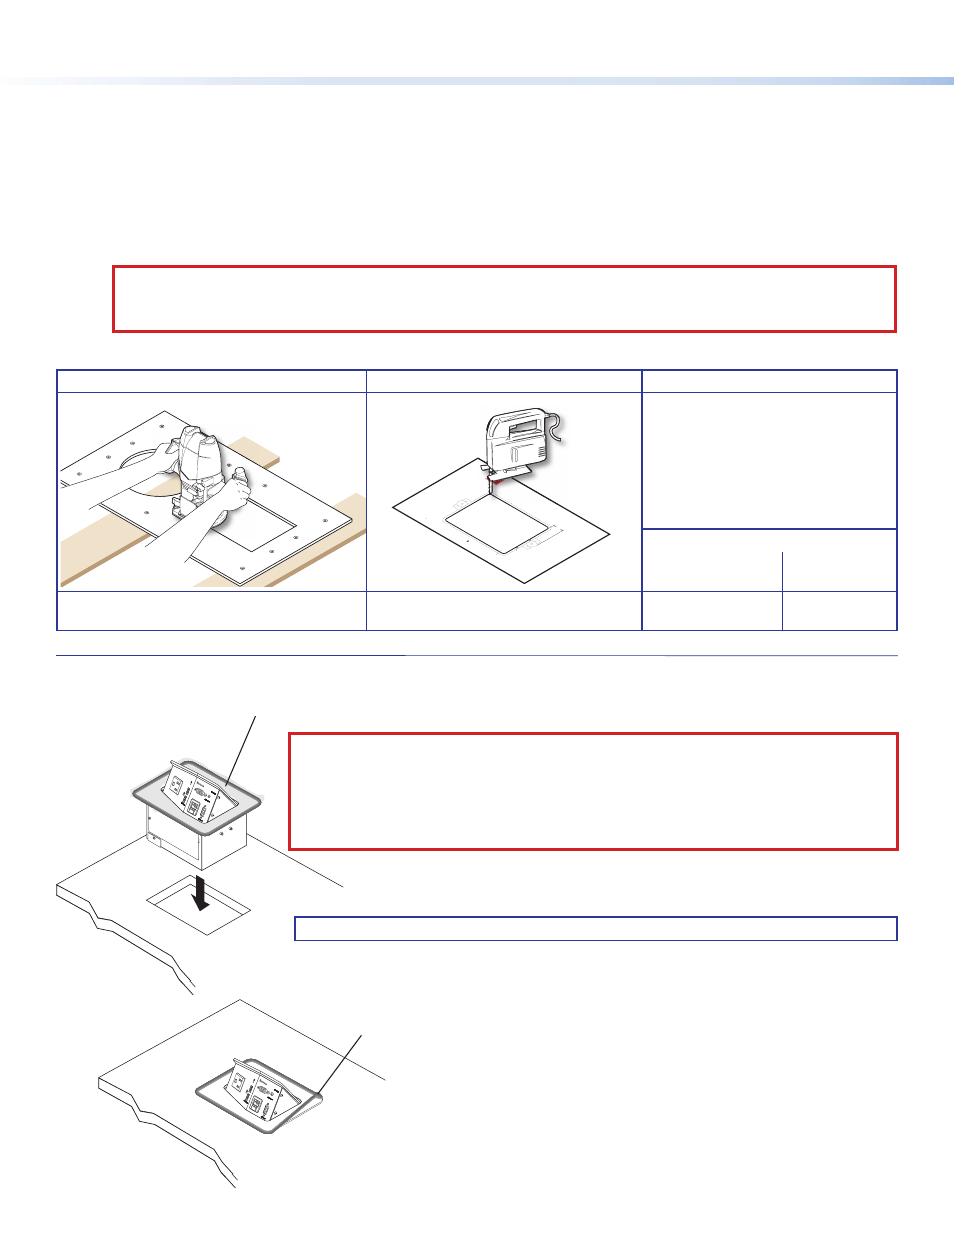
Hand router and routing template
Jigsaw and paper cut-out template
CNC wood router
If using a CNC wood router or other
precise machinery, use the exact
cut-out dimensions for your model
(see the table below).
Visit
www.extron.com
for HSA routing
template part numbers and instructions.
Dimensions and print-out templates are
available online at
www.extron.com
.
Cut-out Dimensions
Width (user access
side)
Side
Dimension
7.68"
(19.50 cm)
5.88"
(14.93 cm)
Cu
t-Ou
t Tem
plate
for Extr
on's
HSA
300
User
Acce
ss (Co
nnect
ors
and A
AP O
penin
gs)
Prin
t th
is
tem
plate
at 10
0%
0.00”
(0.0
0 cm
)
0.02
(0.0
5 cm
)
+
1. Co
nfirm
Pro
duct to
be in
stalle
d
2. Me
asure
cuto
ut an
d te
mpla
te
3. Afte
r ch
eckin
g, cu
t op
enin
g
0.25
"
Trim
Rin
g
Lip W
idth
Trim
Ring’
s O
uter
Edg
e
(Do
not cu
t this
line.)
1.14
”
Cu
t-Ou
t Tem
plate
for E
HSA
30
P
Pri
Prin
t
rint th
is
te
te
tem
tem
em
p
mpl
plat
e
a
at
at
at 1
t 1
10
100
00%
0%
1. Co
nfirm
Pro
du
2. Me
asure
cu
3. Afte
r ch
e
Cutting the Opening with a Router
Cutting the Opening with a Cut-out Template
Router
Cu
t-Ou
t Tem
plate
for Extr
on's
HSA
300
User
Acce
ss (Co
nnect
ors
and A
AP O
penin
gs)
Prin
t th
is
tem
plate
at 10
0%
0.00”
(0.0
0 cm
)
0.02
(0.0
5 cm
)
+
1. Co
nfirm
Pro
duct to
be in
stalle
d
2. Me
asure
cuto
ut an
d te
mpla
te
3. Afte
r ch
eckin
g, cu
t op
enin
g
0.25
"
Trim
Rin
g
Lip W
idth
Trim
Ring’
s O
uter
Edg
e
(Do
not cu
t this
line.)
1.14
”
Cu
t-Ou
t Tem
plate
for E
HSA
30
P
Pri
Prin
t
rint th
is
te
te
tem
tem
em
p
mpl
plat
e
a
at
at
at 1
t 1
10
100
00%
0%
1. Co
nfirm
Pro
du
2. Me
asure
cu
3. Afte
r ch
e
Cutting the Opening with a Router
Cutting the Opening with a Cut-out Template
Router
Preparing the Table
Read the following information before making a cut.
Ensure that the location where the HSA is to be installed is convenient for as many users as possible.
Ensure that the edge on which the lid opens is oriented correctly.
Ensure that there is ample space under the table for cables.
Choose a method for cutting the hole in the table
The opening in the table for the HSA should be cut only by licensed and bonded craftspeople.
CAUTION:
Wear safety glasses when operating power equipment. Failure to comply can result in eye injury.
ATTENTION:
Portez des lunettes de sécurité lorsque vous utilisez l’équipement électrique. Ne pas respecter cela peut
conduire à une blessure à l’oeil.
Choose one of the following methods for cutting the hole:
CAUTION:
The flanged edges of the top of the surface enclosure are sharp. These edges are
also soft and may be easily nicked or bent. Exercise caution when handling the enclosure
to prevent personal injury or damage to the enclosure.
ATTENTION:
Les extrémités à brides du haut de la surface du boîtier sont aiguisées. Ces
extrémités sont aussi lisses et peuvent facilement être coupées ou pliées. Soyez prudents
lorsque vous manipulez le boîtier afin d’éviter de l’endommager ou de vous blesser.
5
From the underside of the table, install
the table clamps on the enclosure at a
height at which the clamps will reach
the underside of the table.
Snugly tighten the Phillips head screws until the
table clamps reach the underside of the table.
VG
A IN
125V
~ 50-
60Hz
12A
MAX
6
7
1
4
3
Once the HSA is seated in the hole, carefully remove the
plastic strip that protects the edges of the enclosure.
Insert the HSA fully into the hole so that the surface of the
enclosure is flush with the table.
2
Carefully lower the HSA enclosure into the hole to test the fit.
Remove the protective film on the surface of the HSA enclosure. Do not remove
the rubber strip that protects the edges of the enclosure until step 3, below.
VG
A IN
VG
A IN
125V
~ 50-
60Hz
12A M
AX
125V
~ 50-
60Hz
12A
MAX
Tighten the wing nuts on
the table clamps to lock
the clamps in position.
NOTE:
If necessary, remove the enclosure and enlarge or smooth the opening.
5
From the underside of the table, install
the table clamps on the enclosure at a
height at which the clamps will reach
the underside of the table.
Snugly tighten the Phillips head screws until the
table clamps reach the underside of the table.
VG
A IN
125V
~ 50-
60Hz
12A
MAX
6
7
1
4
3
Once the HSA is seated in the hole, carefully remove the
plastic strip that protects the edges of the enclosure.
Insert the HSA fully into the hole so that the surface of the
enclosure is flush with the table.
2
Carefully lower the HSA enclosure into the hole to test the fit.
Remove the protective film on the surface of the HSA enclosure. Do not remove
the rubber strip that protects the edges of the enclosure until step 3, below.
VG
A IN
VG
A IN
125V
~ 50-
60Hz
12A M
AX
125V
~ 50-
60Hz
12A
MAX
Tighten the wing nuts on
the table clamps to lock
the clamps in position.