Retractors, Installing retractors, Horizontal or angular mounting – Extron Electronics Cable Cubby 700 User Manual
Page 5
5
Cable Cubby 500 and 700 • Installation Guide (Continued)
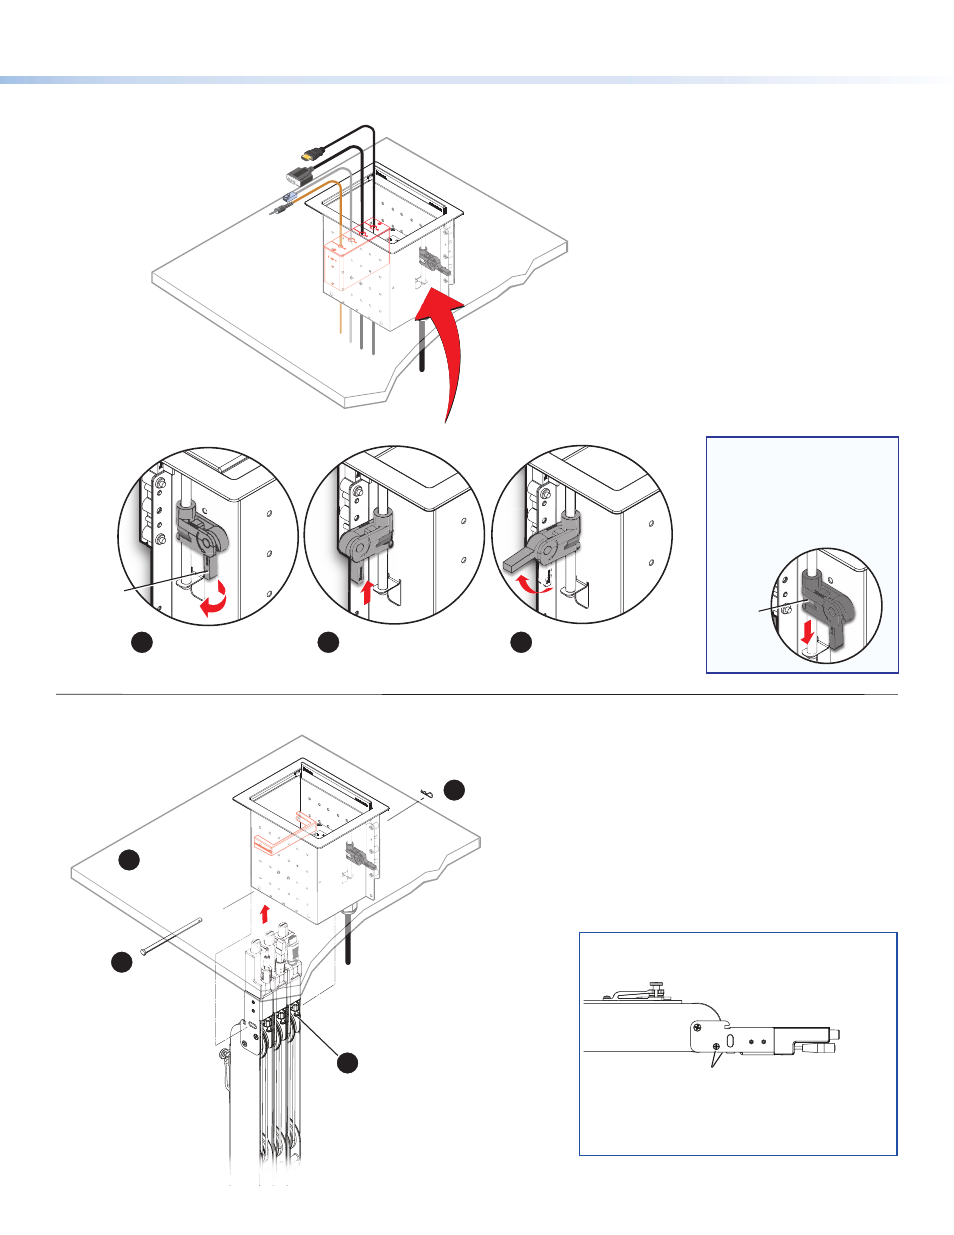
Step 2 — Under the table, adjust the side clamps on the enclosure.
Installing Retractors
NOTE:
To lower the side
clamp, turn the lever
down, then press and
hold the locking plate
while sliding down the
clamp.
Locking
plate
Horizontal or Angular Mounting
For installation details, see the Cable Retractor
Setup Guide available online at
www.extron.com
.
Secure the clip on the pin.
Insert retractors into
the retractor trim.
Secure the locking screw on each retractor.
Do not overtighten.
Insert the pin through the
retractor mounting hole on
the side of the Cable Cubby
and retractor assembly.
1
2
3
4
Insert the pin through the
retractor mounting hole on
the side of the Cable Cubby
and retractor assembly.
Secure the clip on the pin.
Insert retractors into
the retractor bracket.
Secure the locking screw on each
retractor. Do not overtighten.
For horizontal or angular mounting, remove
these orientation screws (front and back),
then follow the steps shown at left.
Rotate the side clamp
outward and ensure that
the lever is down.
Slide the clamp all the
way up against the bottom
of the table.
Ensure the Cable Cubby
is firmly seated in the table.
Raise the lever to secure
the Cable Cubby.
Lever
2
1
3
2
3
1
4
Lower the Cable Cubby into the hole to test the fit.
If necessary, carefully enlarge the opening.
Remove the plastic strips and
film on the surface of the
Cable Cubby.
Ensure that the
side clamps are
seated against the
enclosure.
Secure cables with zip ties to the rectangular
holes in the rear of the Cable Cubby.
For cable pass-through applications, allow at least 36 inches (0.9 m)
of cable loop for each cable.
Connect cables to the AV system
and connect the AC power cord.
Rotate the side clamp
outward and ensure that
the lever is down.
Slide the clamp all the way
up against the bottom of
the table.
Ensure the Cable Cubby
is firmly seated in the table.
Raise the lever to secure
the Cable Cubby.
Lever
1
2
3
2
1
3
1
2
3