Installation and operation, cont’d, Rear panel connections, Wide ban d dis trib utio n am plif ier – Extron Electronics DA RGB_YUV Series User Manual
Page 10: Ac/dc gain/peak on, Through-furniture mounting the da, Figure 2-4 — through-desk mounting, Figure 2-5 — da2 rgbhv rear panel, Figure 2-6 — da4 rgbhv rear panel
DA RGB/YUV Distribution Amplifiers • Installation and Operation
DA RGB/YUV Distribution Amplifiers • Installation and Operation
Installation and Operation, cont’d
2-6
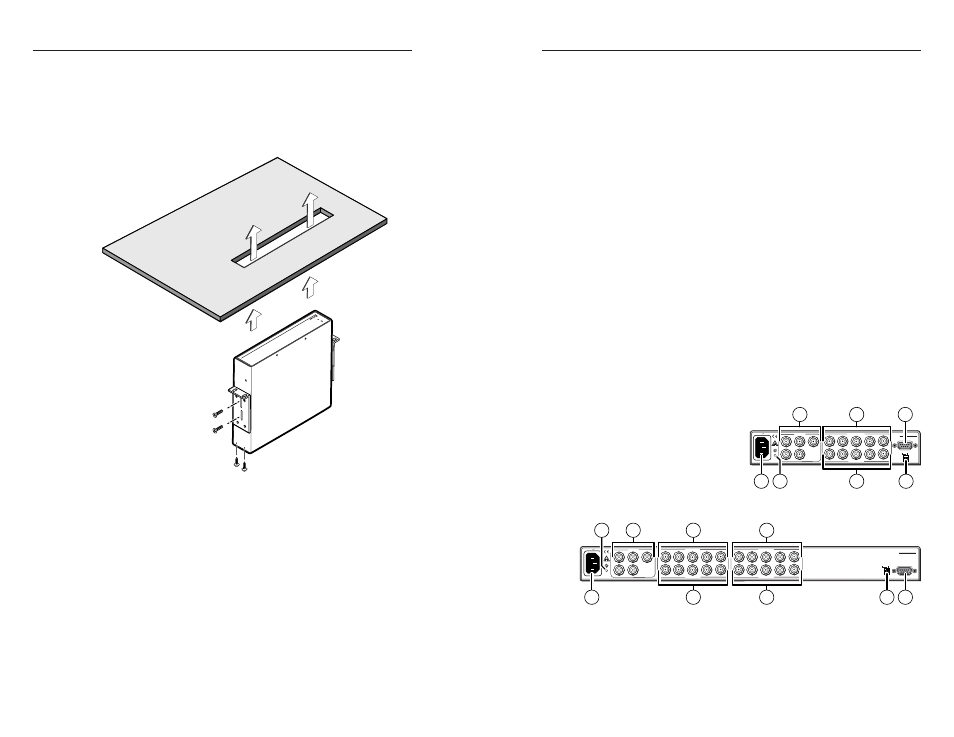
Through-furniture mounting the DA
The DAs can be mounted through a desk or other furniture.
The DA2 RGBHV requires an optional MBD 129 Through-Desk
Mount Kit, part #70-077-02. The DA4 and DA6 models require
the included through-desk and rack mounting bracket. Mount
the DA through a desk or table as follows (figure 2-4):
DA R
GB/Y
UV S
ERIE
S
WIDE
BAN
D DIS
TRIB
UTIO
N AM
PLIF
IER
Figure 2-4 — Through-desk mounting
1
.
Loosely attach the mounting brackets to the DA using the
four machine screws and washers supplied with the
mounting kit. On the DA4 and DA 6 models, use two
screws on each side of the DA, inserted through the
adjustable (slotted) holes on the brackets.
2
.
Hold the DA against the inside of the surface through
which it will be mounted. Mark the four screw holes on
the inside of the surface to which you are mounting the
device.
3
.
Drill four pilot holes, each 3/32" in diameter by 1/4" deep,
where you made marks.
4
.
Using the four provided wood screws, attach the brackets
to the mounting surface.
2-7
5
.
Slide the DA up and down or back and forth in the
mounting brackets until the face of the DA is at the desired
height. Tighten the screws that secure the bracket in place.
If the screws are inaccessible to a screwdriver:
a
.
Mark the location of the brackets relative to the
screws.
b
.
Remove the DA from inside the furniture.
c
.
Tighten the screws.
d
.
Replace the DA inside the surface (repeat step 4).
Rear Panel Connections
All connectors are on the rear panel. The DA can buffer and
output RGBHV or component video to up to six video devices.
The DA6 YUV A also buffers and outputs digital audio. All
DAs output the identical video and/or digital audio output.
The DAs perform no sync or video format manipulation.
DA2 RGBHV is in a half-rack width enclosure and the rest of the
models are in full-rack width enclosures. Figure 2-5 shows a
DA2 RGBHV. Figure 2-6 shows a DA4 RGBHV. Figure 2-7
shows a DA6 YUV A (component video and digital audio). The
three DAs shown have all of the connector configurations that
are available in the DA RGB/YUV product family covered in
this manual.
100-240V 0.2A
50-60Hz
INPUT
OUTPUT 1
OUTPUT 2
R
H
H/V
G
V
H
H/V
V
H
H/V
V
B
R
G
B
R
G
B
DA2 RGBHV
MUTE
AC/DC
GAIN/PEAK
ON
6
8
1
3
3
5
7
Figure 2-5 — DA2 RGBHV rear panel
100-240V 1.3A
50-60Hz
INPUT
OUTPUT 1
OUTPUT 2
R
H
H/V
G
V
H
H/V
V
H
H/V
V
B
R
G
B
R
G
B
DA4 RGBHV
MUTE
AC/DC
GAIN/PEAK
ON
OUTPUT 3
OUTPUT 4
H
H/V
V
H
H/V
V
R
G
B
R
G
B
8
5
6
1
3
3
3
3
7
Figure 2-6 — DA4 RGBHV rear panel