11 communication bus, 12 automatic two-pump operation, 6 system setup and operation – Bell & Gossett P2002548B ecocirc XL High Efficiency Large Wet Rotor Pumps User Manual
Page 12: 1 configure the pump settings, 1 change the communication parameters, 2 change the control mode, 3 change the set point, 4 change the displayed unit of measurement
Wireless module
The wireless module is an optional module, to be coupled with the
ecocircXL circulators. When correctly configured, it generates a wire-
less network accessible by a mobile device, tablet or a personal com-
puter. See wireless module instructions manual for details.
5.2.11 Communication bus
The pump has a built-in RS-485 communication channel (terminals
15-16-17). See Figure 4 on page 8.
The pump can communicate with external BMS systems via Modbus or
BACnet protocol. For a complete description of the protocols, refer to
the advanced functions manual at www.bellgossett.com.
NOTICE:
When remote control is active, the set points and control modes are
managed only through communication channels and cannot be
changed via the user interface. The displayed quantity and unit of
measurement remain active on the user interface.
5.2.12 Automatic two-pump operation
Backup operation
Only the lead pump runs. The second pump starts in case of failure of
the lead pump.
Alternate operation
Only one pump runs at the time. The working time is switched every 24
hours so that workload is balanced between both pumps. The second
pump is started immediately in case of failure of the lead pump.
Parallel operation
Both pumps run simultaneously at the same set point. The lead pump
determines the behavior of the full system and is able to optimize the
performance. To guarantee the required performance with the mini-
mum power consumption, the lead pump starts or stops the lag (sec-
ond) pump to satisfy system requirement of flow and head.
6 System Setup and Operation
Precaution
CAUTION:
Always wear protective gloves when handling the pumps and
motor. When pumping hot liquids, the pump and its parts
may exceed 40°C (104°F).
NOTICE:
The pump must not run dry as this can result in the destruction of the
bearings. Fill the system correctly with liquid and vent the air before
first start-up.
NOTICE:
• Never operate the pump with discharge valve closed for longer
than a few seconds.
• Do not expose an idle pump to freezing conditions. Drain all liq-
uid that is inside the pump. Failure to do so can cause liquid to
freeze and damage the pump.
• The suction plus shut-off discharge pressure must not exceed the
pump pressure rating.
• Do not use the pump if cavitation occurs. Cavitation can damage
the internal components.
6.1 Configure the pump settings
Change the pump settings using one of the following methods:
• User interface
• Bus communication
• Wireless communication
6.1.1 Change the communication parameters
Change pump communication parameters. See
1.
Switch off the pump.
Wait until the power indicator light turns off.
2.
Switch on the pump.
3.
When the display shows COMM (COM), press the parameter but-
ton (3) to access the communication menu.
4.
Select one of the below parameters using the settings button (5).
• BAUD (BDR) = baud rate setup (available values 4.8 - 9.6 -
14.4 - 19.2 - 38.4 - 56.0 - 57.6 kbps)
• ADDR (ADD) = address setup (available address 1-255 for
Modbus 0÷127 for BACnet)
• MODU (MDL) = optional module setup (0 = no module; 1 =
Wireless module; 2 = RS-485 module)
5.
Press the parameter button to enter the submenu
6.
Edit the values using setting buttons.
7.
Press the parameter button to confirm and store the new values.
8.
Press mode button to exit the submenu.
9.
Repeat above procedure for each of the three parameters.
If no buttons are pressed for 10 seconds, then the pump exits the cur-
rent menu and continues start-up procedure. All the parameters that
are changed but not confirmed restore back to previous state.
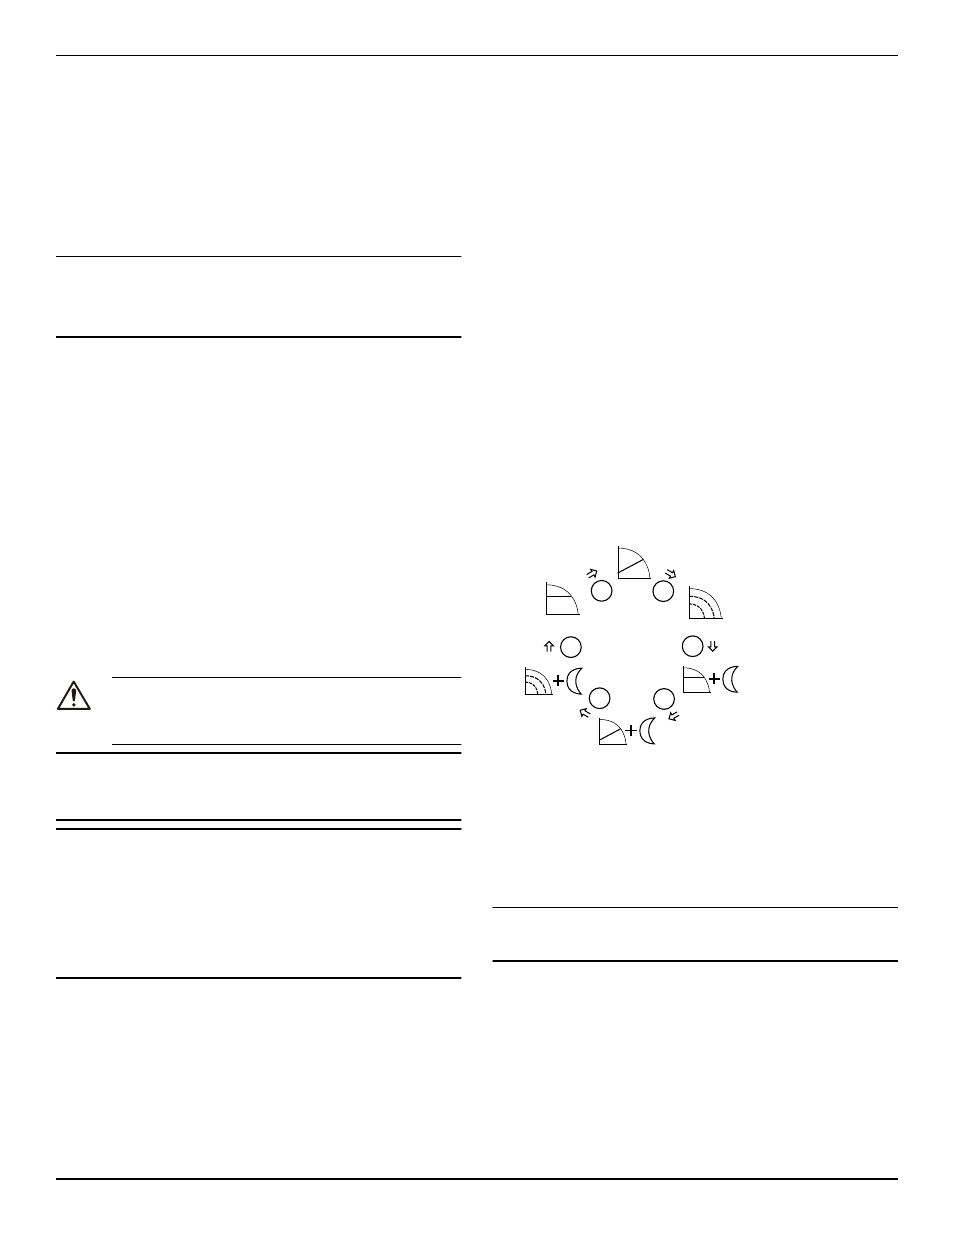
6.1.2 Change the control mode
The pump can be controlled by a BMS (Building management system)
or other devices through the RS-485 communication port via Modbus
or BACnet protocol.
The following instructions are used when making the change on the
user interface. See
• Press the operating mode button (1).
• The operating modes are cyclically changed by the pressed but-
ton.
mode
mode
mode
mode
mode
mode
6.1.3 Change the set point
See
(page 8).
1.
Press one of the arrow setting buttons (5).
The display starts to blink.
2.
Change the value using the buttons (5).
3.
Wait 3 seconds to store and activate the new set point.
The display will stop blinking to confirm the change.
NOTICE:
If a check valve is installed on the system, ensure that the pump head is
sufficient to allow flow through the system.
6.1.4 Change the displayed unit of measurement
Power, Flow, Head and Speed parameters cyclically change by press-
ing the parameter button (3). In order to change the unit of measure-
ment, follow these steps:
1.
Press the button (3) to change the unit of measurement. See
6 System Setup and Operation
10
ecocirc XL Installation, Operation, and Maintenance manual