Warning, Install ramp on gearcage™ cargo rack – Pro Series 5800300 CARGO CARRIER User Manual
Page 4
Cequent Performance Products
47774 Anchor Court West
Plymouth, MI 48170
Technical Service: (888) 521-0510
5800300N 11-5-09 Rev D
5800300
GearCage™ Ramp
Install Ramp On GearCage™ Cargo Rack
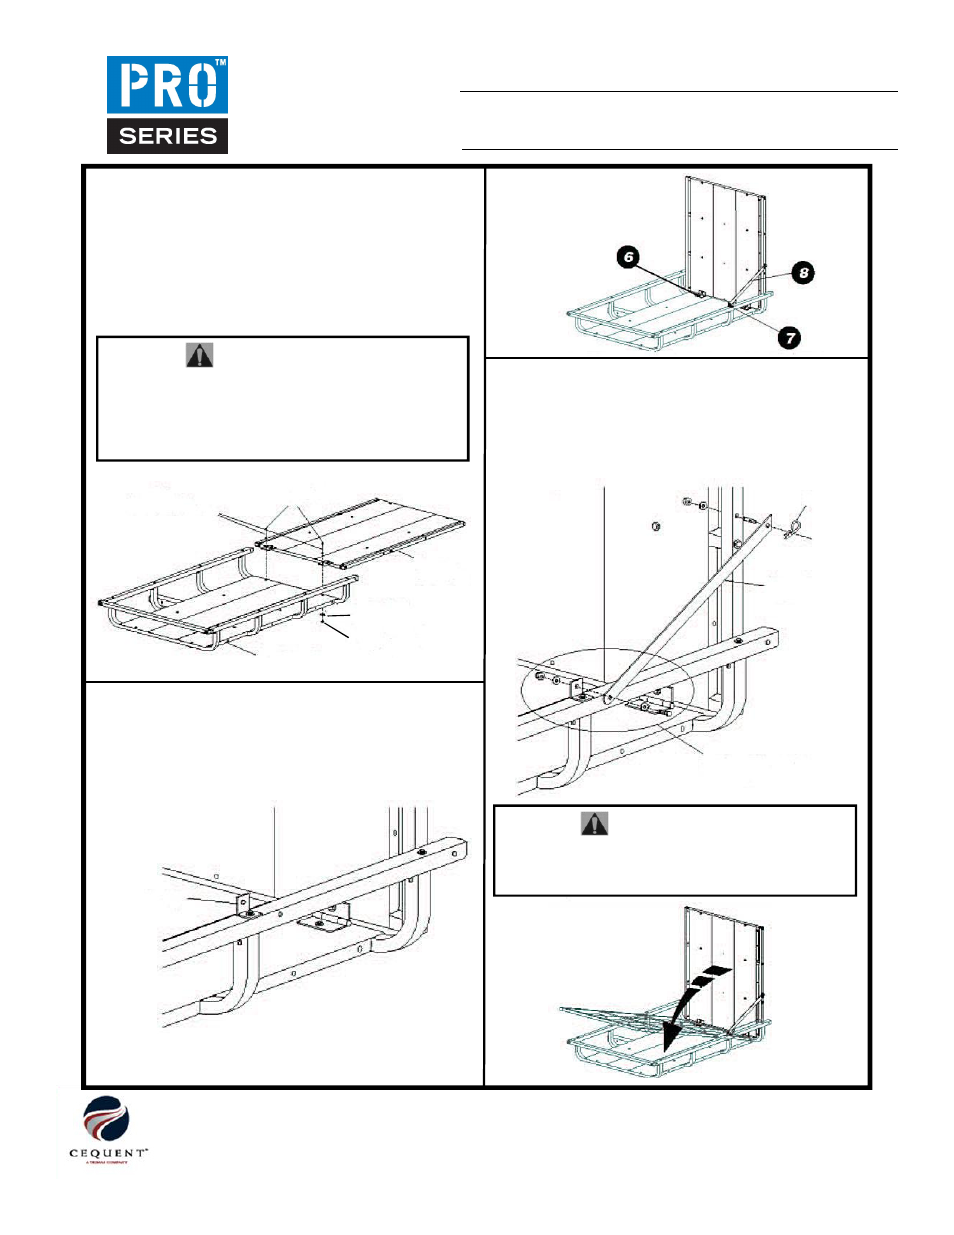
6. Remove the tube on the passenger side of the
GearCage™. Remove the bolts that mount the outside
panels on the GearCage to the U-Tube. Install a 1/4” x 2-
1/2" Bolt (L), two (2) 1/4" Washers (G) and a 1/4" Nyloc Nut
(H) through each Ramp Hinge to secure the Ramp to the
GearCage™.
WARNING!
When installing the 1/4” x 2-1/2" Bolts (L) with 1/4"
Nyloc Nuts (H), always make sure that at least two (2)
threads protrude through the nut. Failure to do so may
cause the Ramp to separate from the carrier in transit,
resulting in property damage, and bodily injury.
¼” Flat washers (G)
¼” x 2-1/2” Long Bolts (L)
GearCage
™
Cargo Rack
Ramp
Assembly
¼” Nyloc Nuts (H)
¼” Flat washers (G)
7. Remove the bolt that secures the second Side Rail from
the end of the GearCage™. Place the bracket from the
Ramp Stop Bracket Assembly (I) over the hole and reinstall
the bolt.
WARNING!
When operating the vehicle, the ramp must be either
removed, secured in the upright position as shown, or
positioned to lay flat on the GearCage™ Cargo Rack.
8. Place the hole in the rounded end of the Ramp Stop
Lever (J) over the hole in the vertical side of the bracket
and secure it in place with the hardware from the Ramp
Stop Bracket Assembly (I).
Use the Pin Clip (N) to secure the other end of the
Ramp Stop Lever to the Lynch Pin (M) installed in
Step 2.
Ramp Stop Bracket
Assembly Hardware
Pin Clip
Ramp Stop
Lever
Page 4 of 4