Ef e – Peerless-AV HLGP432-C450-SM-Q10 - Installation User Manual
Page 4
4 of 5
ISSUED: 05-25-10 SHEET #:125-9113-3 09-15-11
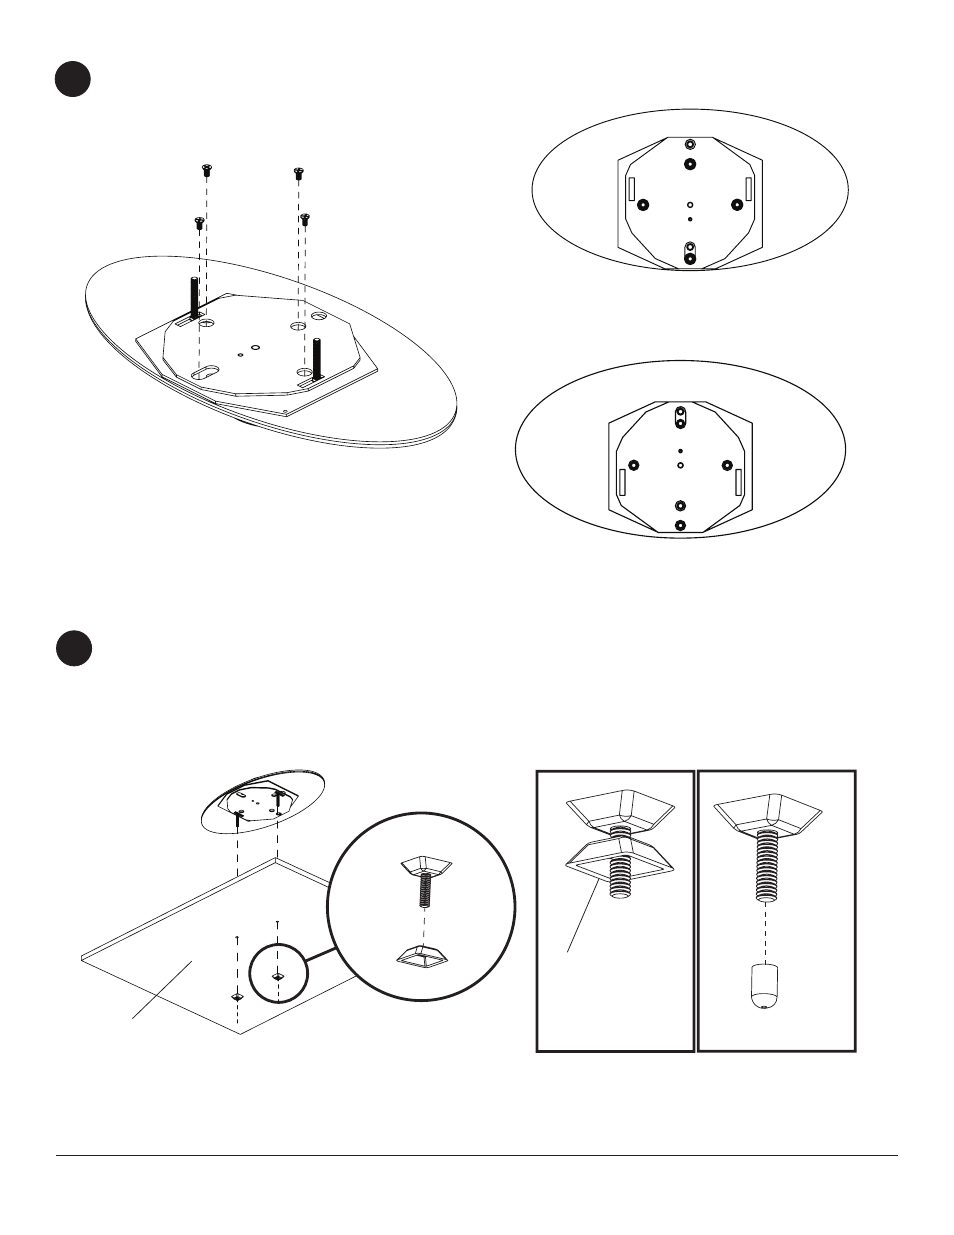
Hand tighten slope nut (
F) through 1/4-20 x 1 3/4" elevator bolt (E) until snug against bottom of desktop surface.
Thread another slope nut (
F) upside-down, about two turns from first slope nut (F). Insert an open box wrench
between both slope nuts (
F) and tighten. NOTE: Avoid jamming both slope nuts (F) together, doing so may make it
difficult to remove slope nut used for tightening first slope nut (
F). After slope nut is secure remove bottom slope nut
and add plastic cap (
I) as shown in figure 5.2. Repeat with remaining 1/4-20 x 1 3/4" elevator bolt (E).
Detail 1
TIGHTENING
SLOPE NUT
4
B
26" Display Base Stand Attachment Location
(note orientation of plate to base stand)
BOTTOM OF DESKTOP
FIG 5.1
FIG 5.2
E
F
E
5
I
Secure swivel plate assembly (
A) to bottom of display base stand using four flat head screws (B) in 26" or 32"
orientation.
FRONT
FRONT
NOTE: Do not overtighten slope nut (F)
plate may distort
32" Display Base Stand Attachment Location
(note orientation of plate to base stand)
- SF680P - Installation (20 pages)
- SFLT646 - Sell Sheet (2 pages)
- LCT620AD - Installation (9 pages)
- HLG440-LG-Q10 - Installation (8 pages)
- LCZ-4F4G30B - Installation (26 pages)
- PRMTLU - Sell Sheet (2 pages)
- STL646 - Sell Sheet (2 pages)
- DS-VW665 - Sell Sheet (2 pages)
- HG442-HT3-S - Installation (7 pages)
- PT660 - Sell Sheet (2 pages)
- SUA765PU - Sell Sheet (2 pages)
- SF670P - Installation (20 pages)
- HF642-003 - Installation (7 pages)
- DS509 - Sell Sheet (2 pages)
- ST632-AW - Installation (29 pages)
- SFL646 - Installation (20 pages)
- PP730 - Sell Sheet (2 pages)
- HT642-003 - Sell Sheet (2 pages)
- IWB600-UNIV - Installation (18 pages)
- HS432-001 - Installation (6 pages)
- SFL637 - Sell Sheet (2 pages)
- IM746P - Installation (24 pages)
- SF630-S - Sell Sheet (2 pages)
- SA761PU - Sell Sheet (2 pages)
- DST995 - Installation (13 pages)
- MIS343 - Installation (3 pages)
- FPEPM-08 - Installation (24 pages)
- ST630-AW - Installation (26 pages)
- DS-VW765-LAND - Installation (13 pages)
- HLG452-SM-Q10 - Sell Sheet (2 pages)
- LCZ-4F4G30B - Sell Sheet (2 pages)
- SF632-AW - Sell Sheet (2 pages)
- FPZ-655 - Sell Sheet (2 pages)
- SUA746PU - Installation (29 pages)
- HS432-002 - Installation (6 pages)
- ST16D - Installation (11 pages)
- LCC-36S - Sell Sheet (2 pages)
- PRMF2X2 - Sell Sheet (2 pages)
- SF632P - Installation (24 pages)
- SC560FK - Installation (11 pages)
- MOD-FPSKIT150-B - Sell Sheet (2 pages)
- SP746PU - Sell Sheet (2 pages)
- IWB600-2SB - Installation (13 pages)
- YBT2X1 - Sell Sheet (2 pages)
- FDS-3250 - Sell Sheet (2 pages)