Banks Power Chevy_GMC Trucks: Duramax LB7 (Diesel ’01 - 04 6.6L) Power Systems- PowerPack & Stinger Systems w_ EconoMind (LB7 & LLY) '01-05 (PDA) Compatible w_ Optional PowerPDA User Manual
Page 33
Section 6 not needed if installing
the Power Level Selector Switch.
Please proceed to Section 7.
Note: This system has been
designed for use with the Palm
Tungsten E2 PDA.
Warning: The PDA may be
susceptible to damage as a
result of extended exposure
to sunlight, heat or extreme
cold. It is highly recommended
that the PDA be removed from
its mounting location if the
vehicle will be subjected to high
concentrations of sunlight, heat
or cold for an extended period
of time. Gale Banks Engineering
is not responsible for damage to
PDAs resulting from exposure
conditions.
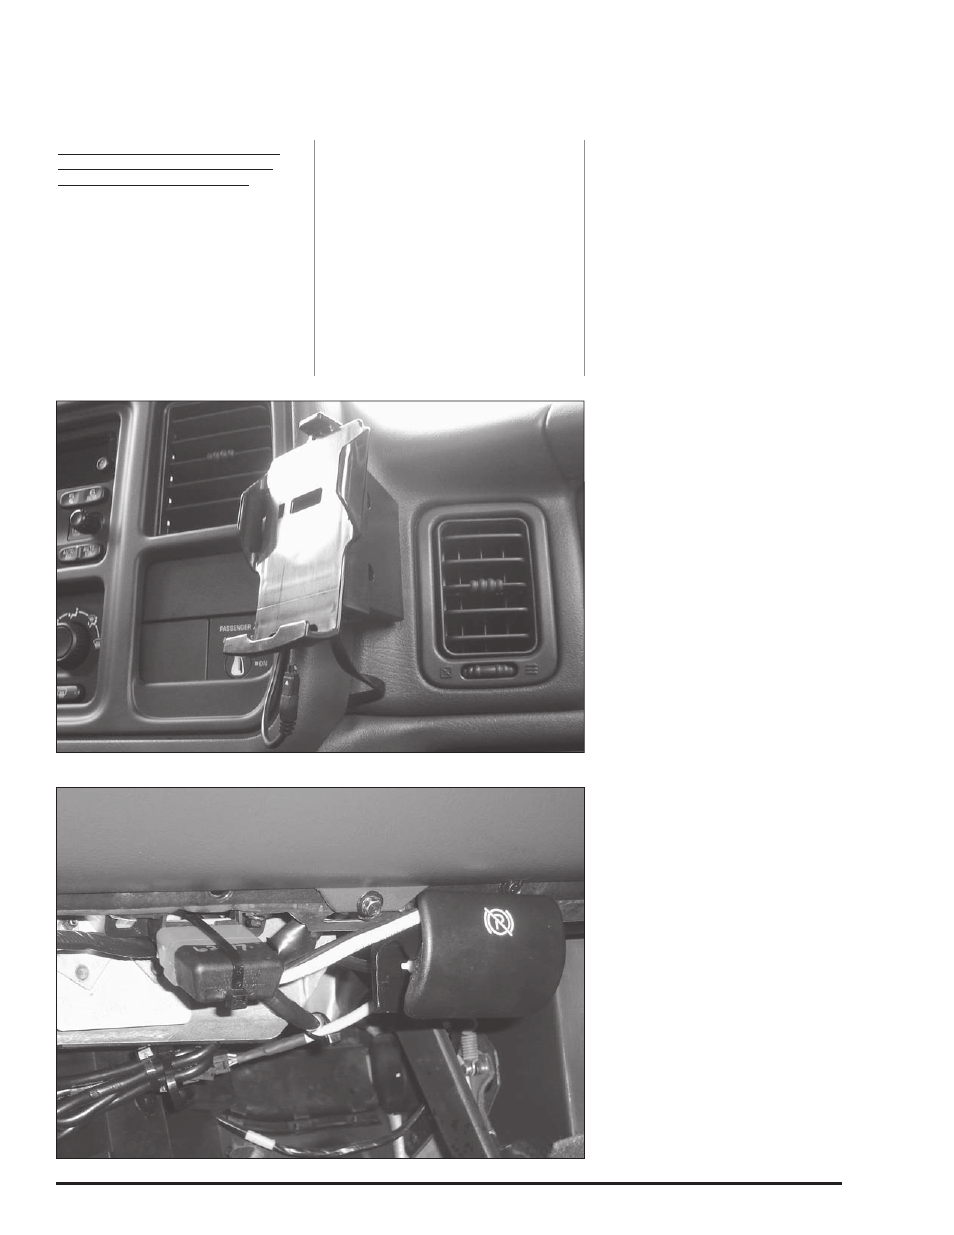
Locate the Docking Station in your
kit. For mounting location see
Figure 40
.
Note: In cold climates, best
results will be obtained if the
vehicle’s heater is run to bring the
inside temperature up to “room
temperature” (at least 68°F).
1.
clean mounting area with
supplied alcohol swab to prepare the
surface for the adhesive tape.
2.
The Docking Station has adhesive
tape applied to it at the factory. Prior
to removing the protective liner from
the tape, test fit the unit on the dash
as indicated in Figure 40. The Docking
Station will fit the dash contours only
where shown in the photo.
3.
After test fitting, remove the liner
from the adhesive tape on the back
of the Docking Station.
4.
carefully align and secure the
Docking Station to the dash in the
same location as it was test fit. Press
the Docking Station firmly against the
dash for one minute to ensure good
adhesion.
5.
Locate the two self-drilling screws
supplied in your kit.
6.
Install the screws through the
two access holes in the right side
of the Docking Station. Doing this
will put two permanent holes in the
dashboard panel. Be certain of the
location of the Docking Station before
installing the screws.
7.
Two push-in plastic plugs are
provided to cover the two screw
access holes in the Docking Station.
Install the plugs at this time.
8.
Locate the Banks OBD II Interface
cable in your kit. This cable has
three connection points. connect
the RED OBD II connector on the
Banks interface cable to the vehicle
OBD II connector. Use a cable tie as
shown in Figure 41 to secure the
Banks interface cable to the vehicle
OBD II connector. Next, connect the
6-pin connector on the Banks OBD II
interface cable to the 6-pin connector
on the EconoMind Tuner harness.
9.
Finally, unclip the dashboard
panel, starting with the lower right
hand corner. (See Figures 42 thru
44) Pry and unclip as needed to
gain enough clearance to route the
RJ12 cable (simular to a telephone
connecter) behind the panel, along
its lower edge.
10.
Locate the RJ12 connector
portion on the Banks interface cable
and pull enough cable through to
reach the bottom of the Docking
Station.
Section 6
MouNTING THE DoCkING STATIoN AND CoNNECTING THE BANkS PoWERPDA
VEHICLE CoMMAND CENTER
Figure 40
Figure 41
96776 v.11.0
33