Rough Country 256.20 User Manual
Page 3
INSTRUCTION SHEET
Technical Assistance - (731) 285-9000
Page 3
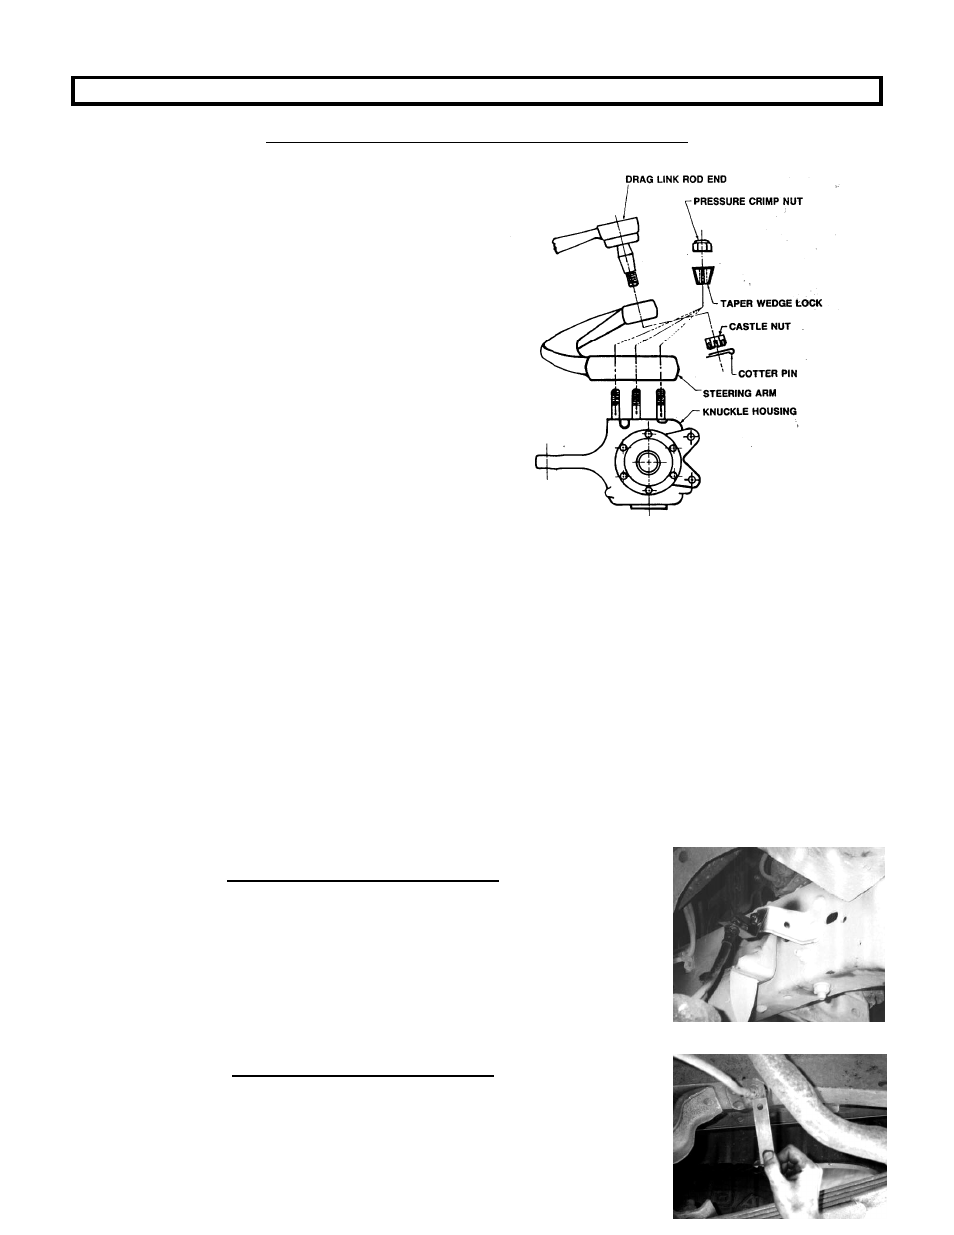
½ & ¾ Ton CHEVY/GMC STEERING ARM INSTRUCTIONS
For 1 Ton steering Correction refer to 6608 Instruction sheet included with kit.
1. Park the vehicle on a smooth, level concrete or
asphalt surface.
2. Remove the drivers side tire, if already removed
proceed to step 3.
3. Disconnect the drag link from the steering arm by
removing the cotter pin, loosening the nut several
turns and tapping the nut with a rubber mallet until the
stud comes loose from the arm.
4. Remove the three nuts that hold the steering arm to
the knuckle housing.
5. Clean mounting surface thoroughly and install the
new Rough Country steering arm using the new nuts
supplied in the kit. Torque nuts to 90ft/lbs.
6. Inspect the drag link assembly. If the drag link is
worn or the ball joint grease boot is torn, replace the
assembly. Install the drag link onto the steering arm
but do not tighten. It may need to be adjusted to allow
the wheels to travel from stop to stop without binding
the steering mechanism.
7. Replace the wheel/tire and set the wheels pointing
straight ahead.
8. Remove the drag link from the steering arm.
9. Turn the steering wheel all the way from left to right, counting the number of turns. Then turn the wheel back
half the number of turns.
10. Adjust the drag link to fits loosely in the steering arm. Tighten the nut and install the new cotter pin. Check
steering again and adjust if necessary.
11. Double check for tightness of all hardware and inspect assembly periodically.
12. Check all fasteners for proper torque. Check to ensure there is adequate clearance between all rotating,
mobile, fixed and heated members. Check steering gear for interference and proper working order. Test brake
system.
13. Perform steering sweep. Check to ensure brake hoses have sufficient slack and will not contact rotating,
mobile, or fixed members, adjust lines/brackets to eliminate interference and maintain proper working order.
Failure to perform inspections may result in component failure.
14. Bump stops and extensions must be in place on all vehicles! Note: allowing suspension to over extend by
neglecting to install or maintain stops and extensions may cause serious damage to OE and related
components.
15. Re torque all fasteners after 500 miles. Visually inspect components and re torque fasteners during routine
vehicle service. Readjust headlights to proper settings if applicable.
FRONT BRAKE LINE INSTALLATION
1. If new lines were purchased with this kit refer to those instructions
included with the new brake line.
2. Unbolt rubber brake line from the steel line
3. Mount steel brake line extension bracket to frame at stock location of
rubber line.
4. Mount the rubber line on the steel bracket.
5. Bend steel line out from the frame to meet the rubber line on the
extension bracket. Tighten.
REAR BRAKE LINE INSTALLATION
1. If new lines were purchased with this kit refer to those instructions
included with the new brake line.
2. Remove the rubber line from the stock location, and gently move the steel line
from the frame.